Managing a Collaborative Software Project
Overview
Teaching: 15 min
Exercises: 30 minQuestions
How can we keep track of identified issues and the list of tasks the team has to do?
How can we communicate within a team on code-related issues and share responsibilities?
How can we plan, prioritise and manage tasks for future development?
Objectives
Register and track progress on issues with the code in our project repository
Describe some different types of issues we can have with software
Manage communications on software development activities within the team using GitHub’s notification system Mentions
Use GitHub’s Project Boards and Milestones for software project management, planning sprints and releases
Introduction
Developing software is a project and, like most projects, it consists of multiple tasks. Keeping track of identified issues with the software, the list of tasks the team has to do, progress on each, prioritising tasks for future development, planning sprints and releases, etc., can quickly become a non-trivial task in itself. Without a good team project management process and framework, it can be hard to keep track of what’s done, or what needs doing, and particularly difficult to convey that to others in the team or share the responsibilities.
Using GitHub to Manage Issues With Software
As a piece of software is used, bugs and other issues will inevitably come to light - nothing is perfect! If you work on your code with collaborators, or have non-developer users, it can be helpful to have a single shared record of all the problems people have found with the code, not only to keep track of them for you to work on later, but to avoid people emailing you to report a bug that you already know about!
GitHub provides Issues - a framework for managing bug reports, feature requests, and lists of future work.
Go back to the home page for your python-intermediate-inflammation repository in GitHub, and click on the Issue tab.
You should see a page listing the open issues on your repository - currently there should be none.
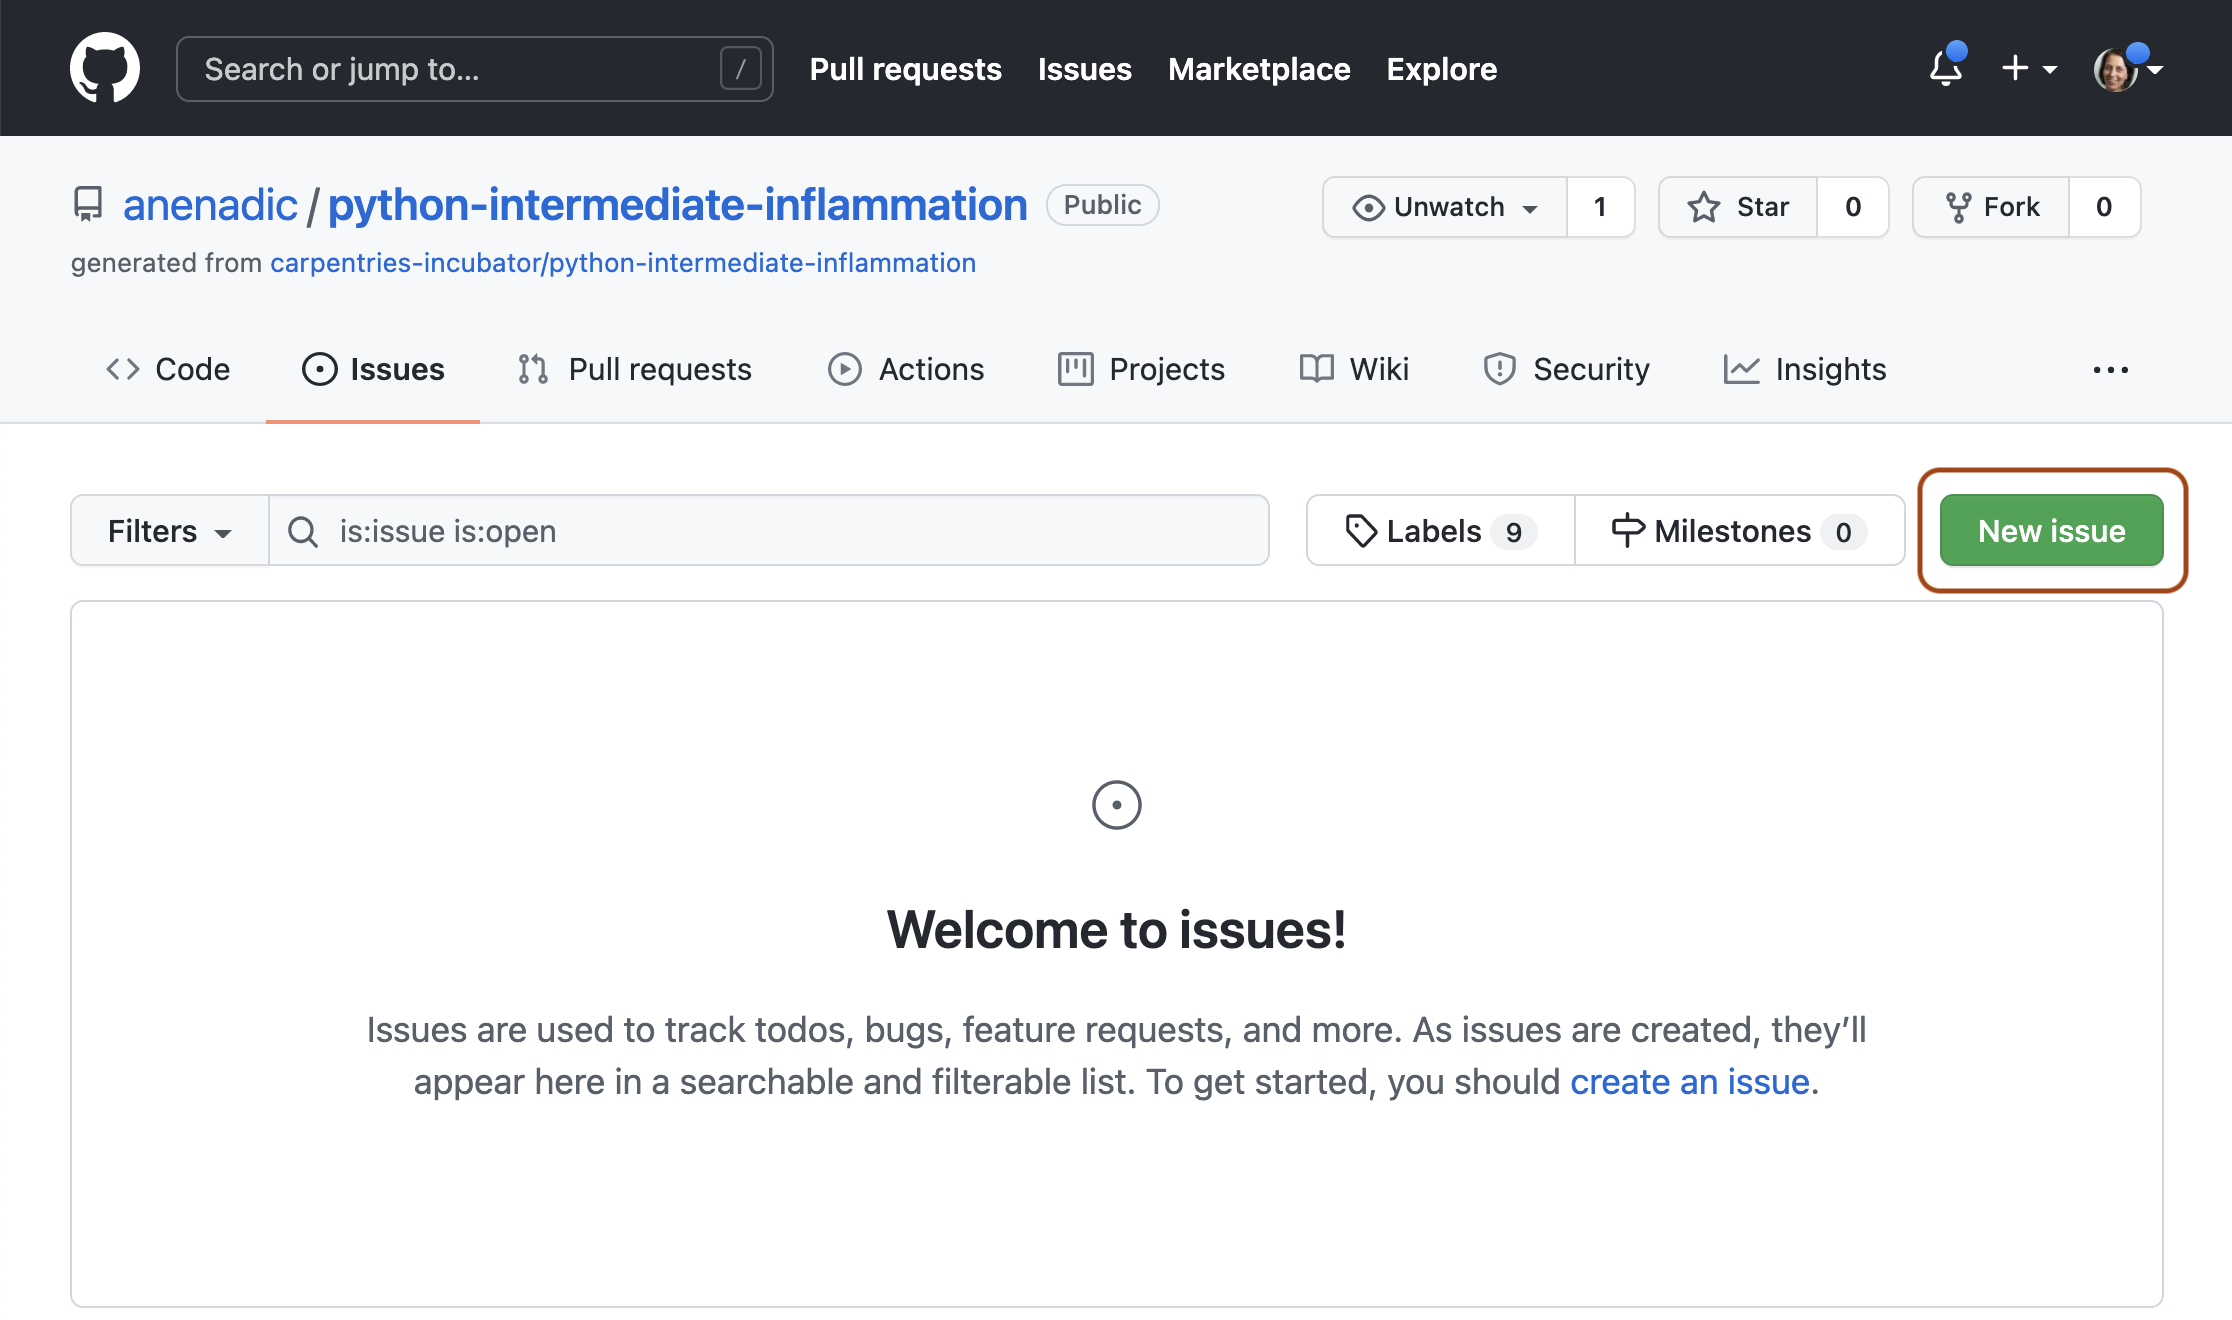
Let’s go through the process of creating a new issue. Start by clicking the New issue button.
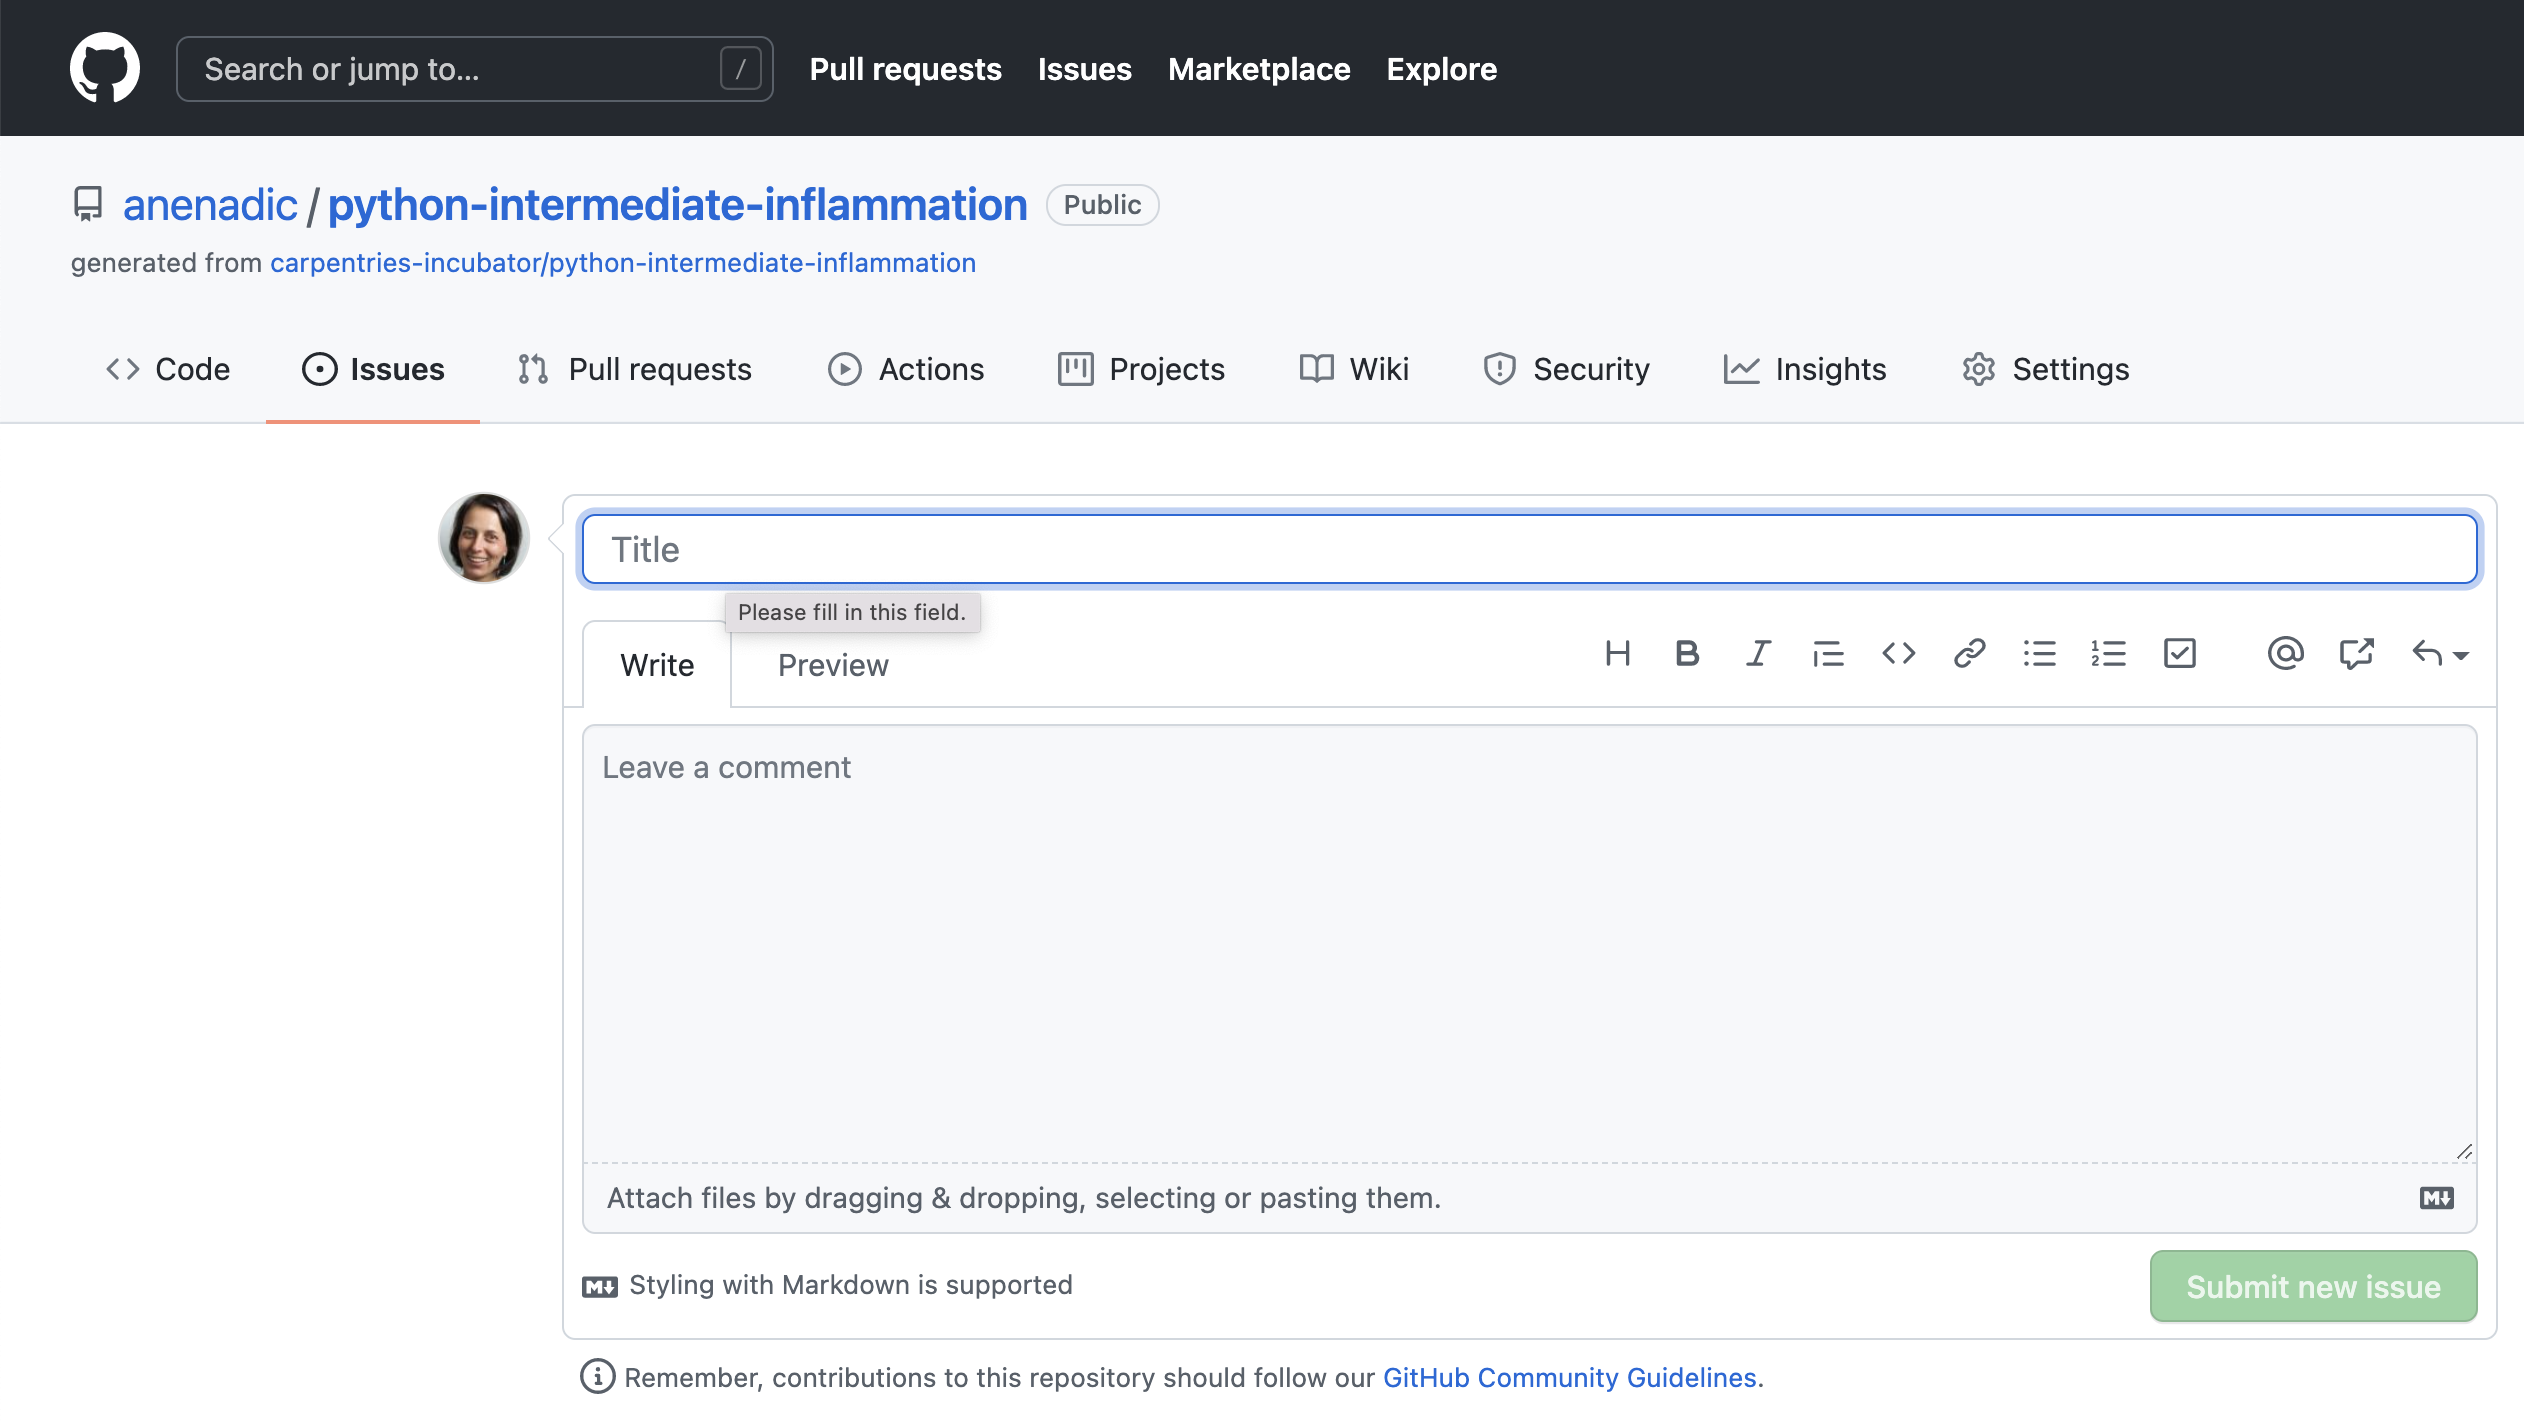
When you create an issue, you can add a range of details to them. They can be assigned to a specific developer for example - this can be a helpful way to know who, if anyone, is currently working to fix the issue, or a way to assign responsibility to someone to deal with it.
They can also be assigned a label. The labels available for issues can be customised, and given a colour, allowing you to see at a glance the state of your code’s issues. The default labels available in GitHub include:
bug- indicates an unexpected problem or unintended behaviordocumentation- indicates a need for improvements or additions to documentationduplicate- indicates similar or already reported issues, pull requests, or discussionsenhancement- indicates new feature requests, or if they are created by a developer, indicate planned new featuresgood first issue- indicates a good issue for first-time contributorshelp wanted- indicates that a maintainer wants help on an issue or pull requestinvalid- indicates that an issue, pull request, or discussion is no longer relevantquestion- indicates that an issue, pull request, or discussion needs more informationwontfix- indicates that work won’t continue on an issue, pull request, or discussion
You can also create your own custom labels to help with classifying issues. There are no rules really about naming the labels - use whatever makes sense for your project. Some conventional custom labels include: status:in progress (to indicate that someone started working on the issue), status:blocked (to indicate that the progress on addressing issue is blocked by another issue or activity), etc.
As well as highlighting problems, the bug label can make code much more usable by allowing users to find out if anyone has had the same problem before, and also how to fix (or work around) it on their end. Enabling users to solve their own problems can save you a lot of time. In general, a good bug report should contain only one bug, specific details of the environment in which the issue appeared (e.g. operating system or browser, version of the software and its dependencies), and sufficiently clear and concise steps that allow a developer to reproduce the bug themselves. They should also be clear on what the bug reporter considers factual (“I did this and this happened”) and speculation (“I think it was caused by this”). If an error report was generated from the software itself, it’s a very good idea to include that in the issue.
The enhancement label is a great way to communicate your future priorities to your collaborators but also to yourself - it’s far too easy to leave a software project for a few months to work on something else, only to come back and forget the improvements you were going to make. If you have other users for your code, they can use the label to request new features, or changes to the way the code operates. It’s generally worth paying attention to these suggestions, especially if you spend more time developing than running the code. It can be very easy to end up with quirky behaviour because of off-the-cuff choices during development. Extra pairs of eyes can point out ways the code can be made more accessible - the easier the code is to use, the more widely it will be adopted and the greater impact it will have.
One interesting label is wontfix, which indicates that an issue simply won’t be worked on for whatever reason. Maybe the bug it reports is outside of the use case of the software, or the feature it requests simply isn’t a priority. This can make it clear
you’ve thought about an issue and dismissed it.
Locking and Pinning Issues
The Lock conversation and Pin issue buttons are both available from individual issue pages. Locking conversations allows you to block future comments on the issue, e.g. if the conversation around the issue is not constructive or violates your team’s code of conduct. Pinning issues allows you to pin up to three issues to the top of the issues page, e.g. to emphasise their importance.
Manage Issues With Your Code Openly
Having open, publicly-visible lists of the the limitations and problems with your code is incredibly helpful. Even if some issues end up languishing unfixed for years, letting users know about them can save them a huge amount of work attempting to fix what turns out to be an unfixable problem on their end. It can also help you see at a glance what state your code is in, making it easier to prioritise future work!
Exercise: Our First Issue!
Individually, with a critical eye, think of an aspect of the code you have developed so far that needs improvement. It could be a bug, for example, or a documentation issue with your README, a missing LICENSE file, or an enhancement. In GitHub, enter the details of the issue and select
Submit new issue. Add a label to your issue, if appropriate.Time: 5 mins
Solution
For example, “Add a licence file” could be a good first issue, with a label
documentation.
Issue (and Pull Request) Templates
GitHub also allows you to set up issue and pull request templates for your software project. Such templates provide a structure for the issue/pull request descriptions, and/or prompt issue reporters and collaborators to fill in answers to pre-set questions. They can help contributors raise issues or submit pull requests in a way that is clear, helpful and provides enough information for maintainers to act upon (without going back and forth to extract it). GitHub provides a range of default templates, but you can also write your own.
Using GitHub’s Notifications & Referencing System to Communicate
GitHub implements a comprehensive notifications system to keep the team up-to-date with activities in your code repository and notify you when something happens or changes in your software project. You can choose whether to watch or unwatch an individual repository, or can choose to only be notified of certain event types such as updates to issues, pull requests, direct mentions, etc. GitHub also provides an additional useful notification feature for collaborative work - Mentions. In addition to referencing team members (which will result in an appropriate notification), GitHub allows us to reference issues, pull requests and comments from one another - providing a useful way of connecting things and conversations in your project.
Referencing Team Members Using Mentions
The mention system notifies team members when somebody else references them in an issue, comment or pull request - you can use this to notify people when you want to check a detail with them, or let them know something has been fixed or changed (much easier than writing out all the same information again in an email).
You can use the mention system to link to/notify an individual GitHub account or a whole team for notifying multiple people. Typing @ in GitHub will bring up a list of all accounts and teams linked to the repository that can be “mentioned”. People will then receive notifications based on their preferred notification methods - e.g. via email or GitHub’s User Interface.
Referencing Issues, Pull Requests and Comments
GitHub also lets you mention/reference one issue or pull request from another (and people “watching” these will be notified of any such updates). Whilst writing the description of an issue, or commenting on one, if you type # you should see a list of the issues and pull requests on the repository. They are coloured green if they’re open, or white if they’re closed. Continue typing the issue number, and the list will narrow down, then you can hit Return to select the entry and link the two. For example, if you realise that several of your bugs have common roots, or that one enhancement can’t be implemented before you’ve finished another, you can use the mention system to indicate the depending issue(s). This is a simple way to add much more information to your issues.
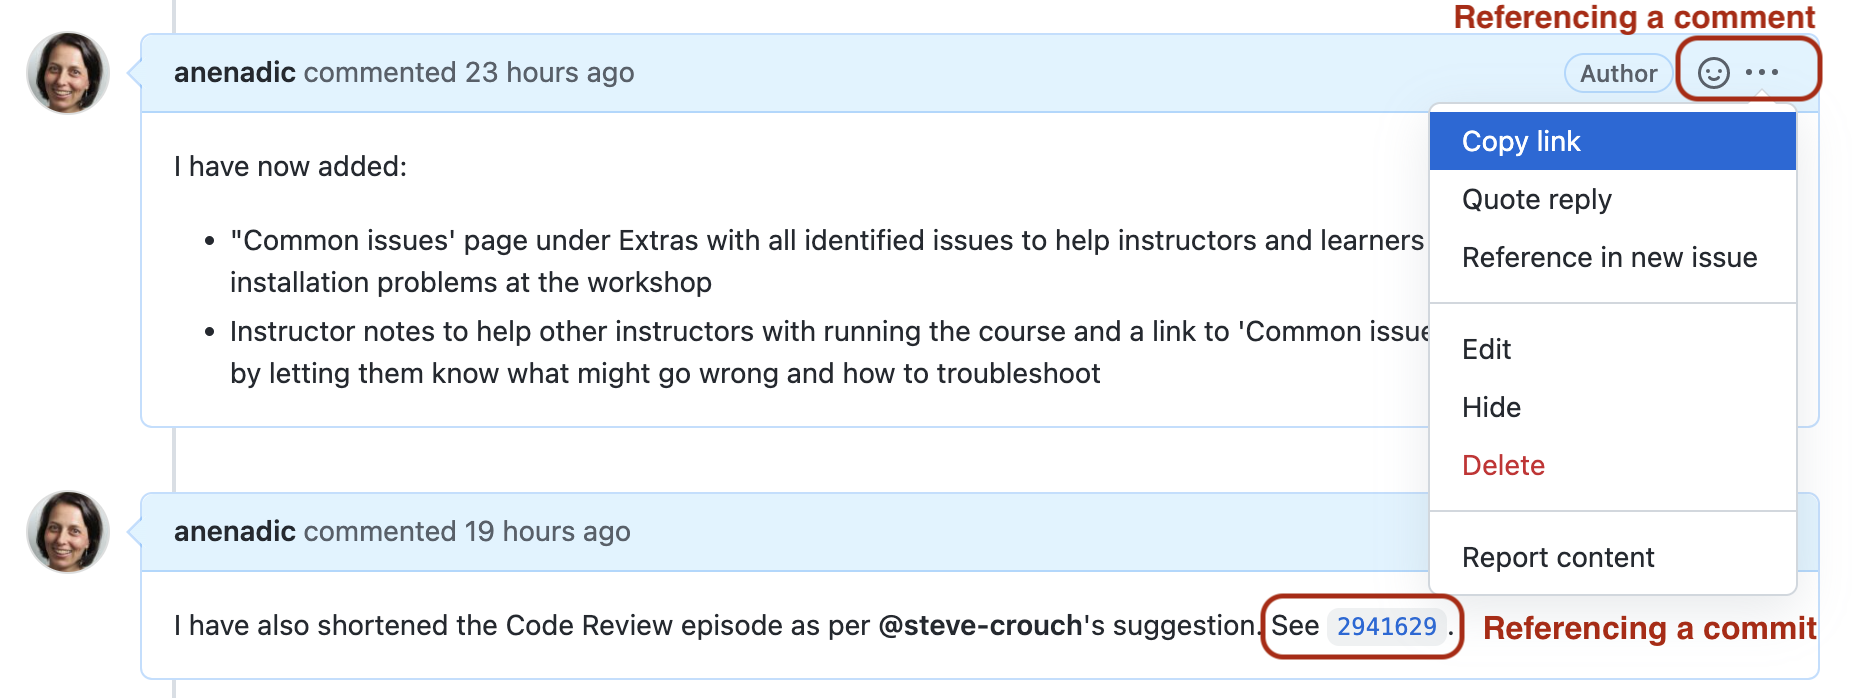
While not strictly notifying anyone, GitHub lets you also reference individual comments and commits. If you click the
... button on a comment, from the drop down list you can select to Copy link (which is a URL that points to that
comment that can be pasted elsewhere) or to Reference [a comment] in a new issue (which opens a new issue and references
the comment by its URL). Within a text box for comments, issue and pull request descriptions, you can reference
a commit by pasting its long, unique identifier (or its first few digits which uniquely identify it)
and GitHub will render it nicely using the identifier’s short form and link to the commit in question.
Exercise: Our First Mention/Reference!
Add a mention to one of your team members using the
@notation in a comment within an issue or a pull request in your repository - e.g. to ask them a question or a clarification on something or to do some additional work.Alternatively, add another issue to your repository and reference the issue you created in the previous exercise using the
#notation.Time: 5 mins
You Are Also a User of Your Code
This section focuses a lot on how issues and mentions can help communicate the current state of the code to others and document what conversations were held around particular issues. As a sole developer, and possibly also the only user of the code, you might be tempted to not bother with recording issues, comments and new features as you don’t need to communicate the information to anyone else.
Unfortunately, human memory isn’t infallible! After spending six months on a different topic, it’s inevitable you’ll forget some of the plans you had and problems you faced. Not documenting these things can lead to you having to re-learn things you already put the effort into discovering before. Also, if others are brought on to the project at a later date, the software’s existing issues and potential new features are already in place to build upon.
Software Project Management in GitHub
Managing issues within your software project is one aspect of project management but it gives a relative flat representation of tasks and may not be as suitable for higher-level project management such as prioritising tasks for future development, planning sprints and releases. Luckily, GitHub provides two project management tools for this purpose - Projects and Milestones.
Both Projects and Milestones provide agile development and project management systems and ways of organising issues into smaller “sub-projects” (i.e. smaller than the “project” represented by the whole repository). Projects provide a way of visualising and organising work which is not time-bound and is on a higher level (e.g. more suitable for project management tasks). Milestones are typically used to organise lower-level tasks that have deadlines and progress of which needs to be closely tracked (e.g. release and version management). The main difference is that Milestones are a repository-level feature (i.e. they belong and are managed from a single repository), whereas projects are account-level and can manage tasks across many repositories under the same user or organisational account.
How you organise and partition your project work and which tool you want to use to track progress (if at all) is up to you and the size of your project. For example, you could create a project per milestone or have several milestones in a single project, or split milestones into shorter sprints. We will use Milestones soon to organise work on a mini sprint within our team - for now, we will have a brief look at Projects.
Projects
A Project uses a “project board” consisted of columns and cards to keep track of tasks (although GitHub now also provides a table view over a project’s tasks). You break down your project into smaller sub-projects, which in turn are split into tasks which you write on cards, then move the cards between columns that describe the status of each task. Cards are usually small, descriptive and self-contained tasks that build on each other. Breaking a project down into clearly-defined tasks makes it a lot easier to manage. GitHub project boards interact and integrate with the other features of the site such as issues and pull requests - cards can be added to track the progress of such tasks and automatically moved between columns based on their progress or status.
Project are a Cross-Repository Management Tool
Project in GitHub are created on a user or organisation level, i.e. they can span all repositories owned by a user or organisation in GitHub and are not a repository-level feature any more. A project can integrate your issues and pull requests on GitHub from multiple repositories to help you plan and track your team’s work effectively.
Let’s create a Project in GitHub to plan the first release of our code.
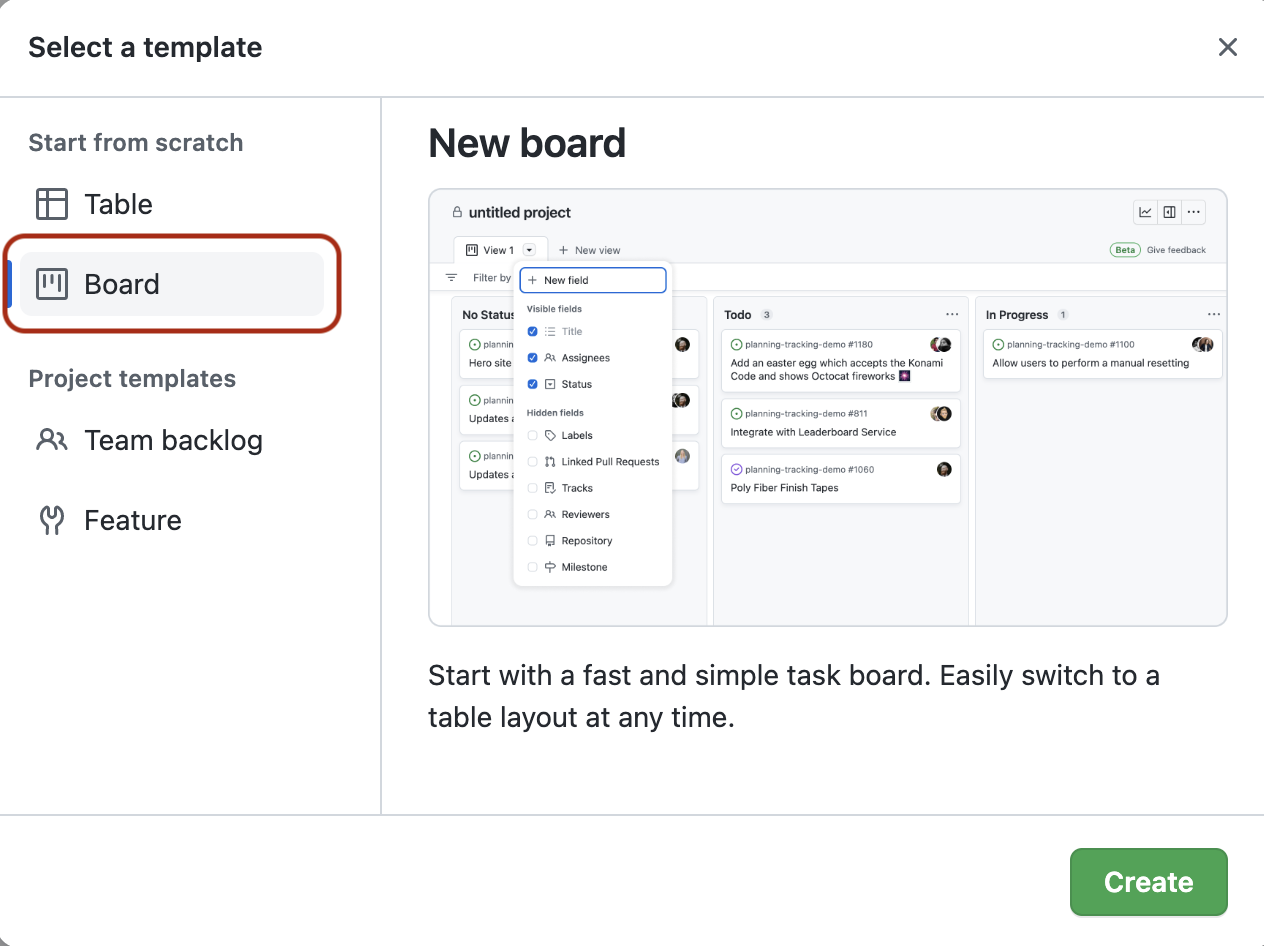
-
From your GitHub account’s home page (not your repository’s home page!), select the “Projects” tab, then click the
New projectbutton on the right.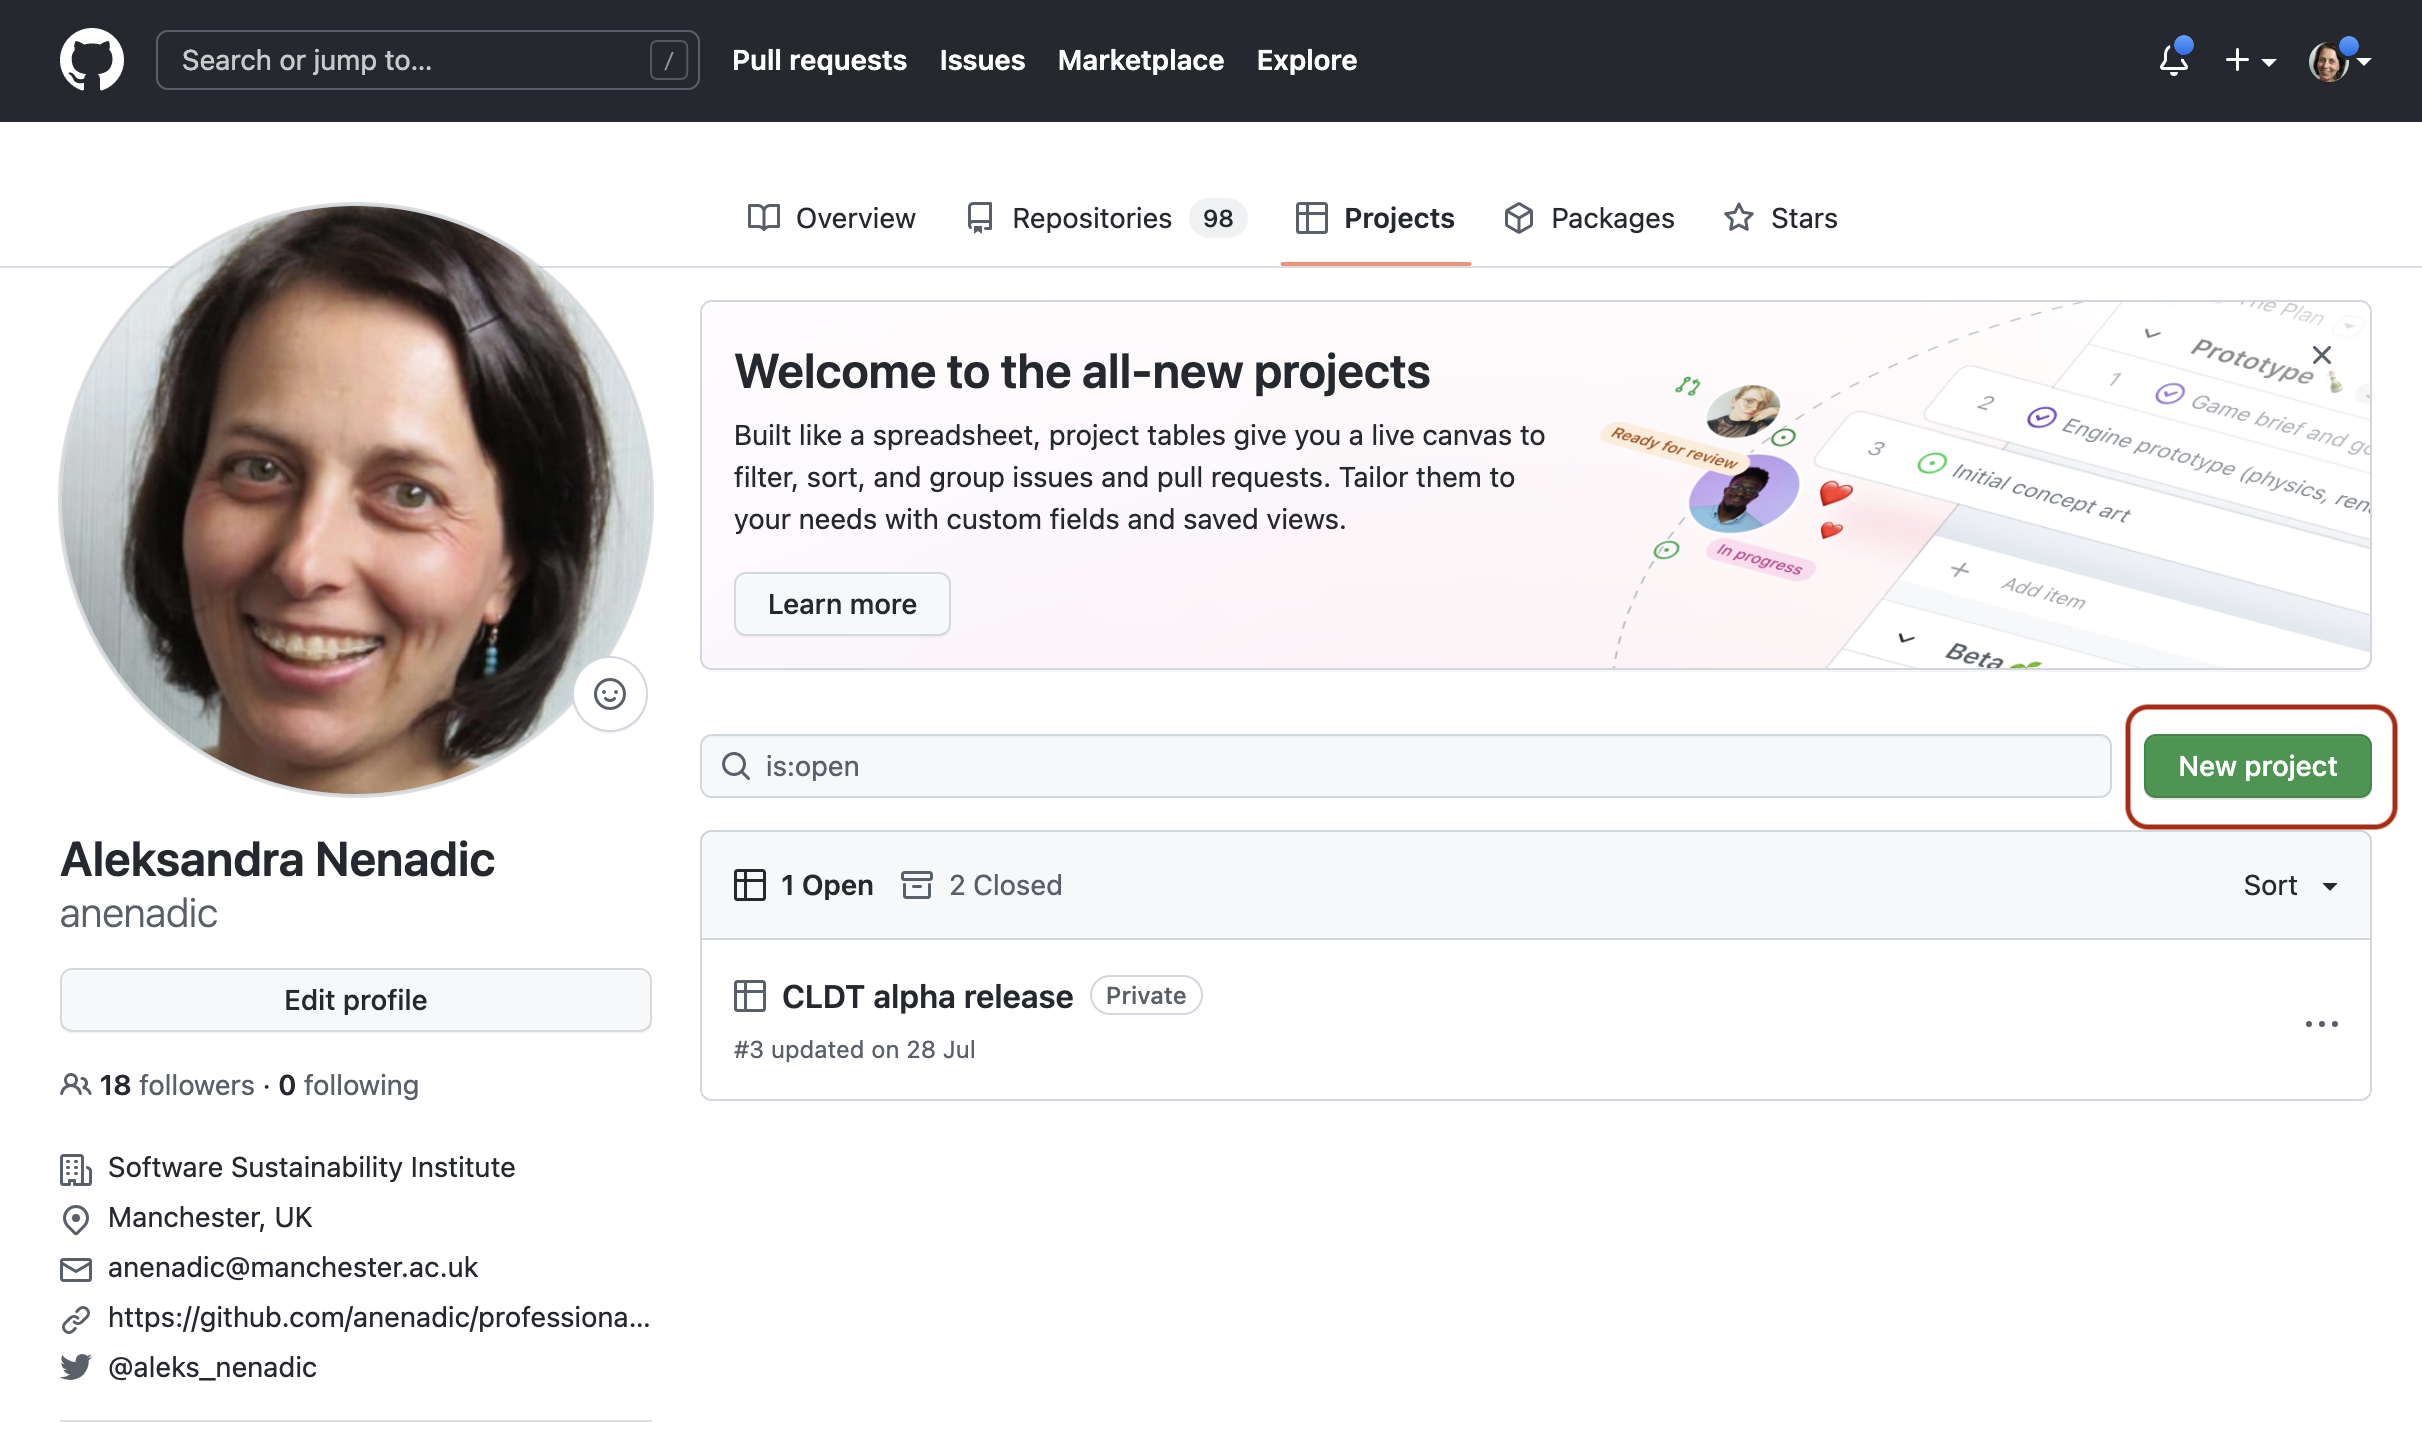
-
In the “Select a template” pop-up window, select “Board” - this will give you a classic “cards on a board” view of the project. An alternative is the “Table” view, which presents a spreadsheet-like and slightly more condensed view of a project.
-
GitHub will create an unnamed project board for you. You should populate the name and the description of the project from the project’s Settings, which can be found by clicking the
...button in the top right corner of the board.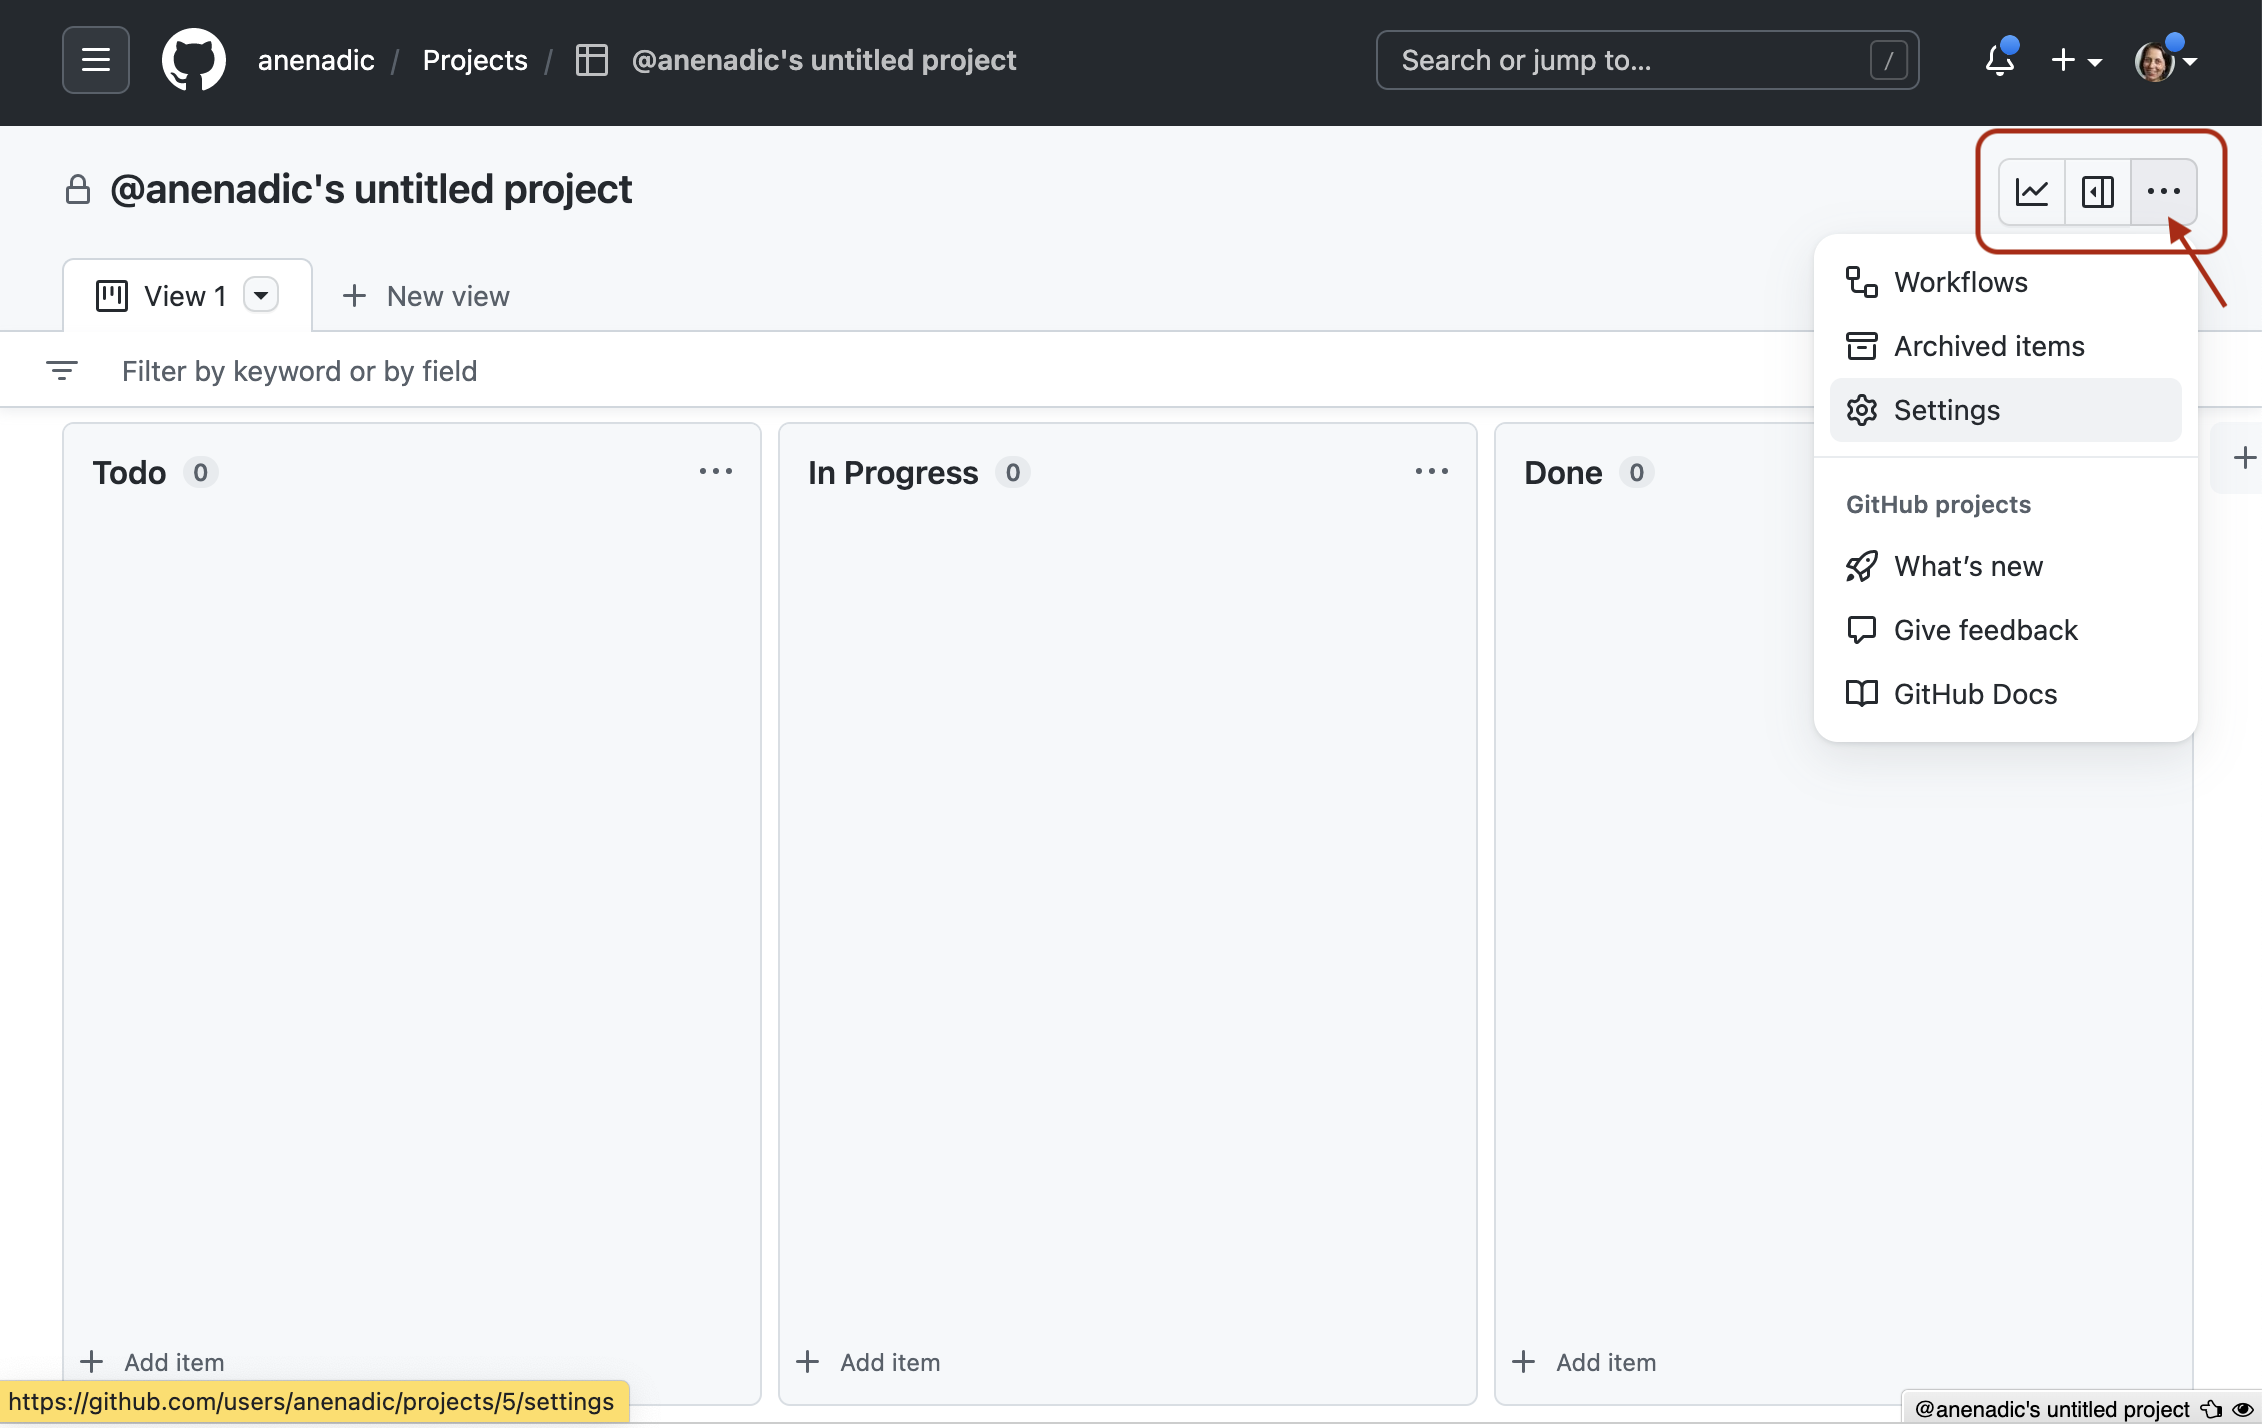
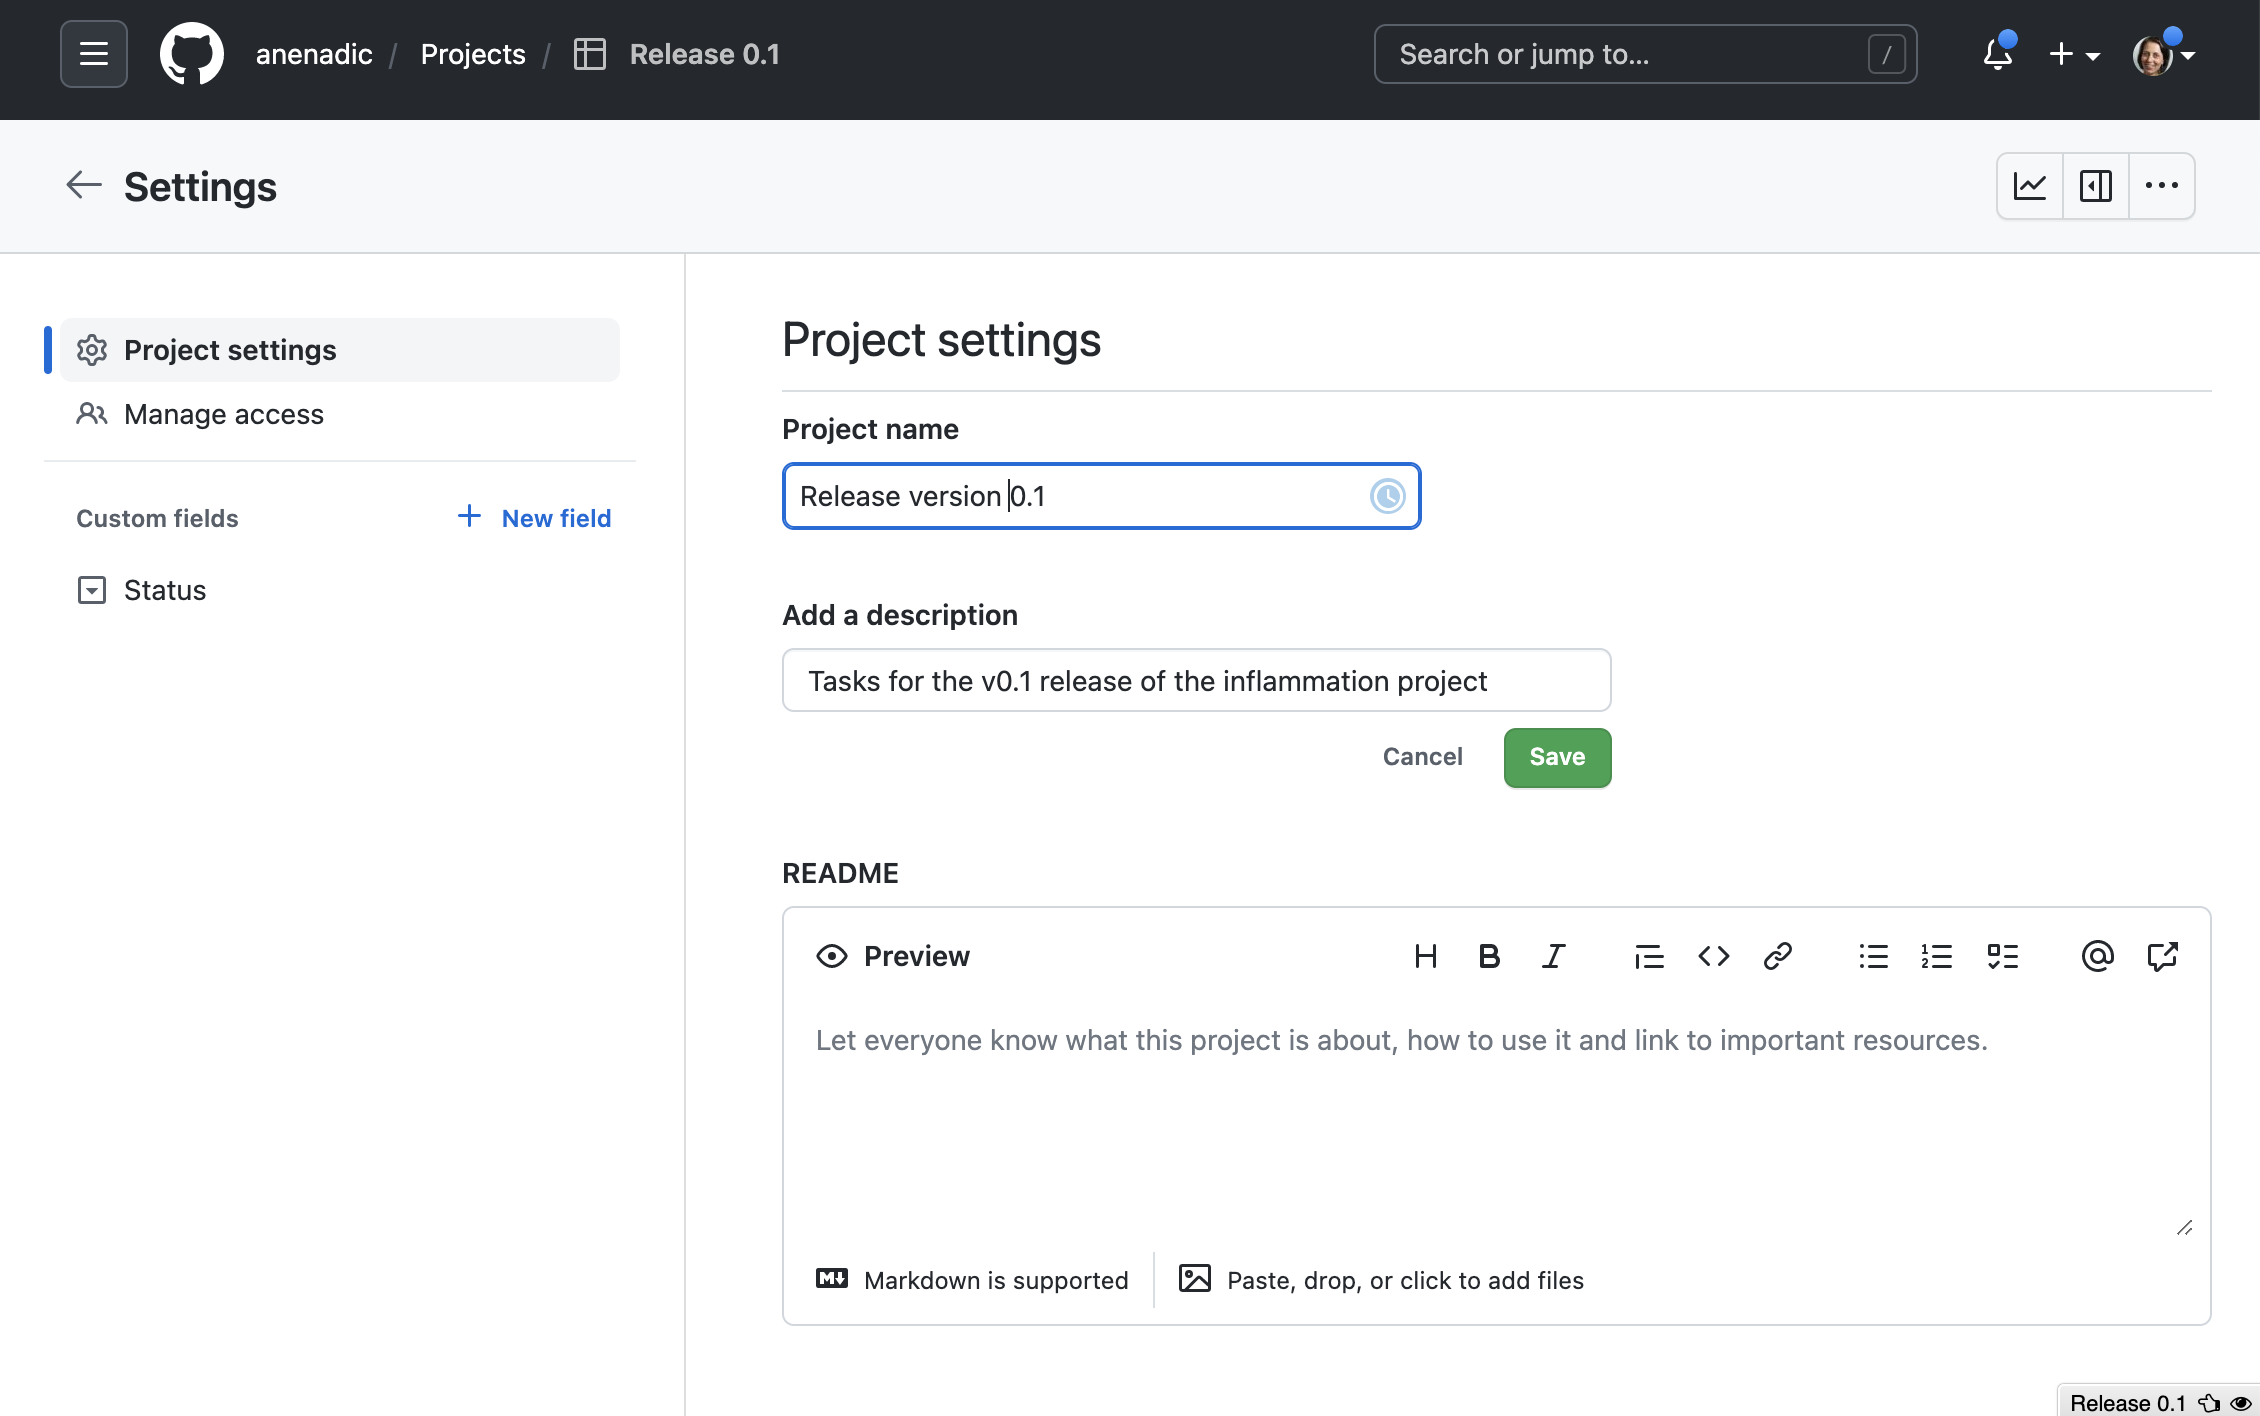
-
We can, for example, use “Inflammation project - release v0.1” and “Tasks for the v0.1 release of the inflammation project” for the name and description of our project, respectively. Or you can use anything that suits your project.
-
GitHub’s default card board template contains the following three columns with pretty self-explanatory names:
To DoIn ProgressDone
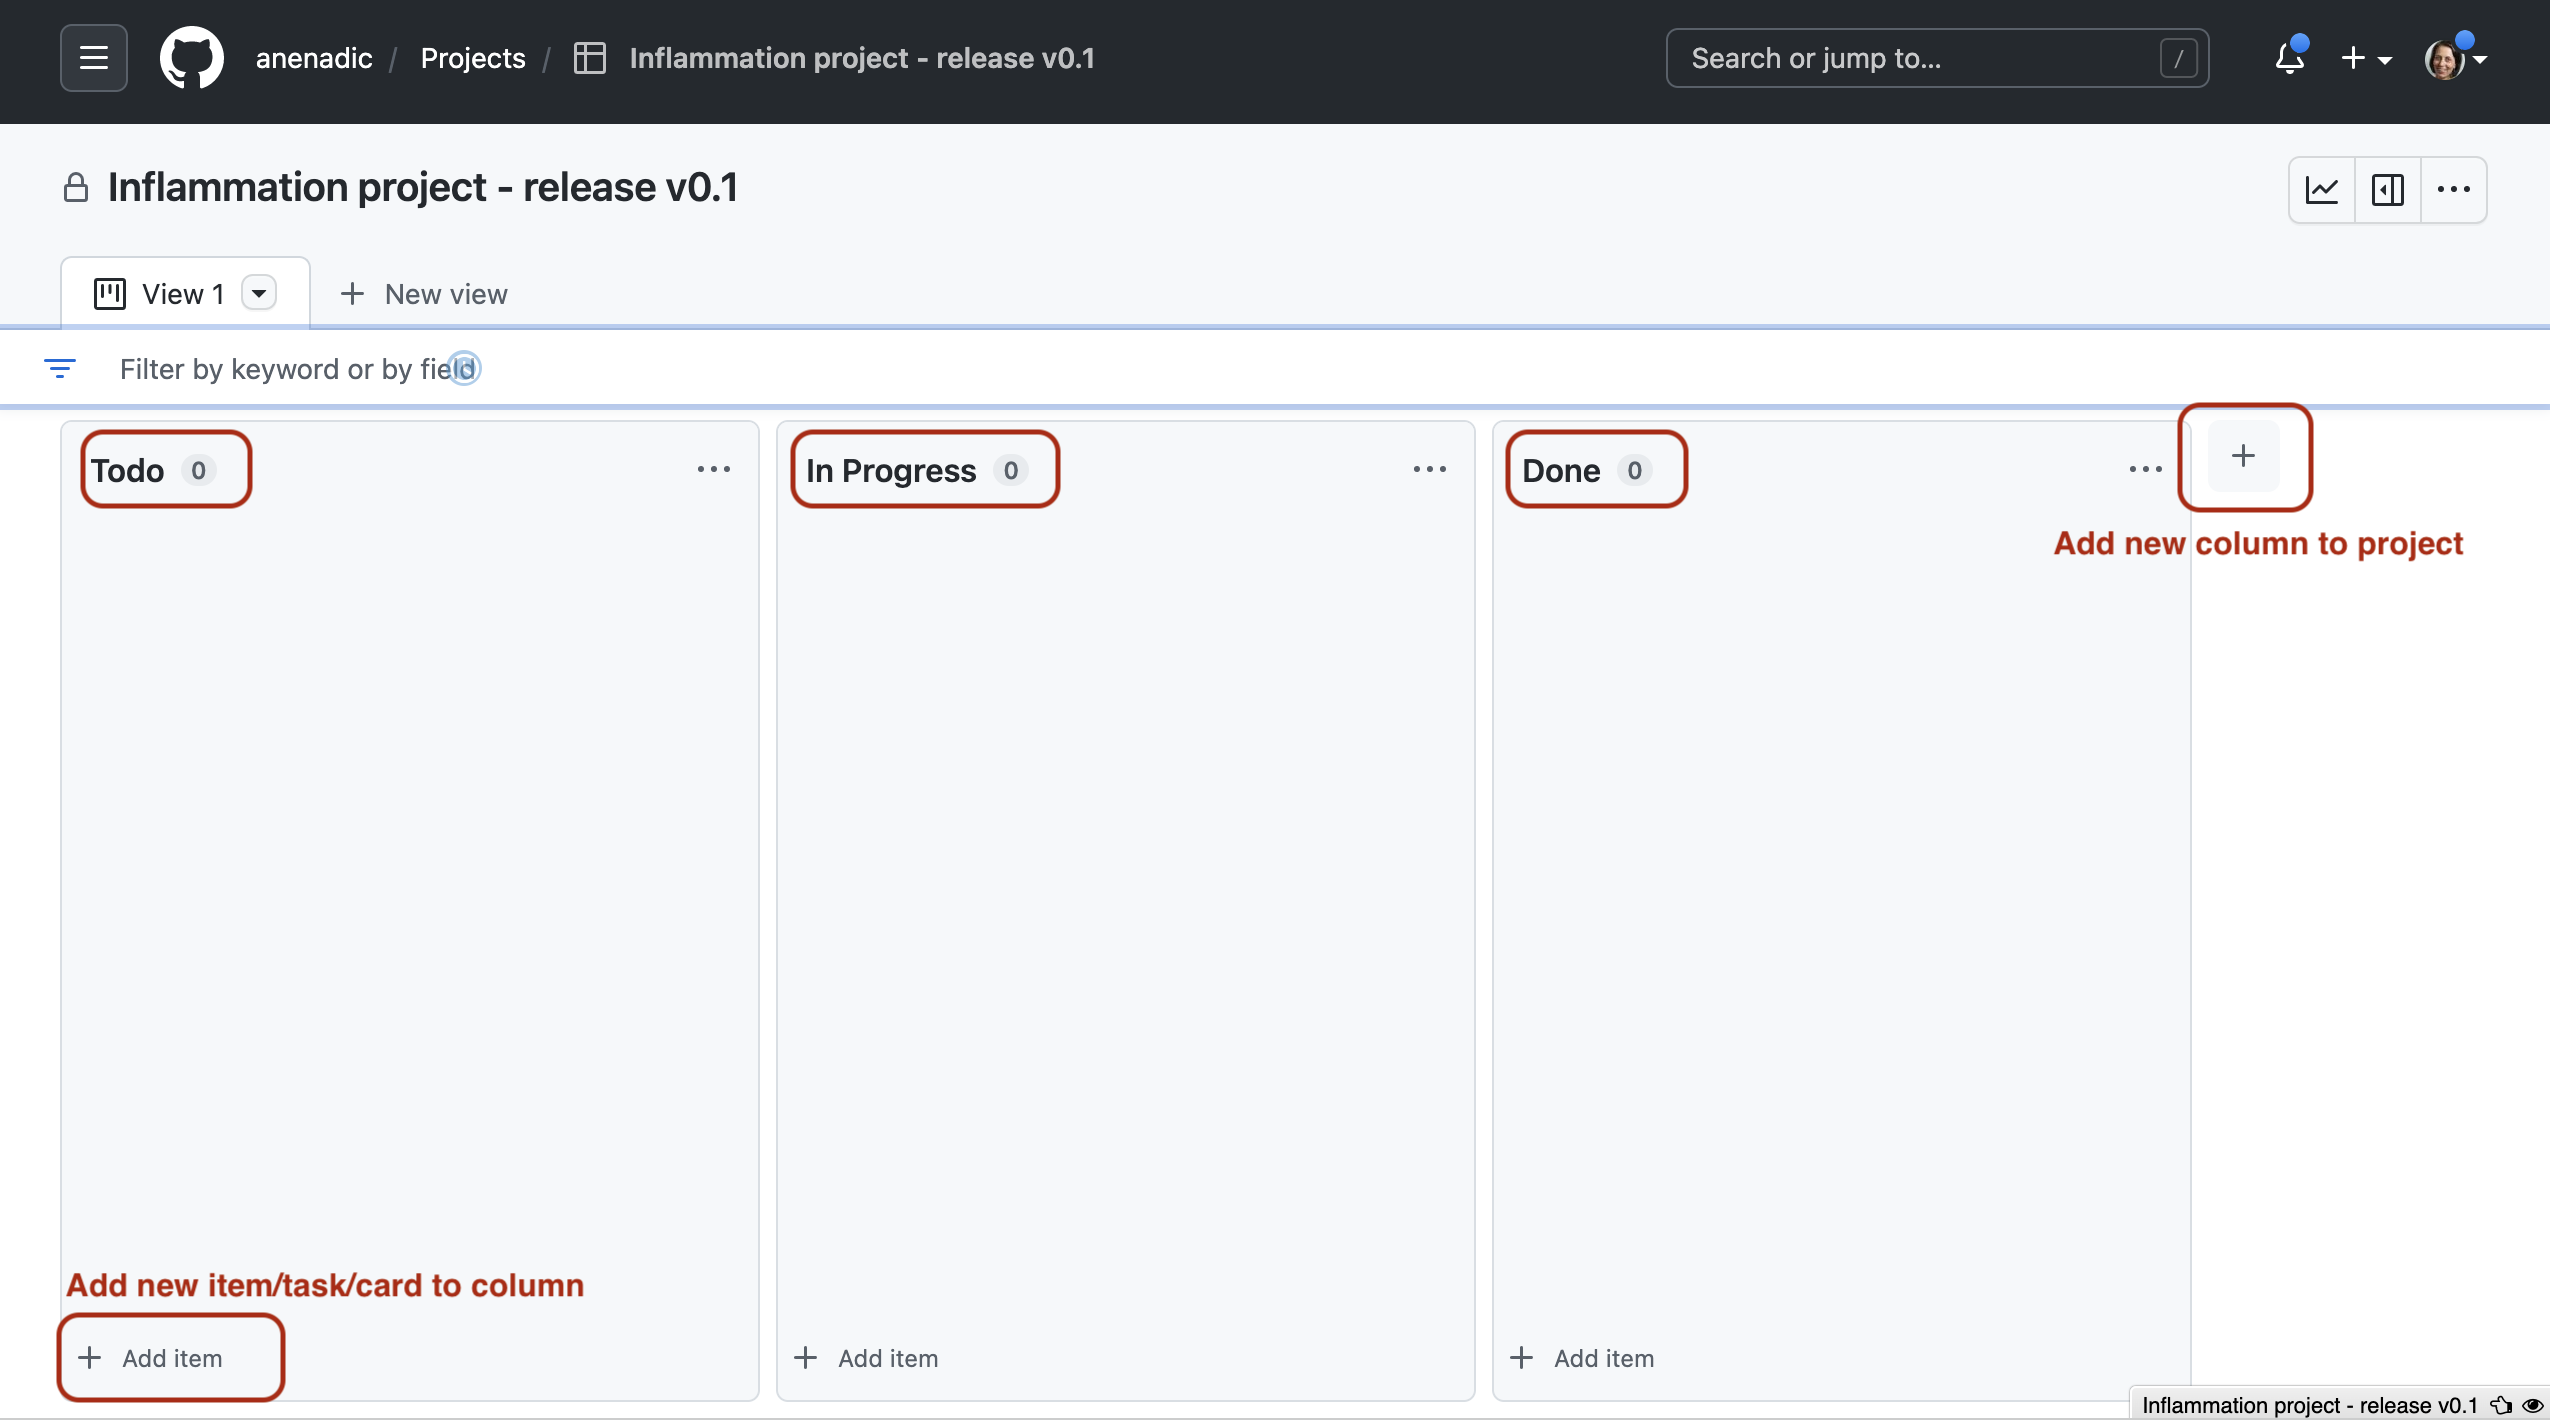
You can add or remove columns from your project board to suit your use case. One commonly seen extra column is
On holdorWaiting- if you have tasks that get held up by waiting on other people (e.g. to respond to your questions) then moving them to a separate column makes their current state clearer.To add a new column, press the
+button on the right; to remove a column select the...button in the top right corner of the column itself and then theDelete columnoption. -
You can now add new items (cards) to columns by pressing the
+ Add itembutton at the bottom of each column - a text box to add a card will appear. Cards can be simple textual notes which you type into the text box and presEnterwhen finished. Cards can also be (links to) existing issues and pull requests, which can be filtered out from the text box by pressing#(to activate GitHub’s referencing mechanism) and selecting the repository and an issue or pull request from that repository that you want to add.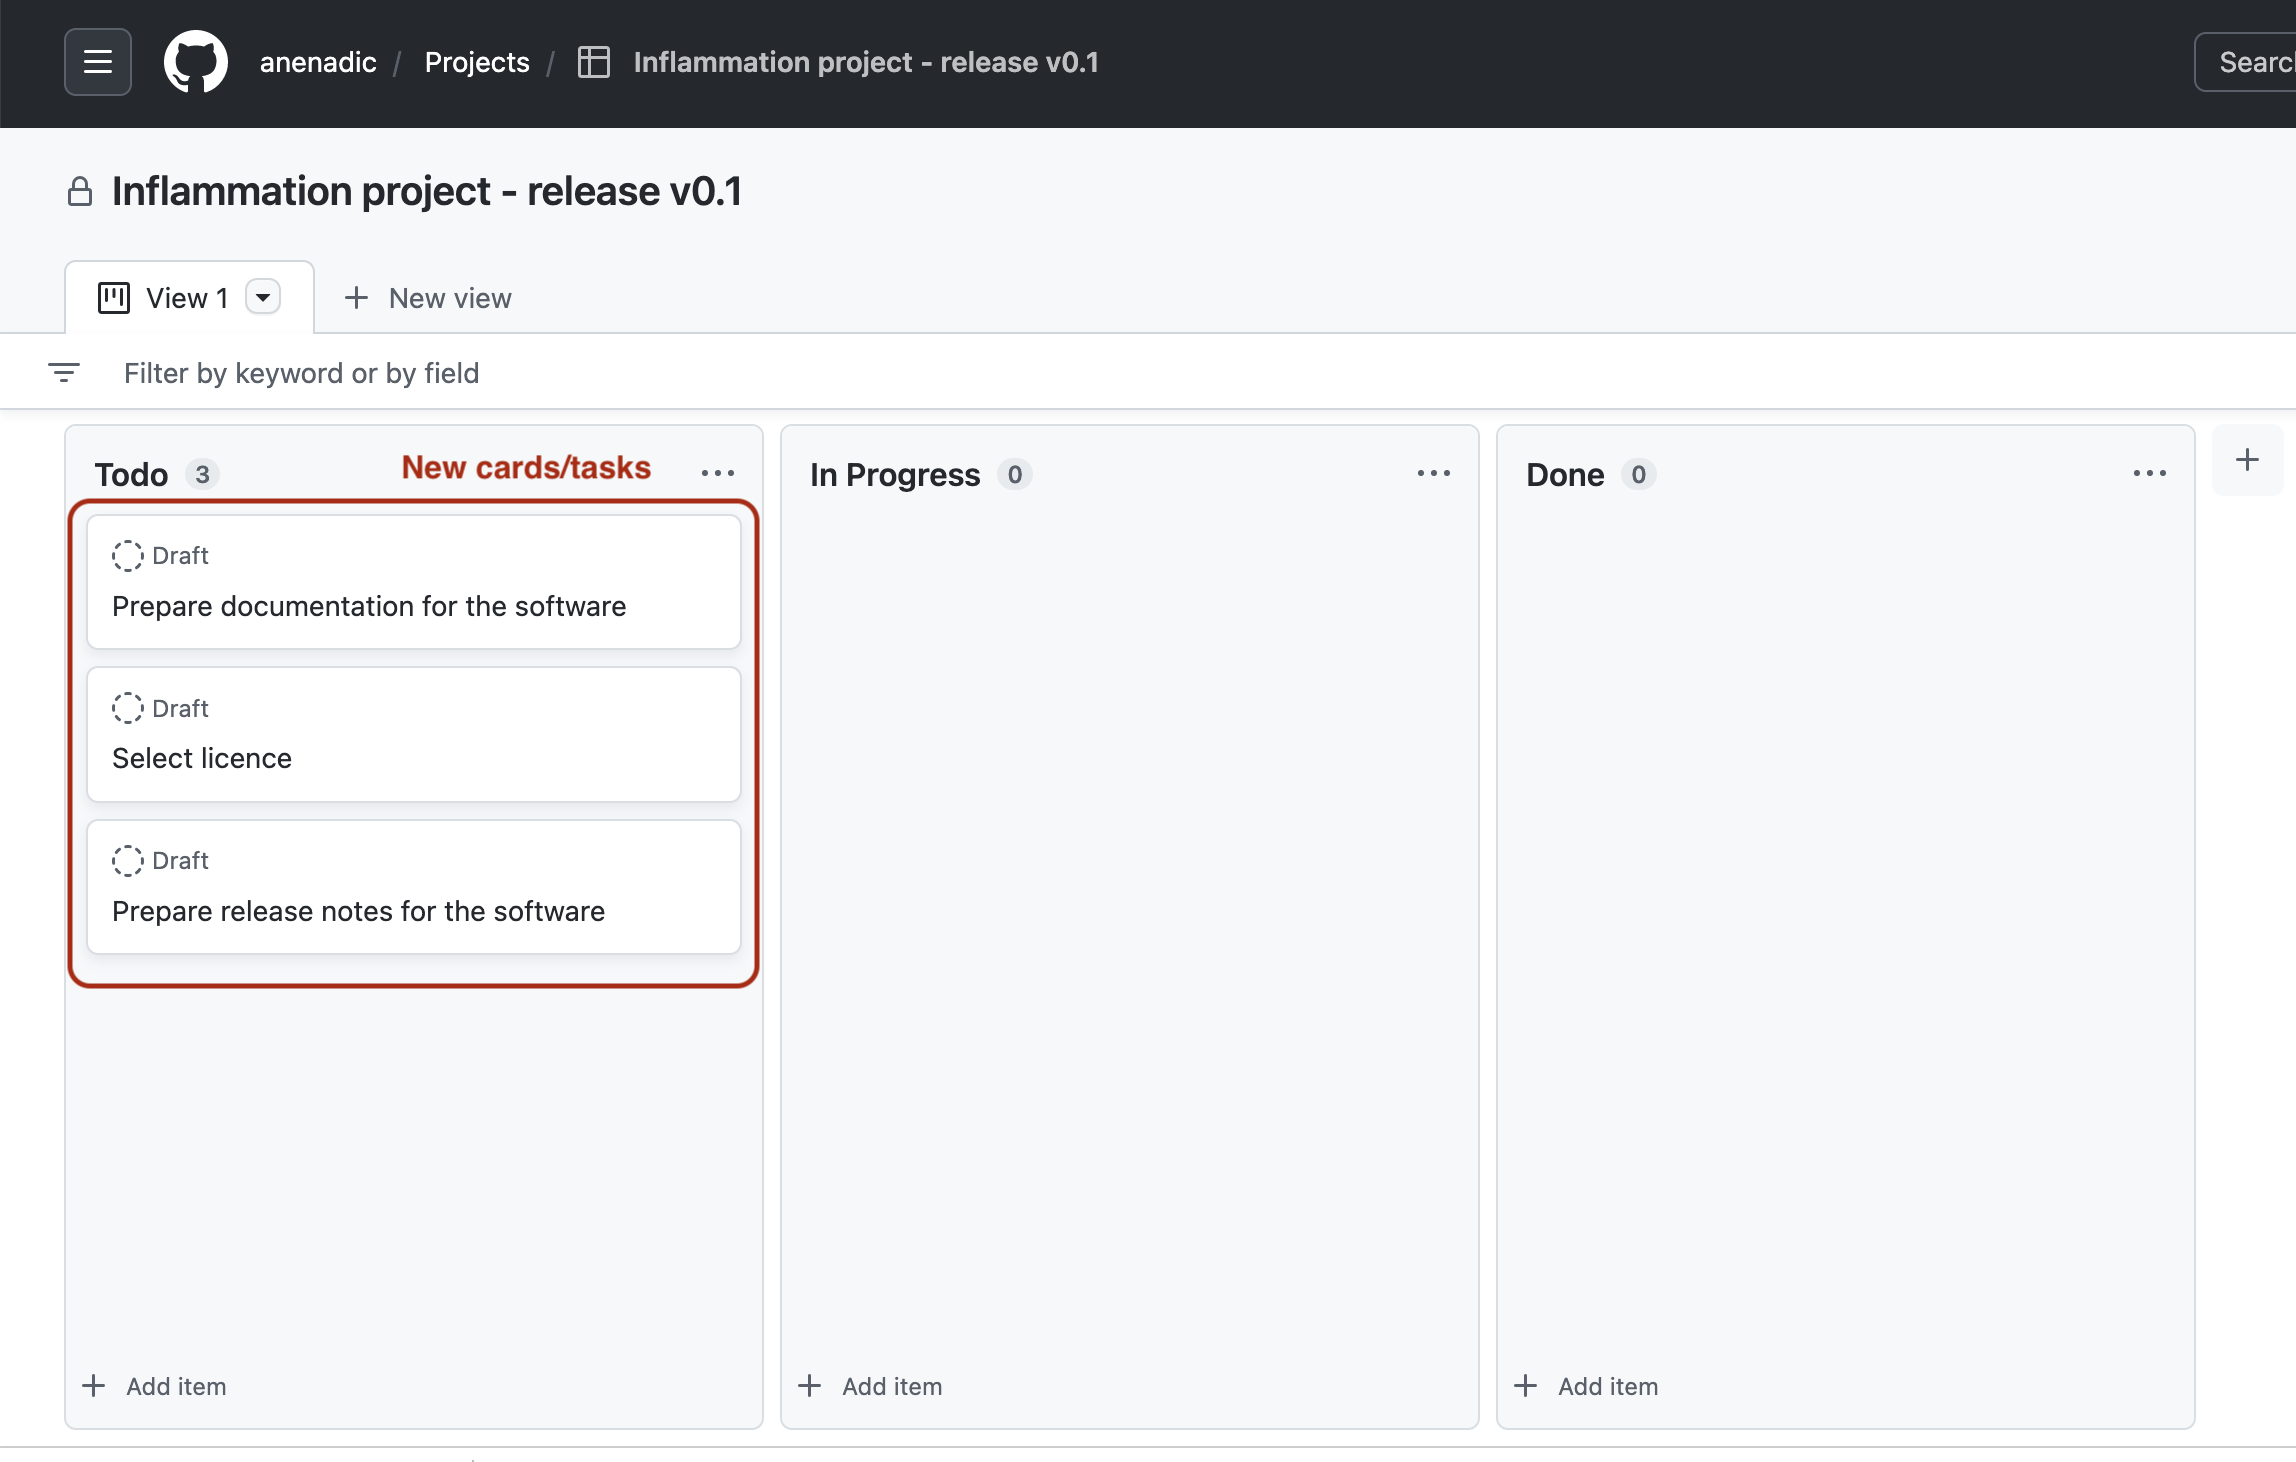
Notes contain task descriptions and can have detailed content like checklists. In some cases, e.g. if a note becomes too complex, you may want to convert it into an issue so you can add labels, assign them to team members or write more detailed comments (for that, use the
Convert to issueoption from the...menu on the card itself).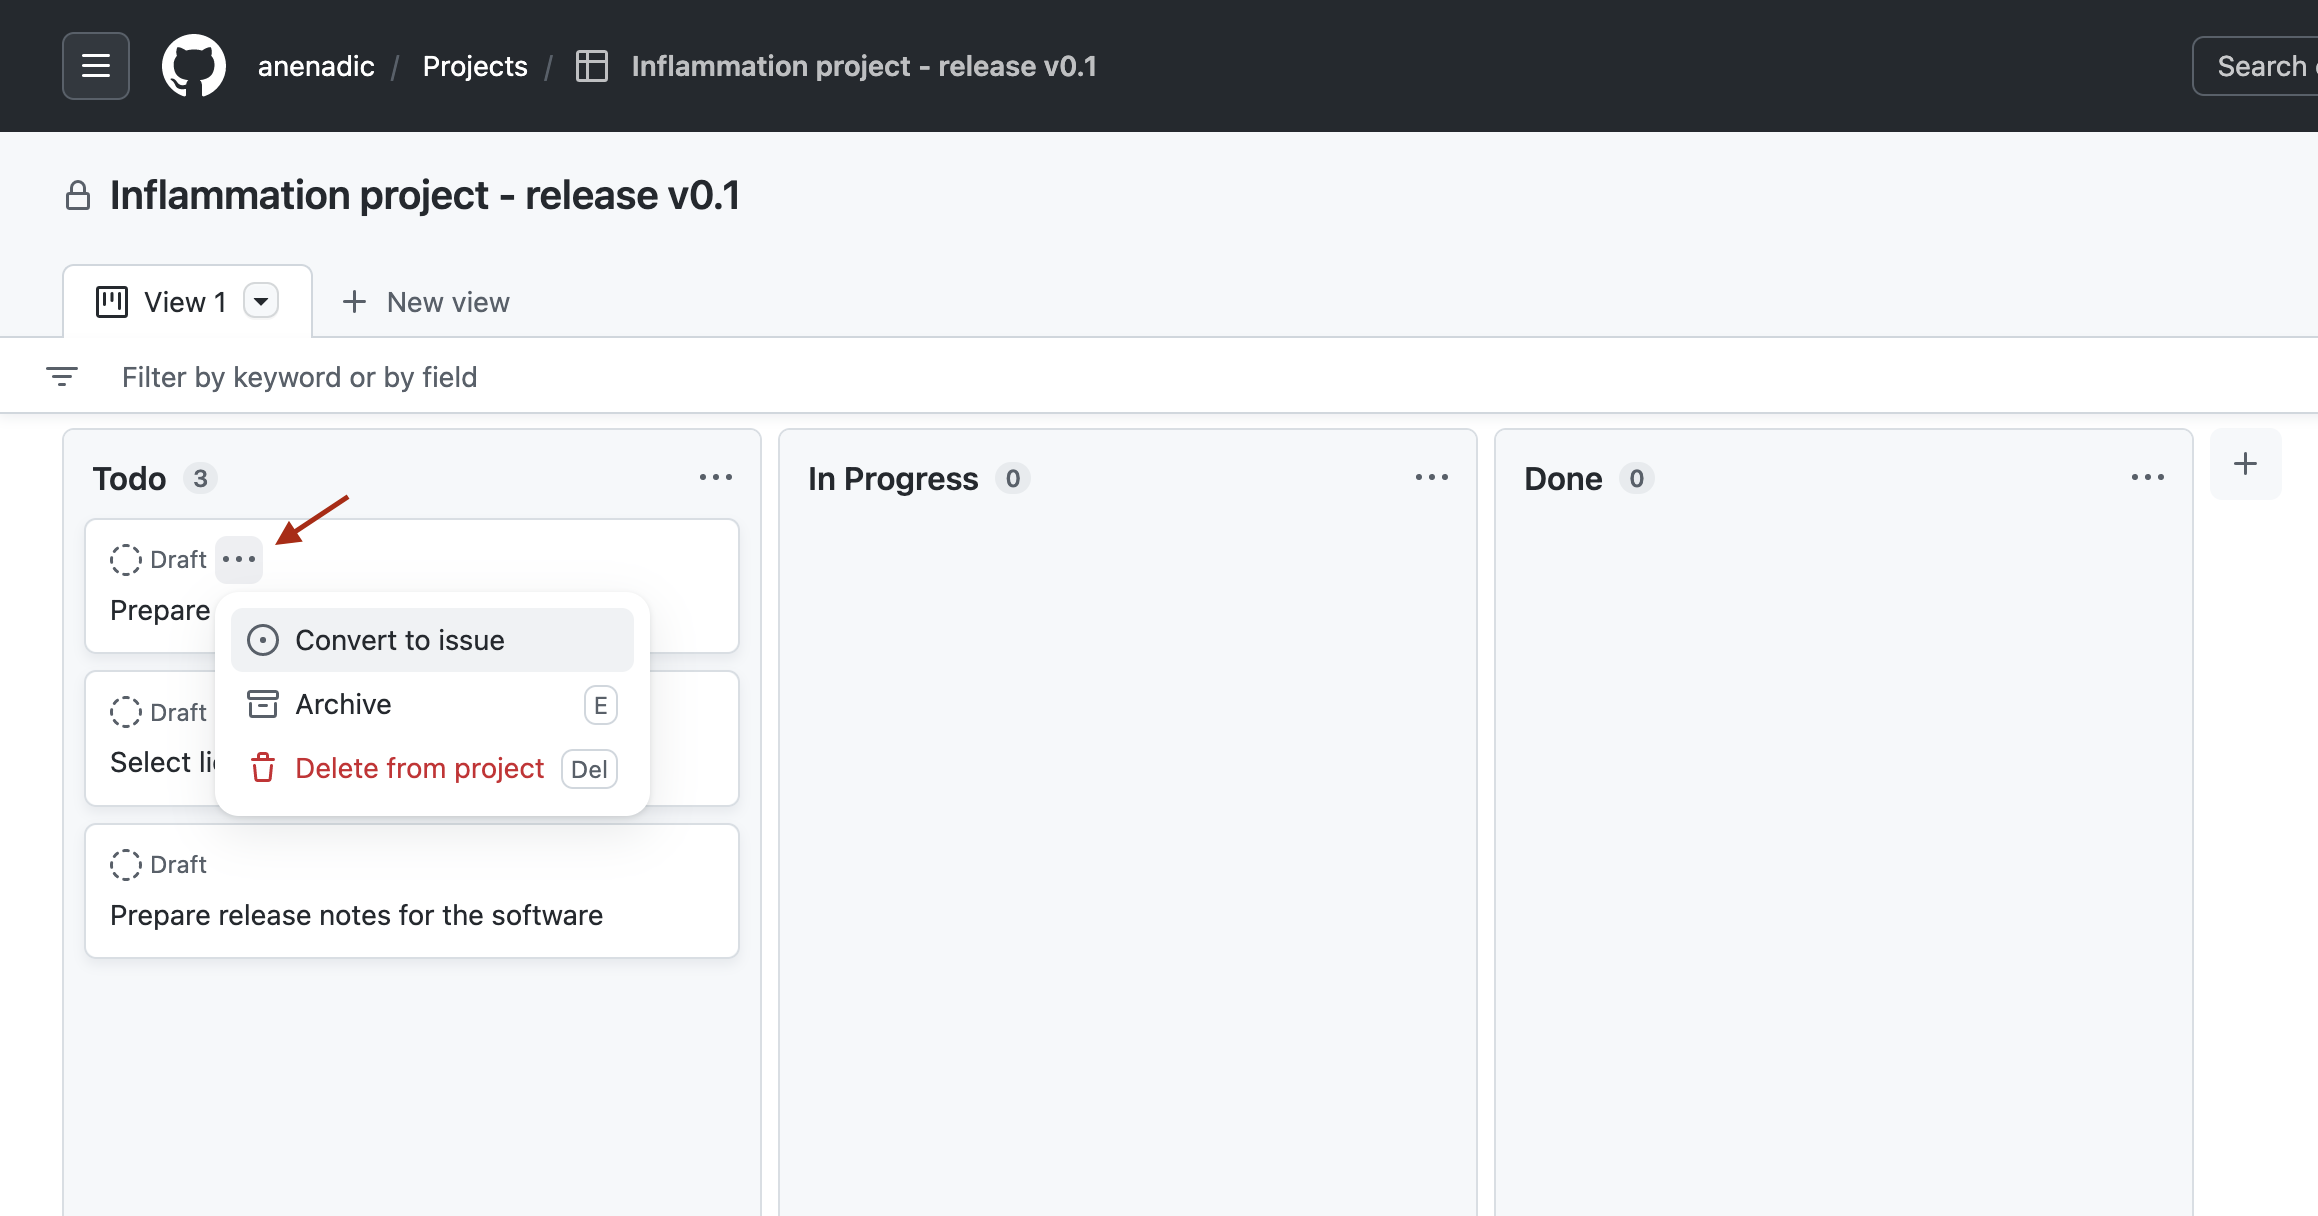
-
You can now drag a card to
In Progresscolumn to indicate that you are working on it or to theDonecolumn to indicate that it has been completed. Issues and pull requests on cards will automatically be moved to theDonecolumn for you when you close the issue or merge the pull request - which is very convenient and can save you some project management time.
Exercise: Working With Projects
Spend a few minutes planning what you want to do with your project as a bigger chunk of work (you can continue working on the first release of your software if you like) and play around with your project board to manage tasks around the project:
- practice adding and removing columns,
- practice adding different types of cards (notes and from already existing open issues and/or unmerged pull requests),
- practice turing cards into issues and closing issues, etc.
Make sure to add a certain number of issues to your repository to be able to use in you project board.
Time: 10 mins
Prioritisation With Project Boards
Once your project board has a large number of cards on it, you might want to begin priorisiting them. Not all tasks are going to be equally important, and some will require others to be completed before they can even be begun. Common methods of prioritisation include:
- Vertical position: the vertical arrangement of cards in a column implicitly represents their importance. High-priority issues go to the top of
To Do, whilst tasks that depend on others go beneath them. This is the easiest one to implement, though you have to remember to correctly place cards when you add them.- Priority columns: instead of a single
To Docolumn, you can have two or more, for example -To Do: Low PriorityandTo Do: High Priority. When adding a card, you pick which is the appropriate column for it. You can even add aTriagecolumn for newly-added issues that you’ve not yet had time to classify. This format works well for project boards devoted to bugs.- Labels: if you convert each card into an issue, then you can label them with their priority - remember GitHub lets you create custom labels and set their colours. Label colours can provide a very visually clear indication of issue priority but require more administrative work on the project, as each card has to be an issue to be assigned a label. If you choose this route for issue prioritisation - be aware of accessibility issues for colour-blind people when picking colours.
Key Points
We should use GitHub’s Issues to keep track of software problems and other requests for change - even if we are the only developer and user.
GitHub’s Mentions play an important part in communicating between collaborators and is used as a way of alerting team members of activities and referencing one issue/pull requests/comment/commit from another.
Without a good project and issue management framework, it can be hard to keep track of what’s done, or what needs doing, and particularly difficult to convey that to others in the team or sharing the responsibilities.