All in One View
Content from Lesson 1: Code Development & Debugging with IDEs
Last updated on 2025-05-01 | Edit this page
Overview
Questions
- What is an Integrated Development Environment (IDE) and what role does it play in software development?
- What are the common features of IDEs?
- Why is debugging important, and what are the main techniques developers use to debug their code?
- How can you use a debugger in an IDE like Visual Studio Code to find and fix errors in your code?
Objectives
- Define what an Integrated Development Environment (IDE) is and describe its role in the software development process
- Identify common features of IDEs and explain how they support efficient code writing, debugging, and software project management
- Explain the importance of debugging and list common debugging techniques
- Demonstrate how to use a debugger within an IDE like Visual Studio Code
- Recognise the benefits of using an IDE for improving code quality, reducing errors, and accelerating software development
This session provides an introduction to Integrated Development Environments (IDEs), powerful tools for software development. We will explore how various features built into IDEs can streamline your software development workflow, especially through their built-in debugging tools — which allow you to identify and fix issues with your code efficiently.
What is an Integrated Development Environment (IDE)?
An Integrated Development Environment (IDE) is a graphical application that provides a comprehensive workspace for writing, editing, testing, and debugging code—all in one place. At the core of an IDE is a code editor, and it combines several tools that developers need into a single interface to streamline the code development process. IDEs are extremely useful and modern software development would be very hard without them.
Historically, developers typically wrote code using simple text editors, often terminal-based with no graphical interface or syntax checking support. They had to rely on separate tools outside the editor to compile, debug, and manage their code, making development a much more fragmented experience. It is worth noting that popular terminal-based editors such as Emacs and Vim may appear deceptively simple at first glance - but they are, in fact, highly powerful and customisable frameworks for coding and automating development workflows.
Today, although some IDEs are designed for specific programming languages, many modern IDEs can support multiple languages through a wide variety of plugins — often created and maintained by the developer community.
Why use an IDE?
An IDE brings everything you need to write, test, and debug code into one place — saving time by helping you write better code faster. IDEs help by:
- reducing setup and development time - everything you need for editing, running, and debugging code is in one place and the need to switch between different tools/applications/windows is significantly reduced
- offering helpful tools like syntax checking, code suggestions and autocomplete, and error checking leading to fewer errors thanks to real-time feedback and intelligent suggestions
- making it easier to debug and test code leading to easier issue detection and fixing
- providing a consistent environment across projects
For beginners, IDEs lower the barrier to entry by making it easier to spot mistakes and understand code structure. For experienced developers, IDEs boost productivity and streamline complex workflows.
Common IDE Features
Let’s look at what most IDEs offer - these features all work together to make your life easier when coding:
- Code editor with syntax highlighting and automatic code formatting for better readability and consistency
- Intelligent code completion that suggests syntactically correct options as you type to speed up development
- Powerful search tools to quickly locate functions, classes, or variables
- Inline documentation and reference lookup to understand symbol (functions, parameters, classes, fields, and methods) and variables definitions and usage without leaving your code
- Built-in support for running and managing tests through integrated testing frameworks
- Seamless integration with version control systems (like Git) for tracking changes and collaboration
- Debugging tools for setting breakpoints, stepping through code, and inspecting variables during runtime
- An integrated terminal for executing commands directly within the IDE
- A project/file explorer for easy navigation and management of your software project
Some IDEs also offfer:
- Deployment tools to package and release your code efficiently
- Basic project and issue tracking features to support task management
Popular IDEs
Here are a few widely used IDEs across different languages and fields:
- Visual Studio Code (VS Code) – lightweight and highly customisable; supports many languages
- PyCharm – great for Python development
- RStudio – tailored for R programming but allows users to mix (R Markdown) text with code in R, Python, Julia, shell scripts, SQL, Stan, JavaScript, C, C++, Fortran, and others, similar to Jupyter Notebooks.
- Eclipse – often used for Java and other compiled languages
- JupyterLab – interactive environment for Python and data science
- Spyder – popular among scientists using Python
What is Code Debugging?
Now, what happens when your code does not work as expected? That is where code debugging comes in. Debugging means finding, understanding, and fixing errors in your code — which can manifest as unexpected behavior, crashes, or incorrect outputs. Debugging is an essential step in software development, ensuring that your code runs as intended and meets its requirements (and quality standards).
Why Debugging Matters?
Debuggin ensures your code behaves as it should and helps you find the root cause of problems — not just guess - when it does not. Even small mistakes in code can cause unexpected behavior or crashes. Debugging helps with:
- code correctness - to ensure your program works as expected and meets requirements
- error resolution - to help you understand why your code is not performing correctly, allowing you to find and fix issues that make your program behave incorrectly
- improving code quality - regular debugging leads to cleaner, more reliable and performant code and reduces the risk of problems in production
- efficient code development - familiarity with debugging tools and techniques can significantly reduce the time spent on troubleshooting and enhance overall productivity.
Debugging is a normal part of the code development process - it is not just about fixing mistakes — it is about understanding your code better.
Common Debugging Techniques
Let’s be real — everyone’s code breaks sometimes. Debugging is just part of the game. For starters, you can try rubber duck debugging - a technique where you explain your code, line by line, out loud — to a colleague or to an inanimate object like a rubber duck. The idea is that by forcing yourself to verbalise what your code is supposed to do, you slow down and think more clearly about each part, which often helps you spot mistakes or logical errors you might have missed when just reading the code silently.
In addition to talking to a rubber duck (which is surprisingly effective), one of the simplest tricks is adding print statements to your code: just printing out variable values or messages at key points can quickly show you where things start to go wrong.
Logging is another smart move, especially for bigger projects, because it helps you track what your program is doing over time and help diagnose issues that occur in specific runtime conditions. A variant of logging is to use assert statements in your code -
But if you want to level up, using a built-in debugger (like the one in VS Code) is a game-changer — you can set breakpoints, step through your code line by line, and actually see what is happening in real time.
And if you really want to catch problems early, writing tests to check that your code behaves properly can save you from bigger headaches later.
Practical Work
In the rest of this session, we will walk you through how to use a debugger in VS Code, focusing on practical steps and tips to help you find and fix errors more efficiently in your code. It is easier than you think and can really save you time.
- Integrated Development Environments (IDEs) are all-in-one tools for writing, editing, testing, and debugging code, improving developer efficiency by reducing the need to switch between different applications.
- Common IDE features include code editing, syntax highlighting, code completion, version control integration, debugging tools, project navigation, and built-in terminals.
- Debugging is the process of finding and fixing bugs in code to ensure it behaves as intended, improving code quality and reliability.
- Common debugging techniques include adding print statements, using built-in debuggers to set breakpoints and inspect variables, writing tests, and using logging.
- Using an IDE for debugging allows developers to step through their code interactively, making error detection and resolution much faster and more effective.
Content from 1.1 Setup & Prerequisites
Last updated on 2025-04-30 | Edit this page
Overview
Questions
- What prerequiste knowledge is required to follow this topic?
- How to setup your machine to follow this topic?
Objectives
- Understand what prerequiste knowledge is needed before following this topic
- Setup your machine to follow this topic
- Shell with Git version control tool installed and the ability to navigate filesystem and run commands from within a shell
- Python version 3.8 or above installed
- Understanding of Python syntax to be able to read code examples
- Visual Studio Code installed (ideally the latest version)
Setup
Shell with Git
On macOS and Linux, a bash shell will be available by default.
If you do not have a bash shell installed on your system and require assistance with the installation, you can take a look at the instructions provided by Software Carpentry for installing shell and Git.
Python
Python version 3.8 or above is required. Type python -v
at your shell prompt and press enter to see what version of Python is
installed on your system. If you do not have Python installed on your
system and require assistance with the installation, you can take a look
at the
instructions provided by Software Carpentry for installing Python in
preparation for undertaking their Python lesson.
VS Code
The hands-on part of this topic will be conducted using Visual Studio Code (VS Code), a widely used IDE. Please download the appropriate version of Visual Studio Code for your operating system (Windows, macOS, or Linux) and system architecture (e.g., 64-bit, ARM).
Content from 1.2 Getting Started with VSCode
Last updated on 2025-10-24 | Edit this page
Overview
Questions
- How do I access the key features of Microsoft Visual Studio (VS) Code?
- How do I open a software project in VSCode?
- What are VSCode extensions, and how do I use them?
Objectives
- Describe the general layout of the VSCode interface
- Download or clone an existing remote GitHub repository
- Open a code folder in VSCode using the explorer feature
- Install and configure an extension to VSCode that helps with Python code development
Running VSCode
Let’s start by running VSCode now on our machines, so run it now. How you run VSCode will differ depending on which operating system you have installed.
The first thing you’ll likely see is a welcome-style page with links to features for opening files, and creating or opening a project. You may find it asks you which kind of theme you’d like - you can select from either a dark or light theme.
Navigating Around VSCode
So let’s take a look at the application. You’ll see some icons on the left side, which give you access to its key features. Hovering your mouse over each one will show a tooltip that names that feature:
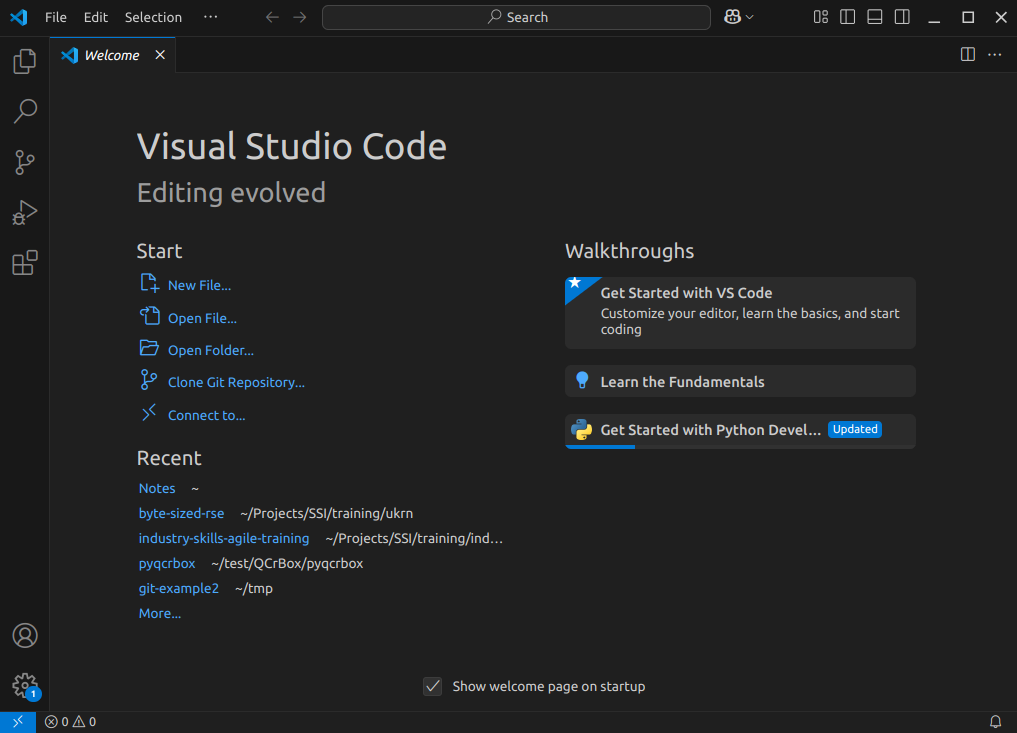
Explorer- the top one is a file navigator, or explorer - we can use this to open existing folders containing program files.Search- the next one down is a search capability, so you can search for things (and replace them with other text) over your code files.-
Source control- this gives you access to source code control, which includes Git version control functionality. This feature means you can do things like clone Git repositories (for example, from GitHub), add and commit files to a repository, things like that.CalloutIf you’re not familiar with Git, that’s totally fine - you don’t have to use this feature, although it’s worth looking into using version control for writing your code. Version control Systems like Git allow you to manage your code by storing it - and all the changes you make to it - within a repository hosted elsewhere, for example, on GitHub.
Run and Debug- this allows you to run programs you write in a special way with a debugger, which allows you to check the state of your program as it is running, which is very useful and we’ll look into later.Extensions- which we’ll look into right now, allows you to install extensions to VSCode to extend its functionality in some way.
There are many other features and ways to access them, and we’ll cover key ones throughout this lesson.
Installing Extensions
Extensions are a major strength of VSCode. Whilst VSCode appears quite lightweight, and presents a simple interface (particularly compared to many other IDEs!), this is quite deceptive. You can extend its functionality in many different ways. For example, installing support for other languages, greater support for version control, there’s even support for working with databases, and so on. There are literally tens of thousands of possible extensions now.
Now VSCode already comes with built-in support for JavaScript, including TypeScript and node.js, but also has extensions for other languages too (C++, C#, Java, PHP, Go, and many others). Installing a language extension will allow you to do more things with that particular language in VSCode, as we’ll see now.
Let’s install an extension now:
- Firstly, select the extensions icon, then type in “Python” into the search box at the top, and it’ll give you a list of all Python-related extensions.
- Select the one which says
Pythonfrom Microsoft. This is the Microsoft official Python extension. - Then select
Install.
It might take a minute - you can see a sliding blue line in the top left to indicate it’s working. Once complete, you should see a couple of “Welcome” windows introducing you to two of its key features - support for Python and Jupyter notebooks. If you use Jupyter notebooks, which is a way of writing Python programs that you can run line by line from within an editor as you write the program, you may find this useful.
For now, let’s configure this extension for our Python development,
and to do that, we need to tell VSCode which Python installation on our
machine we’d like it to use. In the Python Welcome window, select
Select a Python interpreter, and then
Select Python interpreter. You may find you have many
installations of Python, or only have one. Try to select the version
later than 3.8 if you can. Then select Mark done, and close
the Welcome window.
A Sample Project
Next, let’s obtain some example Python and edit it from within
VSCode. First, download the example code we’ll use from https://github.com/UNIVERSE-HPC/code-style-example/releases/tag/v1.0.0,
either as a .zip or .tar.gz compressed archive
file. If you’re unsure, download the .zip file. Then,
extract all the files from the archive into a convenient location. You
should see files contained within a new directory named
code-style-example-1.0.0.
Now we need to load the code into VSCode to see it. You can do this in a couple of ways, either:
- Select the
Source controlicon from the middle of the icons on the left navigation bar. You should see anOpen Folderoption, so select that. - Select the
Fileoption from the top menu bar, and selectOpen Folder....
In either case, you should then be able to use the file browser to
locate the directory with the files you just extracted, and then select
Open. Note that we’re looking for the folder that
contains the files, not a specific file.
What about using Git Version Control?
If your system has the Git version control system installed, you may
see a Clone Repository option here too. If you are familiar
with Git and wish to use this option instead, select it and enter the
repository’s location as
https://github.com/UNIVERSE-HPC/code-style-example. Then
use the file browser that is presented to find a convenient location to
store the cloned code and click on
Select as Repository Destination, then select
Open when ‘Would you like to open the cloned repository?’
popup appears.
You’ll then likely be presented with a window asking whether you trust the authors of this code. In general, it’s a good idea to be at least a little wary, since you’re obtaining code from the internet, so be sure to check your sources! Be careful here - I found on Windows the “Trust” option appears on the left, whilst on Mac, it appears on the right! In this case, feel free to trust the repository! You’ll then see the explorer present you with some files in a small window (or pane) on the left you can use to navigate and find files.
So far within VSCode we have downloaded some code from a repository and opened a folder. Whenever we open a folder in VSCode, this is referred to as a “Workspace” - essentially, a collection of a project’s files and directories. So within this workspace, you’ll see the following:
- A
datafolder, containing a single data file (click on it to see the data file within it). - Two files, a
climate_analysis.pyPython file, and aLICENSE.mdfile
So next, let’s look at editing code.
- Key VSCode features are accessible via the left navigation bar and the menu
- VSCode’s capabilities can be increased by installing extensions
- Language-specific support is available via extensions
- A VSCode “workspace” is a project that consists of a collection of folder and files
- Git source code repositories on GitHub can be cloned locally and opened from within VSCode
Content from 1.3 Using the Code Editor
Last updated on 2025-10-24 | Edit this page
Overview
Questions
- How do I open a source code file in VSCode?
- What editing features will help me when writing code?
Objectives
- Use syntax highlighting to identify code styling issues and common coding mistakes
- Use code completion to automate finishing an incomplete code statement
- Use an extension to help with writing Python docstrings
- Describe how VSCode highlights the status of files managed under version control
Now we’ve acquainted ourselves with running VSCode, let’s take a look
at our example code. Select the climate_analysis.py file in
the explorer window, which will bring up the contents of the file in the
code editor.
The File Explorer has Disappeared!
You may find, perhaps on reopening VSCode, that the explorer is no
longer visible. In this case, you can select Explorer from
the sidebar to bring it back up again, and if you don’t currently have a
workspace loaded, you can select Open Folder to select the
code folder.
Note that as an example, it’s deliberately written to have flaws. Things like the line spacing is inconsistent, there are no code comments, there’s a variable that’s not used, and you may spot other issues too. But in essence, the code is designed to do the following:
- Open a file in the CSV (comma separated value) format
- Go through the file line by line, and:
- If the line begins with a
#symbol, ignore it. - Otherwise, extract the fourth column (which contains temperature in Fahrenheit), convert it to Celsius and Kelvin, and output those readings.
- If the line begins with a
Let’s take a look at some of what the code editor gives us.
Syntax Highlighting
You’ll notice that the Python syntax is being highlighted for us, which helps readability.
Here, it uses colour to distinguish the various parts of our program. Functions are yellow, Python statements are purple, variables are light blue, and strings are this reddy-orange, and so on. Which, perhaps unsurprisingly, is a feature known as Syntax Highlighting, and it’s possible to edit the colour scheme to your liking for a particular language if you like, although we won’t go into that now.
This is really handy to give you immediate feedback on what you are
typing, and can help you to identify common syntax mistakes. For
example, deleting the closing parenthesis on open - the
opening one goes red, with a squiggly line underneath, indicating an
issue.
So this is great, and helps us understand what we are writing, and highlights some mistakes.
Code Completion
Something that’s also useful is VSCode’s ability (via the Python and Pylance extensions) to help you write and format your code whilst you’re typing.
For example, on a blank line somewhere, enter
for x in something:.
On the next line, we can see that it’s automatically indented it for us, knowing that we’re inside a loop.
Another really helpful feature is something known as code completion
(in VSCode, this is referred to as IntelliSense). This is a great time
saver, and a really useful feature of IDEs. Essentially, as you type, it
works out the context of what you are doing, and gives you hints. For
example, if we start typing a variable we’ve already defined, for
example climate_data, we can see that it’s zeroing in as we
type on the options for what we might be trying to type. When we see
climate_data, we can press Tab to complete it
for us. As another example, if we wanted to open another file, we might
type new_file = open(. In this case, it provides
information on the file open function and its arguments,
along with a description of what it does. This is really handy to we
don’t have to take the time to look up all this information up on the
web, for example.
Need a Thing? Install an Extension!
As we just saw, included in the list of issues with our code was the lack of docstrings. If we want to write good code, we should be adding code comments, including docstrings for our functions, methods, and modules.
Let’s try and find an extension that might help us with writing
docstrings. Select the Extensions icon, and type
docstring - you should see an autoDocstring
extension by Nils Werner at the top. Select that, and you’ll see a page
outlining what it is Also note via the number of downloads that it’s
very widely used.
What’s really handy is the little video that shows us what it does
This looks exactly like what we’re after! Select
Install.
Now, when we go to a function for example FahrToCelsius,
go to the next line, and add """, we’ll see a small pop-up
to add a docstring. Press Tab to do so.
It does all the hard work of adding in the structure of a docstring for us, so we just need to fill in the blanks. This is another good example of us realising it would be nice to have something to help us, searching for an extension, and trying it out.
Using a Git Code Repository?
For those of you familiar with version control and who retrieved the example code via cloning its repository instead of downloading it, there are some other editor features that help with using version control. One of these is that the filename changes colours in the file explorer depending on its status within version control:
- White - an existing file is unchanged from the copy in the local repository).
- Orange - the content of an existing file has changed, and the change(s) have not been tracked by version control yet.
- Green - a new file has been added and is unknown to version control.
So at a glance, you can get an idea of what’s changed since your last commit.
Summary
So in summary, many of these editing features are typical of IDEs in general, and the great thing is that they are really helpful at saving us time. Things like syntax highlighting, code completion, automatic code formatting and inserting docstrings, may not seem like much, but it all adds up!
- IDEs typically have a host of features that help save time when writing code
- Syntax highlighting gives you immediate feedback of potential issues as you write code
- Code completion helps to automatically finish incomplete code statements and names
Content from 1.4 Running and Debugging Code
Last updated on 2025-10-24 | Edit this page
Overview
Questions
- How do I run code in VSCode?
- How do I use a debugger to locate the source of a problem in my code?
- How does debugging fit within the broader process of development?
Objectives
- Use VSCode to run a Python script and have any text output displayed within a terminal
- Add a debugging breakpoint to a Python script
- Run a debugger so it pauses program execution at a breakpoint
- Use the debugger to step through our code statement by statement
- Use debugging information to identify the cause of a problem in our code
Running Python in VSCode
Now let’s try running a Python script. First, make sure your Python code doesn’t have any errors! Then, select the “Play”-looking icon at the top right of the code editor.
You should see the program run, and output displayed in a pop-up terminal window at the bottom:
OUTPUT
steve@laptop:~/code-style-example$ /bin/python3 /home/steve/code-style-example/climate_analysis.py
Max temperature in Celsius 14.73888888888889 Kelvin 287.88888888888886
Max temperature in Celsius 14.777777777777779 Kelvin 287.92777777777775
Max temperature in Celsius 14.61111111111111 Kelvin 287.76111111111106
Max temperature in Celsius 13.838888888888887 Kelvin 286.9888888888889
Max temperature in Celsius 15.477777777777778 Kelvin 288.62777777777774
Max temperature in Celsius 14.972222222222225 Kelvin 288.1222222222222
Max temperature in Celsius 14.85 Kelvin 288.0
Max temperature in Celsius 16.33888888888889 Kelvin 289.4888888888889
Max temperature in Celsius 16.261111111111113 Kelvin 289.4111111111111
Max temperature in Celsius 16.33888888888889 Kelvin 289.4888888888889
steve@laptop:~/code-style-example$ Error:
the term conda is not recognised
If you’re running an Anaconda distribution of Python on Windows, if you see this error it means that VSCode is not looking in the right place for Anaconda’s installation. In this case, you may need to configure VSCode accordingly.
VSCode has a sophisticated method to access it’s inner functionality
known as the Command Palette, which we’ll use to address this. Activate
the Command Paletter by pressing Ctrl + Shift
+ P simultaneously, then type
Terminal: Select Default Profile. From the options, select
Command Prompt C:\WINDOWS\..., and hopefully that should
resolve the issue.
The pop-up window is known as the “Console”, and essentially is a
terminal, or command prompt, where the program is run. You’ll notice we
can also type in commands here too. For example in Windows, you could
type dir, on Mac or Linux you could type ls -
to get a listing of files, for example.
We can also close this terminal/console at any time, and start a new
one by selecting Terminal from the menu and selecting
New Terminal. So when we write and run our code, we have
the option of never having to leave VSCode at all for most things.
Debugging Code
Now finally, let’s look at a feature with IDEs which is often overlooked, that of the debugger.
A debugger is a bit like performing exploratory surgery on a patient. You know there’s something wrong, but you don’t know exactly where the problem resides. What’s useful with debuggers is that you go looking within the codebase as it’s actually running to find the source of the problem.
In order to run a debugging session we first need to tell the IDE where we’d like to examine the code. Then you run the code in a special way, using a debugger, and it pauses the execution of the code at that point. You then have the freedom to take a look around and examine the state of variables, which functions have been called up until this point, and so on, and hopefully identify the cause of the issue.
Now, many people when starting out with coding disregard debuggers as complicated and tough to understand. And 30 or 40 years ago, debuggers were indeed quite complicated to set up and use. But these days, debuggers are perhaps a little more straightforward, with IDEs doing a lot of complex stuff for us.
Introducing a Problem
Let’s assume we have a problem with our code - by introducing one. In
our climate_analysis.py code, where it says
if data[0][0] != COMMENT, replace COMMENT with
'!'. We perhaps might assume one of our colleagues
erroneously made this change, but we haven’t spotted it yet. We try to
run the code as before, and now it doesn’t work. We get a
ValueError, which informs us it couldn’t perform a
conversion of a value extracted from the data file to a float as part of
its temperature conversion.
Adding a Debugging Breakpoint
Now we know where the error is occurring but we don’t know the source
of the problem, which may not be in the same place. So let’s add in what
is known as a breakpoint to our code. This is where the
debugger will stop running the code and pause for us Let’s add it at the
start of the for line in climate_data: line. We do that by
clicking in the left margin for that line. By hovering in the margin,
you’ll see a faded red dot appear. Select it on that line and this sets
the breakpoint.
Using the Debugger
Let’s run the code using the debugger. Select the
Run and Debug icon on the left, and select
Run and Debug. Then it will likely ask two questions in
pop-up pane near the top:
- It asks you to
Select debugger, so select the suggestedPython Debugger. - Then it asks you to
Select a debug configuration, so selectPython Fileto debug the current file.
Now the Python script is running in debug mode. You’ll see the execution has paused on the line we entered the breakpoint, which is now highlighted., Some new information is now displayed in various panes on the left of the code editor. In particular:
-
VARIABLES- on the left, we can see a list of variables, and their current state, at this point in the script’s execution, such asCOMMENTandSHIFT, andclimate_data(which is a reference to our open data file). We don’t have many at the moment. It also distinguishes between local variables and global variables - this is to do with the “scope” of the variables, as to how they are accessible from this point in the running of the code. Global variables can be seen from anywhere in the script. And local variables are those that are visible from this point of the program. If we were within a function here, we would see variables that are defined and only used within that function as local variables only. For example, if we set a breakpoint within theFahrToKelvinfunction, we would seekelvinas a local variable, but it wouldn’t be listed as a global variable. -
CALL STACK- this is a record of the journey the script has taken, in terms of functions called, to get to this position in its execution. It shows us that we are at the top level of our script, which makes sense, since our breakpoint is at the top level of script, and not within any function. If it were within theFahrToKelvinfunction, for example, we’d see that added to the call stack. It also shows us the line number where execution has paused at this level of the call stack.
Now, we can also see some new icons at the top to do with debugging:
- The first one is continue, which allows the script to keep running until the next breakpoint.
- The next one allows us to step over - or through - the script one statement at a time.
- The next two allow us to choose to step into or out of a function call, which is interesting.
If we want to examine the inner workings of a function during this debug session, we can do that.
- The green cycle one is to restart the debug process.
- The red cross stops debugging completely.
So let’s step through our code by selecting the second icon and see
what happens. As we do so, we can see the variable state changing. By
looking in the variables section, we can see that the line
variable contains the first line read from the data file. On the next
step, we’ve reached the if statement. If we step again, and
then again, our program halts because it’s run into the problem we saw
before.
This tells us something useful - that the problem occurs in the first
iteration of the loop. So, this implies, the problem might be with the
first line of data being processed, since the Python code is going
through the data file line by line. If we re-run the debugger, we can go
through this process again. And we can see something interesting when we
get to the if statement. From the code, we know that the if
statement is looking for an exclamation mark at the beginning of the
line to indicate a comment. However, the data variable contains a ‘#’ as
the first character instead. Therefore, in this case, the code will
assume it’s a data line and attempt to process it as such. And then it
will fail with the exception we saw before.
Fixing the Issue
So now we’ve identified the problem, we can fix it.
Firstly, stop the debug process by selecting the red square. Then
edit the if line to search for COMMENT
instead, reverting the code to what it was before. We can then rerun the
debugger if we wish, to check our understanding. And as we step through
the code, we can see if correctly identifies the first line as a
comment, and ignores it, continuing to the iteration of the for loop,
and the next line of data. Now we have our solution fixed, we can stop
the debugger again.
We’ve now solved our problem, so we should remove the breakpoint. Running our code again as normal, we can see it now works as expected.
Debugging in Context
Typically, we’d use debugging when we’ve discovered a problem. Other techniques, such as testing, are great at identifying that there are problems, but not always the root cause and location of the actual problem. Debugging is the next step of that process. Sometimes, we discover a problem - perhaps our code testing show us there’s an issue, or maybe we find out some other way. If we’re lucky, we can identify and fix the problem quickly. Where we can’t, debugging is there to help us. With particularly complex programs, it can be very difficult to reason about how they work, and where the problem are, and debugging allows us to pick apart that process, and step by step, help us find the source of those issues.
- Run a script by selecting the “Play” icon in VSCode
- Debugging allows us to pause and inspect the internal state of a program while it is running
- Specify the points a debugger should pause by adding breakpoints to specific lines of code
- When a breakpoint is reached, a debugger typically shows you the current variables and their values and the stack of functions called to reach the current state
- Debuggers typically allow us to: step through the code a statement at a time, step into or out of a function call if we need further debugging information regarding that function, and continue execution until another breakpoint is reached or the end of the program
- Testing is used to identify the existence of a problem, whilst we use debugging to locate the source of a problem
Content from Lesson 2: Code Style, Quality & Linting
Last updated on 2025-05-01 | Edit this page
Overview
Questions
- Why does consistent code style matter in software development?
- What are some common code styling practices and conventions?
- How can poor coding style lead to bugs and maintenance issues?
- What is a linter, and how does it help improve code quality?
Objectives
- Understand why consistent code style is important for collaboration and long-term maintainability.
- Identify key code style practices and how they vary between programming languages.
- Recognise how maintaining good code style can reduce bugs and improve code quality.
- Explain what a linter is and describe its role in detecting errors and enforcing style.
This session introduces the importance of code style and linting in writing clean, consistent, and maintainable code. You will learn how following a defined style guide improves code readability and collaboration, and how automated tools, known as linters, can help identify and fix style issues early in the development process. We will explore common linting tools and how to integrate them into your software development workflow.
Introduction to Code Style
Why Does Code Style Matter?
Software development is inherently a collaborative activity. Even if you do not currently intend for anyone else to read your code, chances are someone will need to in the future — and that person might even be you, months or years later. By following and consistently applying code styling guidelines, you can significantly improve the readability and maintainability of your code. Consistency plays a vital role in this process. Adopting a clear set of style guidelines not only helps you write uniform code but also makes it easier to switch between projects. This is especially important when working as part of a team, where shared understanding and clarity are essential.
Key Code Style Practices & Conventions
Styling practices and conventions play a key role in writing readable and maintainable code, but they can vary significantly between programming languages. These conventions generally cover aspects such as line length, line splitting, the use of white space, naming conventions for variables, functions, and classes, as well as indentation and commenting styles (where not enforced by the language itself).
It is important to note that programmers often have strong and differing opinions about what constitutes good style. For example, many style guides recommend a maximum line length of 80 characters, a convention that dates back to older hardware and terminal limitations. While some developers continue to find this helpful for readability and side-by-side editing, others argue that it feels unnecessarily restrictive on modern screens. Despite these differences, adopting and adhering to a consistent style within a project helps ensure clarity and makes collaboration smoother.
There are many established code style guides tailored to specific programming languages, such as:
- PEP8 and Google Style Guide for Python
- Google C++ Style Guide and C++ Core Guidelines for C++
- Airbnb JavaScript Style Guide and Google JavaScript Style Guide and JavaScript Standard Style for JavaScript
- Go Style Guide and Go Styleguide for Go.
Maintaining Code Quality to Reduce Bugs
Poor coding style can lead to bugs and maintenance issues because it makes code harder to read, understand, and debug. Inconsistent naming, unclear structure, and sloppy formatting can cause confusion about what the code is doing, making it easier to introduce mistakes. Many things that seem harmless and do not cause immediate syntax errors while writing code can produce logic errors, wrong results and lead to issues later on - making them especially tricky to detect and fix. Small issues like unused variables, accidental redefinitions, or incorrect scoping can go unnoticed and later cause unexpected behavior or subtle logic errors. Over time, this makes the codebase more fragile, harder to maintain, and much more difficult for others — or even your future self — to fix or extend.
Some examples of small oversights that stack up over time include:
- defining variables or importing modules or headers that that are never used can clutter the code
- using vague variable names like
dataeverywhere can make it unclear whichdatayou are actually handling, causing mistakes - bad indentation can cause logic errors — like running a block of code when you did not intend to
- variable scoping problems (e.g. reusing the same variable name in different scopes can lead to shadowing, where a local variable hides a global or outer-scope variable, resulting in unexpected values being used.
Introduction to Linters
What is a Linter and Why Use One?
A linter is a tool that performs static analysis on your code — meaning it examines the source code without running it — to detect potential errors, stylistic issues, and code patterns that might cause bugs in the future. The term originates from a 1970s tool for the C programming language called “lint”.
Linters help catch errors early and enforce consistent code style, making your code more reliable, readable, and easier to maintain. They are especially useful for improving code quality and streamlining collaboration in teams.
Practical Work
In the rest of this session, we will walk you through how to use a linting tool.
The use of linting tools is often automated through integration with Continuous Integration (CI) pipelines or pre-commit hooks available in version controlled code repositories, helping to streamline the development process and ensure code quality consistently on each commit. This is covered in a separate session.
Content from 2.1 Setup & Prerequisites
Last updated on 2025-04-30 | Edit this page
Overview
Questions
- What prerequiste knowledge is required to follow this topic?
- How to setup your machine to follow this topic?
Objectives
- Understand what prerequiste knowledge is needed before following this topic
- Setup your machine to follow this topic
- Shell with Git version control tool installed and the ability to navigate filesystem and run commands from within a shell
- Python version 3.8 or above installed
- Understanding of Python syntax to be able to read code examples
- Pip Python package installer
- Visual Studio Code installed (ideally the latest version)
Setup
Shell with Git
On macOS and Linux, a bash shell will be available by default.
If you do not have a bash shell installed on your system and require assistance with the installation, you can take a look at the instructions provided by Software Carpentry for installing shell and Git.
Python
Python version 3.8 or above is required. Type python -v
at your shell prompt and press enter to see what version of Python is
installed on your system. If you do not have Python installed on your
system and require assistance with the installation, you can take a look
at the
instructions provided by Software Carpentry for installing Python in
preparation for undertaking their Python lesson.
Pip
Pip Python package should come together with your Python
distribution. Try typing pip at the command line and you
should see some usage instructions for the command appear if it is
installed.
VS Code
The hands-on part of this topic will be conducted using Visual Studio Code (VS Code), a widely used IDE. Please download the appropriate version of Visual Studio Code for your operating system (Windows, macOS, or Linux) and system architecture (e.g., 64-bit, ARM).
Content from 2.2 Some Example Code
Last updated on 2025-10-24 | Edit this page
Overview
Questions
- Why should I write readable code?
- What is a “code smell”?
Objectives
- Obtain and run example code used for this lesson
- List the benefits of writing readable code
- Describe the key indicators of a “bad code smell”
Obtaining Example Code
For this lesson we’ll be using some example code available on GitHub, which we’ll clone onto our machines using the Bash shell. So firstly open a Bash shell (via Git Bash in Windows or Terminal on a Mac). Then, on the command line, navigate to where you’d like the example code to reside, and use Git to clone it. For example, to clone the repository in our home directory, and change our directory to the repository contents:
Examining the Code
Next, let’s take a look at the code, which is in the root directory
of the repository in a file called climate_analysis.py.
PYTHON
import string


shift = 3
comment = '#'
climate_data = open('data/sc_climate_data_10.csv', 'r')

def FahrToCelsius(fahr):
    celsius = ((fahr - 32) * (5/9))
    return celsius
def FahrToKelvin(fahr):
    kelvin = FahrToCelsius(fahr) + 273.15
    return kelvin


for line in climate_data:
    data = line.split(',')
    if data[0][0] != comment:
        fahr = float(data[3])
        celsius = FahrToCelsius(fahr)
        kelvin = FahrToKelvin(fahr)
        print('Max temperature in Celsius', celsius, 'Kelvin', kelvin)
The code is designed to process temperature data from a separate data file. The code reads in data line by line from the data file, and prints out fahrenheit temperatures in both celsius and kelvin.
The code expects to find the data file
sc_climate_data_10.csv (formatted in the Comma Separated
Value CSV format) in the data directory, and looks like
this:
# POINT_X,POINT_Y,Min_temp_Jul_F,Max_temp_jul_F,Rainfall_jul_inch
461196.8188,1198890.052,47.77,58.53,0.76
436196.8188,1191890.052,47.93,58.60,0.83
445196.8188,1168890.052,47.93,58.30,0.74
450196.8188,1144890.052,48.97,56.91,0.66
329196.8188,1034890.052,49.26,59.86,0.78
359196.8188,1017890.052,49.39,58.95,0.70
338196.8188,1011890.052,49.28,58.73,0.74
321196.8188,981890.0521,48.20,61.41,0.72
296196.8188,974890.0521,48.07,61.27,0.78
299196.8188,972890.0521,48.07,61.41,0.78
It contains a number of lines, each containing a number of values, each separated by a comma. There’s also a comment line at the top, to tell us what each column represents.
Now let’s take a look at the Python code, using any text or code
editor you like to open the file. You can also use nano if
you’d prefer to use the command line, e.g.
The code opens the data file, and also defines some functions to do two temperature conversions from Fahrenheit to Celsius and Fahrenheit to Kelvin. Note that for the purposes of this lesson, the code is deliberately written to contain some issues!
Why Write Readable Code?
Readable Code
As a group, answer the following questions:
- Who has seen or used code that looks like this?
- Who has written code like this?
No one writes great code that’s readable, well formatted, and well designed all the time. Sometimes you often need to explore ideas with code to understand how the code should be designed, and this typically involves trying things out first. But… the key is that once you understand how to do something, it’s a good idea to make sure it’s readable and understandable by other people, which may include a future version of yourself, 6 months into the future. So it’s really helpful to end up with good clean code so yit’s easier to understand.
Another key benefit to writing “cleaner” code is that its generally easier to extend and otherwise modify in the future. When code is initially written it’s often impossible to tell if it will be reused in some way elsewhere. A familiar scenario is that you stop developing a piece of code for a while, and put it to one side. Maybe it’s not needed any more, or perhaps a project has finished. You forget about it, until suddenly, there’s a need to use the code again. Maybe all of it needs to be reused in another project, or maybe just a part of it. However, you come back to your code, and it’s a mess you can’t understand. But by spending a little time now to write good code while you understand it, you can save yourself (and possibly others) a lot of time later!
Does my Code Smell?
Developers sometimes talk about “code smells”. Code smells are cursory indications from looking at the source code that a piece of code may have some deeper issues. And looking at this code, it smells pretty terrible. For example, we can see that there is inconsistent spacing, with lines bunched together in some places, and very spread out in others. This doesn’t engender a great deal of confidence that the code will work as we expect, and it raises the question that if the style of the code appears rushed, what else has been rushed? How about the design of the code? Something to bear in mind when writing code!
Running the Example Code
Now despite the issues with the code, does it work? Let’s find out. Within the shell, in the root directory of the repository, run the code as follows:
OUTPUT
Max temperature in Celsius 14.73888888888889 Kelvin 287.88888888888886
Max temperature in Celsius 14.777777777777779 Kelvin 287.92777777777775
Max temperature in Celsius 14.61111111111111 Kelvin 287.76111111111106
Max temperature in Celsius 13.838888888888887 Kelvin 286.9888888888889
Max temperature in Celsius 15.477777777777778 Kelvin 288.62777777777774
Max temperature in Celsius 14.972222222222225 Kelvin 288.1222222222222
Max temperature in Celsius 14.85 Kelvin 288.0
Max temperature in Celsius 16.33888888888889 Kelvin 289.4888888888889
Max temperature in Celsius 16.261111111111113 Kelvin 289.4111111111111
Max temperature in Celsius 16.33888888888889 Kelvin 289.4888888888889
And we can see that the code does indeed appear to work, with Celsius and Kelvin values being printed to the terminal. But how can we improve its readability? We’ll use a special tool, called a code linter, to help us identify these sorts of issues with the code.
- No one writes readable, well designed and well formatted code all the time
- Writing clear and readable code helps others - as well as yourself in the future - to understand, modify and extend your code more easily
- A code smell is a cursory indication that a piece of code may have underlying issues
Content from 2.3 Analysing Code using a Linter
Last updated on 2025-10-23 | Edit this page
Overview
Questions
- What tools can help with maintaining a consistent code style?
- How can I keep dependencies between different code projects separate?
- How can we automate code style checking?
Objectives
- Use Pylint to verify a program’s adherence to an established Python coding style convention
- Describe the benefits of a virtual environment
- Create and use a virtual environment to manage Python dependencies separately for our example code
- Install the Pylint static code analysis tool as a VSCode extension
- Use the Pylint extension to identify deeper potential issues and errors
- List the various types of issue messages that are output from Pylint
- Fix an issue identified by Pylint and re-run Pylint to ensure it is resolved
Installing a Code Linter
The first thing we need to do is install Pylint, a very well established tool for statically analysing Python code.
Now fortunately, Pylint can be installed as a Python package, and we’re going to create what’s known as a virtual environment to hold this installation of Pylint.
Installing Python Packages
Who has installed a Python package before, using the program
pip? Who has created and used a Python virtual environment
before?
Benefits of Virtual Environments
Virtual environments are an indispensible tool for managing package dependencies across multiple projects, and could be a whole topic itself. In the case of Python, the idea is that instead of installing Python packages at the level of our machine’s Python installation, which we could do, we’re going to install them within their own “container”, which is separate to the machine’s Python installation. Then we’ll run our Python code only using packages within that virtual environment.
There are a number of key benefits to using virtual environments:
- It creates a clear separation between the packages we use for this project, and the packages we use other projects.
- We don’t end up with a machine’s Python installation containing a clutter of a thousand different packages, where determining which packages are used for which project often becomes very time consuming and prone to error.
- Since we are sure what our code actually needs as dependencies, it becomes much easier for someone else (which could be a future version of ourselves) to know what these dependencies are and install them to use our code.
- Virtual environments are not limited to Python; for example there are similar tools for available for Ruby, Java and JavaScript.
Setting up a Virtual Environment
Let’s now create a Python virtual environment and make use of it. Make sure you’re in the root directory of the repository, then type
Here, we’re using the built-on Python venv module -
short for virtual environment - to create a virtual environment
directory called “venv”. We could have called the directory anything,
but naming it venv (or .venv) is a common
convention, as is creating it within the repository root directory. This
makes sure the virtual environment is closely associated with this
project, and not easily confused with another.
Once created, we can activate it so it’s the one in use:
BASH
[Linux] source venv/bin/activate
[Mac] source venv/bin/activate
[Windows] source venv/Scripts/activate
You should notice the prompt changes to reflect that the virtual environment is active, which is a handy reminder. For example:
OUTPUT
(venv) $Now it’s created, let’s take a look at what’s in this virtual environment at this point.
OUTPUT
Package    Version
---------- -------
pip        22.0.2
setuptools 59.6.0
We can see this is essentially empty, aside from some default packages that are always installed. Note that whilst within this virtual environment, we no longer have access to any globally installed Python packages.
Installing Pylint into our Virtual Environment
The next thing we can do is install any packages needed for this codebase. As it turns out, there isn’t any needed for the code itself, but we wish to use pylint, and that’s a python package.
What is Pylint?
Pylint is a tool that can be run from the command line or via IDEs like VSCode, which can help our code in many ways:
- Ensure consistent code style : whilst in-IDE context-sensitive highlighting such as that provided by VSCode, it helps us stay consistent with established code style standards such as (PEP 8) as we write code by highlighting infractions.
- Perform basic error detection: Pylint can look for certain Python type errors.
- Check variable naming conventions: Pylint often goes beyond PEP 8 to include other common conventions, such as naming variables outside of functions in upper case.
- Customisation: you can specify which errors and conventions you wish to check for, and those you wish to ignore.
So we can install pylint library into our virtual
environment as:
Now if we check the packages, we see:
OUTPUT
Package           Version
----------------- -------
astroid           3.3.9
dill              0.3.9
isort             6.0.1
mccabe            0.7.0
pip               22.0.2
platformdirs      4.3.7
pylint            3.3.6
setuptools        59.6.0
tomli             2.2.1
tomlkit           0.13.2
typing_extensions 4.13.1
So in addition to Pylint, we see a number of other dependent packages installed that are required by it.
We can also deactivate our virtual environment:
You should see the “(venv)” prefix disappear, indicating we have returned to our global Python environment. Let’s reactivate it since we’ll need it to use pylint.
Analysing our Code using a Linter
Let’s point Pylint at our code and see what it reports:
We run this, and it gives us a report containing issues it has found with the code, and also an overall score.
OUTPUT
************* Module climate_analysis
climate_analysis.py:9:35: C0303: Trailing whitespace (trailing-whitespace)
climate_analysis.py:9:0: C0325: Unnecessary parens after '=' keyword (superfluous-parens)
climate_analysis.py:1:0: C0114: Missing module docstring (missing-module-docstring)
climate_analysis.py:4:0: C0103: Constant name "shift" doesn't conform to UPPER_CASE naming style (invalid-name)
climate_analysis.py:5:0: C0103: Constant name "comment" doesn't conform to UPPER_CASE naming style (invalid-name)
climate_analysis.py:6:15: W1514: Using open without explicitly specifying an encoding (unspecified-encoding)
climate_analysis.py:8:0: C0116: Missing function or method docstring (missing-function-docstring)
climate_analysis.py:8:0: C0103: Function name "FahrToCelsius" doesn't conform to snake_case naming style (invalid-name)
climate_analysis.py:8:18: W0621: Redefining name 'fahr' from outer scope (line 20) (redefined-outer-name)
climate_analysis.py:9:4: W0621: Redefining name 'celsius' from outer scope (line 21) (redefined-outer-name)
climate_analysis.py:11:0: C0116: Missing function or method docstring (missing-function-docstring)
climate_analysis.py:11:0: C0103: Function name "FahrToKelvin" doesn't conform to snake_case naming style (invalid-name)
climate_analysis.py:11:17: W0621: Redefining name 'fahr' from outer scope (line 20) (redefined-outer-name)
climate_analysis.py:12:4: W0621: Redefining name 'kelvin' from outer scope (line 22) (redefined-outer-name)
climate_analysis.py:6:15: R1732: Consider using 'with' for resource-allocating operations (consider-using-with)
climate_analysis.py:1:0: W0611: Unused import string (unused-import)
------------------------------------------------------------------
Your code has been rated at 0.59/10 (previous run: 0.59/10, +0.00)For each issue, it tells us:
- The filename
- The line number and text column the problem occurred
- An issue identifier (what type of issue it is)
- Some text describing this type of error (as well as a shortened form of the error type)
You’ll notice there’s also a score at the bottom, out of 10. Essentially, for every infraction, it deducts from an ideal score of 10. Note that it is perfectly possible to get a negative score, since it just keeps deducting from 10! But we can see here that our score appears very low - 0.59/10, and if we were to now resolve each of these issues in turn, we should get a perfect score.
Identifying and Fixing an Issue
We can also ask for more information on an issue identifier. For example, we can see at line 9, near column 35, there is a trailing whitespace
OUTPUT
:trailing-whitespace (C0303): *Trailing whitespace*
Used when there is whitespace between the end of a line and the newline. This
message belongs to the format checker.Which is helpful if we need clarification on a particular message.
If we now edit the file, and go to line 9, column 35, we can see that there is an unnecessary space.
Let’s fix this issue now by removing the space, save the changed file, and then re-run pylint on it.
OUTPUT
------------------------------------------------------------------
Your code has been rated at 1.18/10 (previous run: 0.59/10, +0.59)And we see that the C0303 issue has disappeared and our
score has gone up! Note that it also gives us a comparison against our
last score.
As a gentle warning: it can get quite addictive to keep increasing your score, which might well be the point!
So looking at the issue identifiers, e.g. C0303, what do
the C, W, R prefix symbols
mean?
At the end, we can see a breakdown of what they mean:
-
Iis for informational messages -
Cis for a programming standards violation. Part of the code is not conforming to the normally accepted conventions of writing good code (e.g. things like variable or function naming) -
Rfor a need to refactor, due to a “bad code smell” -
Wfor warning - something that isn’t critical should be resolved -
Efor error - so pylint think’s it’s spotted a bug (useful, but don’t depend on this to find errors!) -
Ffor a fatal pylint error
So if we run it again on our code:
OUTPUT
************* Module climate_analysis
climate_analysis.py:9:0: C0325: Unnecessary parens after '=' keyword (superfluous-parens)
climate_analysis.py:1:0: C0114: Missing module docstring (missing-module-docstring)
climate_analysis.py:4:0: C0103: Constant name "shift" doesn't conform to UPPER_CASE naming style (invalid-name)
climate_analysis.py:5:0: C0103: Constant name "comment" doesn't conform to UPPER_CASE naming style (invalid-name)
climate_analysis.py:6:15: W1514: Using open without explicitly specifying an encoding (unspecified-encoding)
climate_analysis.py:8:0: C0116: Missing function or method docstring (missing-function-docstring)
climate_analysis.py:8:0: C0103: Function name "FahrToCelsius" doesn't conform to snake_case naming style (invalid-name)
climate_analysis.py:8:18: W0621: Redefining name 'fahr' from outer scope (line 20) (redefined-outer-name)
climate_analysis.py:9:4: W0621: Redefining name 'celsius' from outer scope (line 21) (redefined-outer-name)
climate_analysis.py:11:0: C0116: Missing function or method docstring (missing-function-docstring)
climate_analysis.py:11:0: C0103: Function name "FahrToKelvin" doesn't conform to snake_case naming style (invalid-name)
climate_analysis.py:11:17: W0621: Redefining name 'fahr' from outer scope (line 20) (redefined-outer-name)
climate_analysis.py:12:4: W0621: Redefining name 'kelvin' from outer scope (line 22) (redefined-outer-name)
climate_analysis.py:6:15: R1732: Consider using 'with' for resource-allocating operations (consider-using-with)
climate_analysis.py:1:0: W0611: Unused import string (unused-import)
------------------------------------------------------------------
Your code has been rated at 1.18/10 (previous run: 1.18/10, +0.00)We can see that most of our issues are do to with coding conventions.
- Virtual environments help us maintain dependencies between different code projects separately, avoiding confusion between which dependencies are strictly required for a given project
- One method to create a Python virtual environment is to use
python -m venv venvto generate a virtual environment in the current directory calledvenv - Code linters such as Pylint help to analyse and identify deeper issues with our code, including potential run-time errors
- Pylint outputs issues of different types, including informational messages, programming standards violations, warnings, and errors
- Pylint outputs an overall score for our code based on deductions from a perfect score of 10
Content from 2.4 Advanced Linting Features
Last updated on 2025-10-23 | Edit this page
Overview
Questions
- What can I do to increase the detail of Pylint reports?
- How can I reduce unwanted messages from Pylint?
- How can I use static code analysis tools within VSCode?
Objectives
- Use Pylint to produce a verbose report showing number of occurrences of encountered message types
- Fix an issue within our code to increase our Pylint score
- Specify message types to Pylint that we don’t want reported
- Install a Pylint extension into VSCode
More Verbose Reporting
We can also obtain a more verbose report by adding
--reports y to the command, which gives us a lot more
detail:
Here’s a part of that output:
OUTPUT
...
Messages
--------
+---------------------------+------------+
|message id |occurrences |
+===========================+============+
|redefined-outer-name |4 |
+---------------------------+------------+
|invalid-name |4 |
+---------------------------+------------+
|missing-function-docstring |2 |
+---------------------------+------------+
|unused-import |1 |
+---------------------------+------------+
|unspecified-encoding |1 |
+---------------------------+------------+
|superfluous-parens |1 |
+---------------------------+------------+
|missing-module-docstring |1 |
+---------------------------+------------+
|consider-using-with |1 |
+---------------------------+------------+
...It gives you some overall statistics, plus comparisons with the last time you ran it, on aspects such as:
- How many modules, classes, methods and functions were looked at
- Raw metrics (which we’ll look at in a minute)
- Extent of code duplication (none, which is good)
- Number of messages by category (again, we can see that it’s mainly convention issues)
- A sorted count of the messages we received
Looking at raw metrics, we can see that it breaks down our program into how many lines are code lines, Python docstrings, standalone comments, and empty lines. This is very useful, since it gives us an idea of how well commented our code is. In this case - not very well commented at all! For normal comments, the usually accepted wisdom is to add them to explain why you are doing something, or perhaps to explain how necessarily complex code works, but not to explain the obvious, since clearly written code should do that itself.
Increasing our Pylint Score - Adding a Docstring
Docstrings
Who’s familiar with Python docstrings?
Docstrings are a special kind of comment for a function, that explain what the function does, the parameters it expects, and what is returned. You can also write docstrings for classes, methods, and modules, but you should usually aim to add docstring comments to your code wherever you can, particularly for critical or complex functions.
Let’s add one to our code now, within the
fahr_to_celsius function.
PYTHON
"""Convert fahrenheit to Celsius.
:param fahr: temperature in Fahrenheit
:returns: temperature in Celsius
"""Re-run pylint command - can see we have one less
docstring error, and a slightly higher score.
If you’d like to know more about docstrings and commenting, there’s an in-depth RealPython tutorial on these and the different ways you can format them.
Ignoring Issues
We can instruct pylint to ignore any particular types of issues, which is useful if they are not seen as important or pedantic, or we need to see other types more clearly. For example, to ignore any unused imports:
Or, to disable all issues of type “warning”:
This can be particularly useful if we wish to ignore particularly pedantic rules, such as long line lengths over 100 characters.
Challenge
Edit the climate_analysis.py file and add in a comment
line that exceeds 100 characters. Then re-run pylint and determine the
issue identifier for this message, and re-run pylint again disabling
this specific issue.
OUTPUT
************* Module climate_analysis
climate_analysis.py:3:0: C0301: Line too long (111/100) (line-too-long)
climate_analysis.py:17:0: C0325: Unnecessary parens after '=' keyword (superfluous-parens)
climate_analysis.py:1:0: C0114: Missing module docstring (missing-module-docstring)
...We can see that the identifier is C0301, so:
However, if we wanted to ignore this issue for the foreseeable future, typing this in every time would be tiresome. Fortunately we can specify a configuration file to pylint which specifies how we want to interpret issues.
We do this by first using pylint to generate a default
.pylintrc file. It directs this as output to the shell, so
we need to redirect it to a file to capture it. Ensure you are in the
repository root directory, then:
If you edit this generated file you’ll notice there are many things
we can specify to pylint. For now, look for disable= and
add C0301 to the list of ignored issues already present
that are separated by commas, e.g.:
# no Warning level messages displayed, use "--disable=all --enable=classes
# --disable=W".
disable=C0301,
raw-checker-failed,
bad-inline-option,
locally-disabled,
file-ignored,
suppressed-message,
useless-suppression,
deprecated-pragma,
use-implicit-booleaness-not-comparison-to-string,
use-implicit-booleaness-not-comparison-to-zero,
use-symbolic-message-insteadEvery time you re-run it now, the C0301 issue will not
be present.
Using Pylint within VSCode
The good news is that if you’re using the VSCode IDE, we can also (or
alternatively) install a Python linter in VSCode to give us this code
analysis functionality, by installing the Pylint extension. Select the
Extensions icon and this time search for
Pylint, the one by Microsoft, and click
Install.
Going back to our code you should now find lots of squiggly underlines of various colours.
I don’t see any Squiggly Underlines!!
If you happen to not see any squiggly underlines in the editor, it
could be the linter extension hasn’t looked at your code yet. In order
to trigger the linter to show us further issues, try saving the file to
trigger the linter to do this. So go to File then
Save on the menu bar, and you should now see a lot of
squiggly underlines in the code.
These squiggly lines indicate an issue, and by hovering over them, we
can see details of the issue. For example, by hovering over the
variables shift or comment - we can see that
the variable names don’t conform to what’s known as an
UPPER_CASE naming convention. Simply, the linter has
identified these variables as constants, and typically, these are in
upper case. We should rename them, e.g. SHIFT and
COMMENT. But following this, we also need to update the
reference to comment in the code so it’s also upper case.
Now if we save the file selecting File then
Save, we should see the linter rerun, and those highlighted
issues disappear.
We can also see a comprehensive list of all the issues found, by
opening a code Problems window. In the menu, go to
View then Problems, and then you’ll see a
complete list of issues which we can work on displayed in the pane at
the bottom of the code editor. We don’t have to address them, of course,
but by following them we bring our code style closer to a commonly
accepted and consistent form of Python.
Summary
Code linters like pylint help us to identify problems in our code, such as code styling issues and potential errors, and importantly, if we work in a team of developers such tools help us keep our code style consistent. Attempting to understand a code base which employs a variety of coding styles (perhaps even in the same source file) can be remarkably difficult.
But there are some aspects we should be careful of when using linters and interpreting their results:
- They don’t tell us that the code actually works and they don’t tell us if the results our code produces are actually correct, so we still need to test our code.
- They don’t give us any Idea of whether it’s a good implementation, and that the technical choices are good ones. For example, this code contains functions to conduct temperature conversions, but it turns out there’s a number of well-maintained Python packages that do this (e.g. pytemperature)so we should be using a tried and tested package instead of reinventing the wheel.
- They also don’t tell us if the implementation is actually fit for purpose. Even if the code is a good implementation, and it works as expected, is it actually solving the intended problem?
- They also don’t tell us anything about the data the program uses which may have its own problems.
- A high score or zero warnings may give us false confidence. Just because we have reached a 10.00 score, doesn’t mean the code is actually good code, just that it’s likely well formatted and hopefully easier to read and understand.
So we have to be a bit careful. These are all valid, high-level questions to ask while you’re writing code, both as a team, and also individually. In the fog of development, it can be surprisingly easy to lose track of what’s actually being implemented and how it’s being implemented. A good idea is to revisit these questions regularly, to be sure you can answer them!
However, whilst taking these shortcomings into account, linters are a very low effort way to help us improve our code and keep it consistent.
- Use the
--reports yargument on the command line to Pylint to provide verbose reports - Instruct Pylint to ignore messages on the command line using the
--disable=argument followed by comman-separated list of message identifiers - Use
pylint --generate-rcfile > .pylintrcto generate a pre-populated configuration file for Pylint to edit to customise Pylint’s behaviour when run within a particular directory - Pylint can be run on the command line or used within VSCode
- Using Pylint helps us keep our code consistent, particularly across teams
- Don’t use Pylint feedback and scores as the only means to judge code quality
Content from Lesson 3: Intermediate Git
Last updated on 2025-05-29 | Edit this page
Overview
Questions
- What is a Git branch and why is it useful in collaborative development?
- When should I create a new branch in my project?
- What are the differences between fast-forward merge, 3-way merge, rebase, and squash and merge?
- How does Git handle merging when branches have diverged?
Objectives
- Understand the purpose and benefits of using Git branches, especially the feature branch workflow in collaborative projects.
- Compare Git merging strategies (fast-forward, 3-way merge, rebase, squash and merge) and understand when to use each.
- Gain familiarity with intermediate Git features, including cherry-picking, stashing, and resetting.
Basic Git training usually covers the essential concepts, such as adding files, committing changes, viewing commit history, and checking out or reverting to earlier versions. But for RSEs working in collaborative, code-intensive projects, that is just the tip of the iceberg. More detailed topics like branching and merging strategies, and understanding merge conflicts are critical for managing code across teams and maintaining clean, reproducible development workflows.
In this session we will explore branching and feature branch workflow, a popular method for collaborative development using Git, along with some intermediate Git features (merging, rebasing, cherry-picking) and handling merge conflicts that can help streamline your development workflow and avoid common pitfalls in collaborative software development.
Introduction to Feature Branch Workflow
Git Branches
You might be used to committing code directly, but not sure what
branches really are or why they matter? When you start a new Git
repository and begin committing, all changes go into a branch — by
default, this is usually called main (or
master in older repositories). The name main
is just a convention — a Git repository’s default branch can technically
be named anything.
Why not just always use main branch? While it is
possible to always commit to main, it is not ideal when
you’re collaborating with others, you are working on new features or
want to experiment with your code, and you want to keep main clean and
stable for your users and collaborators.
Feature Branch
Creating a separate branch (often called a “feature” branch) allows you to add or test code (containing a new “feature”) without affecting the main line of development, work in parallel with collagues without worrying that your code may break something for the rest of the team and review and merge changes safely after testing using pull/merge requests.
How do you decide when to use a new branch? You should consider starting a new branch whenever you are working on a distinct feature or fixing a specific bug. This allows you to collect a related set of commits in one place, without interfering with other parts of the project.
Branching helps separate concerns in your codebase, making development, testing, and code review much easier. It also reduces the chance of conflicts during collaborative work, especially when multiple people are contributing to the same repository.
This approach is known as the feature branch workflow. In this model, each new feature or fix lives in its own branch. Once the work is complete and has been tested, the branch is reviewed by project collaborators (other than the code author), any merge conflicts addressed and the new work merged back into the main branch. Using feature branches is an efficient way to manage changes, collaborate effectively, and keep the main branch stable and production-ready.
Introduction to Merging Strategies
Merging
When you are ready to bring the changes from your feature branch back into the main branch, Git offers you to do a merge - a process that unifies work done in 2 separate branches. Git will take two (or more - you can merge more branches at the same time) commit pointers and attempt to find a common base commit between them. Git has several different methods of finding the base commit - these methods are called “merge strategies”. Once Git finds the common base commit it will create a new “merge commit” that combines the changes of the specified merge commits. Technically, a merge commit is a regular commit which just happens to have two parent commits.
Each merge strategy is suited for a different scenario. The choice of strategy depends on the complexity of changes and the desired outcome. Let’s have a look at the most commonly used merge strategies.
Fast Forward Merge
A fast-forward merge occurs when the main branch has not diverged from the feature branch - meaning there are no new commits on the main branch since the feature branch was created.
A - B - C [main]
\
D - E [feature]In this case, Git simply moves the main branch pointer to the latest commit in the feature branch. This strategy is simple and keeps the commit history linear - i.e. the history is one straight line.
After a fast forward merge:
A - B - C - D - E [main][feature]3-Way Merge with Merge Commit
A fast-forward merge is not possible if the main and the feature branches have diverged.
A - B - C - F [main]
\
D - E [feature]If you try to merge your feature branch changes into the main branch and other changes have been made to main - regardless of whether these changes create a conflict or not - Git will try to do a 3-way merge and generate a merge commit.
A merge commit is a dedicated special commit that records the combined changes from both branches and has two parent commits, preserving the history of both lines of development. The name “3-way merge” comes from the fact that Git uses three commits to generate the merge commit - the two branch tips and their common ancestor to reconstruct the changes that are to be merged.
A - B - C - F - "MergeCommitG" [main]
\ /
D - E [feature]In addition, if the two branches you are trying to merge both changed the same part of the same file, Git will not be able to figure out which version to use and merge automatically. When such a situation occurs, it stops right before the merge commit so that you can resolve the conflicts manually before continuing.
Rebase & Merge
In Git, there is another way to integrate changes from one branch into another: the rebase.
Let’s go back to an earlier example from the 3-way merge, where main and feature branches have diverged with subsequent commits made on each (so fast-forward merging strategy is not an option).
A - B - C - F [main]
\
D - E [feature]When you rebase the feature branch with the main branch, Git replays each commit from the feature branch on top of all the commits from the main branch in order. This results in a cleaner, linear history that looks as if the feature branch was started from the latest commit on main.
So, all the changes introduced on feature branch (commits D and E) are reapplied on top of commit F - becoming D’ and E’. Note that D’ and E’ are rebased commits, which are actually new commits with different SHAs but the same modifications as commits D and E.
A - B - C - F [main]
\
D' - E' [feature]At this point, you can go back to the main branch and do a fast-forward merge with feature branch.
Fast forward merge strategy is best used when you have a short-lived feature branch that needs to be merged back into the main branch, and no other changes have been made to the main branch in the meantime.
Rebase is ideal for feature branches that have fallen behind the main development line and need updating. It is particularly useful before merging long-running feature branches to ensure they apply cleanly on top of the main branch. Rebasing maintains a linear history and avoids merge commits (like fast forwarding), making it look as if changes were made sequentially and as if you created your feature branch from a different point in the repository’s history. A disadvantage is that it rewrites commit history, which can be problematic for shared branches as it requires force pushing.
Here is a little comparison of the three merge strategies we have covered so far.
| Fast Forward | Rebasing | 3-Way Merge |
|---|---|---|
| Maintains linear history | Maintains linear history | Non-linear history (commit with 2 parents) |
| No new commits on main | New commits on main | New commits on main |
| Avoids merge commits | Avoids merge commits | Uses merge commits |
| Only works if there are no new commits on the main branch | Works for diverging branches | Works for diverging branches |
| Does not rewrite commit history | Rewrites commit history | Does not rewrite commit history |
Squash & Merge
Squash and merge squashes all the commits from a feature branch into a single commit before merging into the main branch. This strategy simplifies the commit history, making it easier to follow. This strategy is ideal for merging feature branches with numerous small commits, resulting in a cleaner main branch history.
Handy Git Features for Managing Local Changes
As your projects grow, you will occasionally need to manage your local code history more precisely. Git offers a few useful features to help you do just that — especially when you are not quite ready to commit or want to isolate specific changes.
Git Stash: Setting Changes Aside for Later
Imagine you are halfway through some code changes and suddenly need
to switch tasks or pull updates from the remote branch. Committing is
not ideal yet — so what do you do? Use git stash to safely
store your uncommitted changes in a local “stash”. This lets you clean
your working directory and avoid conflicts, without losing any work.
When you are ready, you can bring those changes back using
git stash pop.
Git Cherry-Pick: Pulling in a Specific Commit
Sometimes, you want to take just one specific commit (say, from
another branch) and apply it to your current branch — without merging
the whole branch. That is where git cherry-pick command
comes in. It applies the changes from the chosen commit directly on top
of your current branch, as if you’d made them there all along.
Git Reset: Rewinding Your Commit History
Made a commit too soon? git reset allows you to undo
commits locally. It moves your branch pointer back to an earlier commit,
turning those “undone” changes into uncommitted edits in your working
directory. It is handy for rewriting local history before sharing code —
but be careful using it on shared branches, as it alters commit
history.
Practical Work
In the rest of this session, we will walk you through the feature branch workflow, different merging strategies and handling conflicts before merging.
- A Git branch is an independent line of development; the default is
conventionally called
main(but all branches are equal and the main branch can be renamed). - Branches help you manage change, collaborate better, and avoid messy mistakes on main.
- Feature branches let you develop and test code without affecting the main branch and support collaborative and parallel development.
- Fast-forward merges are used when the main branch has not changed since the feature branch was created, resulting in a linear history.
- 3-way merges occur when both branches have diverged; Git creates a merge commit to preserve both histories.
- Rebasing replays feature branch commits on top of the main branch for a cleaner, linear history—but it rewrites history and should be used with care.
- Squash and merge compresses all changes from a feature branch into a single commit, simplifying history.
- Understanding different merge strategies and when to use them is crucial for maintaining clean and manageable project histories.
Content from 3.1 Setup & Prerequisites
Last updated on 2025-04-30 | Edit this page
Overview
Questions
- What prerequiste knowledge is required to follow this topic?
- How to setup your machine to follow this topic?
Objectives
- Understand what prerequiste knowledge is needed before following this topic
- Setup your machine to follow this topic
- Shell with Git version control tool installed and the ability to navigate filesystem and run commands from within a shell
- Account on GitHub.com
- Understanding of Python syntax to be able to read code examples
Setup
Shell with Git
On macOS and Linux, a bash shell will be available by default.
If you do not have a bash shell installed on your system and require assistance with the installation, you can take a look at the instructions provided by Software Carpentry for installing shell and Git.
GitHub Account
GitHub is a free, online host for Git repositories that you will use during the course to store your code in so you will need to open a free GitHub account unless you do not already have one.
Content from 3.2 Some Example Code
Last updated on 2025-10-24 | Edit this page
Overview
Questions
- What are Git “branches”?
- Why should I separate different strands of code work into “feature branches”?
- How should I capture problems with my code that I want to fix?
Objectives
- Obtain example code used for this lesson
- List the issues with the example code
- Describe the limitations of using a single branch on a repository
- Create issues on GitHub that describe problems that will be fixed throughout the lesson
Creating a Copy of the Example Code Repository
For this lesson we’ll need to create a new GitHub repository based on the contents of another repository.
- Once logged into GitHub in a web browser, go to https://github.com/UNIVERSE-HPC/git-example.
- Select
Use this template, and then selectCreate a new repositoryfrom the dropdown menu. - On the next screen, ensure your personal GitHub account is selected
in the
Ownerfield, and fill inRepository namewith “git-example”. - Ensure the repository is set to
Public. - Select
Create repository.
You should be presented with the new repository’s main page. Next, we
need to clone this repository onto our own machines, using the Bash
shell. So firstly open a Bash shell (via Git Bash in Windows or Terminal
on a Mac). Then, on the command line, navigate to where you’d like the
example code to reside, and use Git to clone it. For example, to clone
the repository in our home directory (replacing
github-account-name with our own account), and change
directory to the repository contents:
Examining the Code
Let’s first take a look at the example code on GitHub, in the file
climate_analysis.py.
PYTHON
SHIFT = 3
COMMENT = '#'
climate_data = open('data/sc_climate_data_10.csv', 'r')
def FahrToCelsius(fahr):
"""COnverts fahrenehit to celsius
Args:
fahr (float): temperature in fahrenheit
Returns:
float: temperature in Celsius
"""
celsius = ((fahr - 32) * (5/9))
return celsius
def FahrToKelvin(fahr):
kelvin = FahrToCelsius(fahr) + 273.15
return kelvin
for line in climate_data:
data = line.split(',')
if data[0][0] != COMMENT:
fahr = float(data[3])
celsius = FahrToCels(fahr)
kelvin = FahrToKelvin(fahr)
print('Max temperature in Celsius', celsius, 'Kelvin', kelvin)If you have been through previous Byte-sized RSE episodes, you may have already encountered a version of this code before!
It’s designed to perform some temperature conversions from fahrenheit to either celsius or kelvin, and the code here is for illustrative purposes. If we actually wanted to do temperature conversions, there are at least three existing Python packages we would ideally use instead that would do this for us (and much better). Similarly, this code should also use a library to handle the CSV data files, as opposed to handling them line by line itself.
There are also a number of other rather large issues (which should be emphasised is deliberate!):
- The code is quite untidy, with inconsistent spacing and commenting which makes it harder to understand.
- It contains a hardcoded file path, as opposed to having them within a separate configuration file or passed in as an argument.
- Function names are capitalised - perhaps we need to change these to be lower case, and use underscores between words - a naming style also known as snake case.
- The code is also some comments (known as docstrings) describing the
function and the script (or module) itself. For those that haven’t
encountered docstrings yet, they are special comments described in a
particular format that describe what the function or module is supposed
to do. You can see an example here in the
FahrToCelsiusfunction, where the docstring explains what the function does, its input arguments, and what it returns. - An incorrect function name
FahrToCels, which should beFahrToCelsius. This will cause it to fail if we try to run it.
Another thing to note on this repository is that we have a single main branch (also used to be called a master branch which you may see in older repositories). You’ll also notice some commits on the main branch already. One way to look at this is as a single “stream” of development. We’ve made changes to this codebase one after the other on this main branch, however, it might be that we may want to add a new software feature, or fix a bug in our code later on. This may take, maybe, more than a few commits to complete and make it work, perhaps over a matter of hours or days. Of course, as we make changes to make this feature work, the commits along the way may well break the “working” nature of our repository and after that, users getting hold of our software by cloning the repo, also get a version of the software that then isn’t working. This is also true for developers as well: for example, it’s very hard to develop a new feature for a piece of software if you don’t start with software that is already working. The problem would also become compounded if other developers become involved, perhaps as part of a new project that will develop the software. What would be really helpful would be to be able to do all these things whilst always maintaining working code in our repository. Fortunately, version control allows us to create and use separate branches in addition to the main branch, which will not interfere with our working code on the main branch. Branches created for working on a particular feature are typically called feature branches.
Create Example Issues
Before we look into branches, let’s create a few new issues on our repository, to represent some work we’re going to do in this session.
One thing that might be good to do is to tidy up our code. So let’s add issues to fix that script function naming bug, changing our function names to use snake case, and add the missing docstrings.
Let’s create our first issue about using snake case:
- Go to your new repository in GitHub in a browser, and select
Issuesat the top. You’ll notice a new page with no issues listed at present. - Select
New issue. - On the issue creation page, add something like the following:
- In the title add: Functions should use snake case naming style
- In the description add: Naming of functions currently is using capitalisation, and needs to follow snake case naming instead.
- We can also assign people to this issue (in the top right), and for
the purposes of this activity, let’s assign ourselves, so select
Assign yourself. - Select
Createto create the issue.
Adding Work for Ourselves
Repeat the process of adding issues on your GitHub repository for the following two issues in this order:
- “Add missing docstrings to function and module”
- “Script fails with undefined function name error”
We’ll refer back to these issues later!
- Using Git branches helps us keep different strands of development separated, so development in one strand doesn’t impact and confuse development in the others
- Branches created to work specifically on a particular code feature are called feature branches
- GitHub allows us to capture, describe and organise issues with our code to work on later
Content from 3.3 Feature Branch Workflow
Last updated on 2025-10-23 | Edit this page
Overview
Questions
- How do I use Git to create and work on a feature branch?
- How do I push my local branch changes to GitHub?
Objectives
- Create and use new a feature branch in our repository to work on an issue
- Fix issue and commit changes to the feature branch
- Push the new branch and its commits to GitHub
Create new feature branch to work on first issue
We’ll start by working on the missing docstring issue. For the purpose of this activity, let’s assume that the bug which causes the script to fail is being tackled by someone else.
So let’s create a feature branch, and work on adding that docstring, using that branch. But before we do, let’s take a look and see what’s already there.
Examining Existing Repository Branches
We’ve already checked out our new repository, and can see what branches it currently has by doing:
OUTPUT
* mainAnd we can see we have only our main branch, with an asterisk to indicate it’s the current branch we’re on.
We can also use -a to show us all branches:
OUTPUT
* main
remotes/origin/HEAD -> origin/main
remotes/origin/mainNote the other two remotes/origin branches, which are
references to the remote repository we have on GitHub. In this case, a
reference to the equivalent main branch in the remote
repository. HEAD here, as you may know, refers to the
latest commit, so this refers to the latest commit on the main branch
(which is where we are now). You can think of origin as a
stand-in for the full repository URL. Indeed, if we do the following, we
can see the full URL for origin:
OUTPUT
origin git@github.com:steve-crouch/git-example2.git (fetch)
origin git@github.com:steve-crouch/git-example2.git (push)If we do git log, we can see only one commit so far:
OUTPUT
commit be6376bb349df0905693fdaad3a016273de2bdeb (HEAD -> main, origin/main, origin/HEAD)
Author: Steve Crouch <s.crouch@software.ac.uk>
Date: Tue Apr 8 14:47:05 2025 +0100
Initial commitCreating a new Branch
So, in order to get started on our docstring work, let’s tell git to create a new branch.
When we name the branch, it’s considered good practice to include the issue number (if there is one), and perhaps something useful about the issue, in the name of the feature branch. This makes it easier to see what this branch was about:
Now if we use the following, we can see that our new branch has been created:
OUTPUT
issue-2-missing-docstrings
* mainHowever, note that the asterisk indicates that we are still on our
main branch, and any commits at this point will still go on this main
branch and not our new one. We can verify this by doing
git status:
OUTPUT
On branch main
Your branch is up-to-date with 'origin/main'.
nothing to commit, working tree cleanSwitching to the New Branch
So what we need to do now is to switch to this new branch, which we can do via:
OUTPUT
Switched to branch 'issue-2-missing-docstrings'Now if we do git branch again, we can see we’re on the
new branch. And if we do git status again, this verifies
we’re on this new branch.
Using git status before you do anything is a good habit.
It helps to clarify on which branch you’re working, and also any
outstanding changes you may have forgotten about.
Now, one thing that’s important to realise, is that the contents of
the new branch are at the state at which we created the branch. If we do
git log, to show us the commits, we can see they are the
same as when we first cloned the repository (i.e. from the first
commit). So any commits we do now, will be on our new feature branch and
will depart from this commit on the main branch, and be separate from
any other commits that occur on the main branch.
Work on First Issue in New Feature Branch
Now we’re on our feature branch, we can make some changes to fix this
issue. So open up the climate_analysis.py file in an editor
of your choice.
Then add the following to the FahrToKelvin function
(just below the function declaration):
PYTHON
"""Converts fahrenheit to kelvin
Args:
fahr (float): temperature in fahrenheit
Returns:
float: temperature in kelvin
"""Then save the file.
Now we’ve done this, let’s commit this change to the repository on our new branch.
Notice we’ve added in the issue number and a short description to the commit message here. If you’ve never seen this before, this is considered good practice. We’ve created an issue describing the problem, and in the commit, we reference that issue number explicitly. Later, we’ll see GitHub will pick up on this, and in this issue, we’ll be able to see the commits associated with this issue.
Now we’ve also got a module docstring to add as well, so let’s add that. Open up our editor on this file again, and add the following to the top of the file:
Then, add and commit this change:
So again, we’re committing this change against issue number 2. Now let’s look at our new branch:
OUTPUT
commit 6bfc96e2961277b441e5f5d6d924c4c4d4ec6a68 (HEAD -> issue-2-missing-docstrings)
Author: Steve Crouch <s.crouch@software.ac.uk>
Date: Tue Apr 8 15:40:47 2025 +0100
#2 Add missing module docstring
commit 20ea697db6b122aae759634892f9dd17e6497345
Author: Steve Crouch <s.crouch@software.ac.uk>
Date: Tue Apr 8 15:29:37 2025 +0100
#2 Add missing function docstring
commit be6376bb349df0905693fdaad3a016273de2bdeb (origin/main, origin/HEAD, main)
Author: Steve Crouch <s.crouch@software.ac.uk>
Date: Tue Apr 8 14:47:05 2025 +0100
Initial commitSo, as we can see, on our new feature branch we now have our initial commit inherited from the main branch, and also our two new commits.
Push New Feature Branch and Commits to GitHub
Let’s push these changes to GitHub. Since this is a new branch, we need to tell GitHub where to push the new branch commits, by naming the branch on the remote repository.
If we just type git push:
OUTPUT
fatal: The current branch issue-2-missing-docstrings has no upstream branch.
To push the current branch and set the remote as upstream, use
git push --set-upstream origin issue-2-missing-docstringsWe get a suggestion telling us we need to do this, which is quite helpful!
OUTPUT
Enumerating objects: 8, done.
Counting objects: 100% (8/8), done.
Delta compression using up to 20 threads
Compressing objects: 100% (6/6), done.
Writing objects: 100% (6/6), 805 bytes | 805.00 KiB/s, done.
Total 6 (delta 2), reused 0 (delta 0), pack-reused 0
remote: Resolving deltas: 100% (2/2), completed with 1 local object.
remote:
remote: Create a pull request for 'issue-2-missing-docstrings' on GitHub by visiting:
remote: https://github.com/steve-crouch/git-example2/pull/new/issue-2-missing-docstrings
remote:
To github.com:steve-crouch/git-example2.git
* [new branch] issue-2-missing-docstrings -> issue-2-missing-docstrings
Branch 'issue-2-missing-docstrings' set up to track remote branch 'issue-2-missing-docstrings' from 'origin'.So here, we’re telling git to push the changes on the new branch to a
branch with the same name on the remote repository. origin
here is a shorthand that refers to the originating repository (the one
we cloned originally). You’ll notice a message suggesting we could
create a pull request to merge the changes with the main branch.
- A branch is one version of your project that can contain its own set of commits
- Feature branches enable us to develop / explore / test new code features without affecting the stable main code
- Use
git branchto create a new branch in Git - Use
git switchto change to and use another branch - Add an issue number, e.g.
#1to a Git commit message so GitHub registers those commits under that issue - Use
git push --set-upstream origin branch-nameto push the commits on a new branch to a GitHub repository
Content from 3.4 Creating a Pull Request
Last updated on 2025-10-23 | Edit this page
Overview
Questions
- How can I organise a set of changes together so they can be merged later?
Objectives
- Describe what is meant by a pull request
- Describe the benefits of using pull requests
- Create a pull request using GitHub to group together and propose a set of changes to be merged to another branch
How to Merge our Changes with main?
We’ve essentially fixed the docstring issue now, so next we need to somehow merge these changes on our feature branch with the main branch.
Test Code Before you Push it!
Now before we this, ordinarily we should test the changes and ensure the code is working properly. To save time, we haven’t done that here, but that’s definitely something worth noting:
- Before pushing any changes, always manually test your code first.
- If you have any unit tests, run those too to check that your changes haven’t broken anything.
- Particularly if this was a change implementing a new feature, consider writing a new unit test to test that feature.
And we’ll do that now by using what’s known as a pull request. A pull request is a way to propose changes on a particular Git branch, and request they be merged with another branch. They’re really useful as a tool in teams, since they provide a way to check the changes before doing a merge. They allow you to see the changes to files across all the commits in the branch, and look at how these commits will change the codebase. And you can assign a number of reviewers to review the pull request, and submit a review with their thoughts on whether to accept the pull request, or make changes, and so on. Really useful! So we could create the pull request on the command line, but we’ll use the GitHub interface to do it. Which frankly, is much clearer and gives you a far better view of what’s going on.
So let’s go back to our repository on GitHub. You may see a message displayed at the top about protecting the main branch. We may come back to this later, so no need to worry about this for now.
If we select the dropdown where it says main, it gives
us a list of branches. We can see all branches by selecting that option
at the bottom. Now, we can see we have our new branch that has appeared,
which is separate from our main branch. If we select that, we can see
the state of the repository within this branch, including the new latest
commits here - on our climate-analysis.py file.
Create a Pull Request
Let’s create the pull request now, by selecting
Compare & pull request. We could also do this from the
Pull requests tab from the top menu as well, then selecting
New pull request.
Now it shows us an interface for creating the pull request: -
Importantly, at the top, it shows us which branch will be merged with
which branch, with the source (or comparison) branch on the right, and
the destination branch on the left. This should be our new branch for
compare:, and main for base:. -
It tells us we are “able to merge” - and in this case, there are no
conflicts to worry about, which is really useful to know. So what if
there are conflicts? This is something we’ll look at later. - Below
this, it also shows us the commits associated with this branch as well
as the sum of changes to the files by these commits.
In the title, we’ll rename the PR to reference issue 2 directly,
changing it to Fixes #2 - missing docstrings. We could add
more contextual information in the description if needed. We could also
assign others as reviewers, as we did in the previous session on code
review. But for simplicity, we’ll leave those for now. But we will
assign the pull request (or PR for short) to ourselves, since it’s a
good idea to assign responsibility where we can. So let’s create the
pull request by selecting the button.
Now we get another screen describing the new PR itself. If we’d assigned any reviewers, we now wait for their reviews of this pull request. At this point, we could assume we’ve just done that, and the PR has been approved and is ready to merge.
By contributing work in PRs, and having reviews of PRs, it’s not just a number of people making changes in isolation. In collaborations around software, it’s very important to increase the flow of information between people making changes in case there are any new potential issues that are introduced. And PRs give us that discipline - an opportunity really - to make sure that the changes we are making are well considered. This then becomes part of the overall cycle of development: we write code, we have it reviewed, it gets merged. But also, we help with reviewing other code too.
Coming back to the interface, it now tells us we can merge this branch automatically, and also the list of commits involved. Interestingly, even though we have created this PR to do a merge, we could continue developing our code on this new branch indefinitely if we wanted. We could make and push new commits to this branch, which would show up here, and we then merge at a future date. This may be particularly useful if we need to have a longer discussion about the PR as it is developing. The discussion would be captured in the comments for the PR, and when ready, we then merge the PR.
How Long should PRs be Open?
Which raises the question, of how long should PRs be open, or
branches for that matter? To some degree, this depends on the nature of
the changes being made But branches in Git are designed, and should be
wherever possible, short-lived and deleted when no longer required. The
longer a branch is open, the more potential changes could be made to the
main branch. Then when it comes time to merge the branch, we may get a
lot of conflicts we need to manage. So generally, it’s a good idea to
keep your branches open for a day or two, a few days maximum, before
creating a PR and doing a merge if you can. Note that we can also see
this PR, as well as any others, by selecting the
Pull request tab.
- Always test code before you push changes to a remote repository
- Pull requests give us the opportunity to properly consider and review logical sets of changes to our codebase before they are merged
- GitHub gives us powerful tools to create and manage pull requests
- Where possible, keep Git branches short lived and merge them as soon as is convenient, to avoid increasing disparities between the feature branch and main branch
Content from 3.5 Merging a Pull Request
Last updated on 2025-10-24 | Edit this page
Overview
Questions
- How do I merge changes proposed within a pull request with the main branch?
- What should I do with a branch that has been merged and is no longer required?
Objectives
- Use GitHub to approve and merge a pull request
- Delete a branch that has been merged
- View commits associated with a particular GitHub issue
- List the benefits of using a feature branch approach
How to Merge the Pull Request?
You’ll notice there’s a subtle dropdown on the
Merge pull request button, which presents options for how
to perform the merge.
You may remember from the introduction about doing a “rebase and
merge” as opposed to just doing a merge commit, since it leads to a
cleaner repository history. For example, if we did a normal merge here,
we’d end up with our two new commits and a merge commit on the
main branch. But if we do a rebase and then merge, our two
commits are essentially just added to the top of the main
branch. Let’s use this method, by selecting the third option in the
dropdown: Rebase and merge.
Note that if there had been a conflict with any commits on the main
branch, we very likely wouldn’t have been able to merge using this
method. Which in itself is a good question: even if we’d done a straight
commit directly to the main branch, what would happen if
there was a conflict? If we have time, we’ll look at this later
The Golden Rule of Rebasing
Note that you can also do rebasing with branches on the command line. But a word of warning: when doing this, be sure you know what will happen.
Rebasing in this way rewrites the repository’s history, and therefore, with rebasing, there is a GOLDEN RULE which states that you should only rebase with a local branch, never a public (shared) branch you suspect is being used by others. When rebasing, you’re re-writing the history of commits, so if someone else has the repository on their own machine and has worked on a particular branch, if you rebase on that branch, the history will have changed, and they will run into difficulties when pushing their changes due to the rewritten history. It can get quite messy, so if in doubt, do a standard merge!
Merge the Pull Request
So now let’s go ahead and select Rebase pull request. We
can add more information here if needed - but let’s
Confirm rebase and merge. Note that it says that the merge
was done successfully, and suggests we can delete the branch.
We said earlier that branches in Git should be short lived where possible, and keeping branches hanging around may cause confusion. So let’s delete it now. Now if we go the main branch on the main repository page in GitHub, we can see that the changes have been merged. And if we look at “commits”, we can see the commits we made on our feature branch have been added to the main branch.
See Commits on Issues
Now, remember those commit messages with the issue numbers in them? If we go to our issues, we can see them with the commits associated with those issues, which are listed in chronological order. This is really handy when checking on issue progress. Plus, it means the reason behind each commit is now traceable back to the originating issue. So why are there two sets of commits, when we only made one? That’s because we first made two commits to the branch, and then, using a rebase method, we applied our commits to the main branch.
Summary
So what are the benefits so far?
- By using different feature branches, as opposed to just committing directly to the main branch, we’ve isolated the “churn” of developing a feature from the main branch. This makes the work on any single branch easier to understand as a thread of work.
- It gives us the opportunity to abandon a branch entirely, with no need to manually change things back. In such a case, all we need to do is delete the branch.
- From a single developer’s perspective, we are also effectively isolated from the changes being made on other feature branches. So when a number of changes are being made, we still (hopefully!) only have to worry about our own changes.
- It gives us a process that helps us maintain a working version of
the code on
mainfor our users (which may very well include ourselves!), as long as we ensure that work on other branches is properly tested and works as expected before we merge back to themainbranch. - It also gives us a mechanism - via pull requests - to have others review our code before changes are introduced into the codebase.
So what we’ve shown is one way to use feature branch workflow, By
using feature branches directly off the main branch, and merging to
main when these changes are ready. We’ve chosen this way
for the training, since it’s more straightforward to teach in a
practical activity, but there are other “branching strategies” you can
use. Another way is to use a long-lived branch off of main, called
usually something like dev or develop:
- This
devbranch represents a general branch of development. - Feature branches are created off of the
devbranch instead ofmain, and then merged back to thedevbranch. - Later, when a release of the software is due, or at an appropriate
point after the software has been tested, the
devbranch is merged with the main branch.
This approach gives development greater distance from the main
branch, and it means you can merge and test all changes together on the
dev branch before you merge with the main
branch, to ensure it all works together first. However, it also means
when it comes to merging back to main, it can be more
difficult since the dev branch could have built up a
considerable number of changes that need to be merged. In either case,
the key is to make sure that code is tested and checked with the right
people in your team before you merge to main.
- Choose the branch merging method that is right for the situation
- If you use a rebasing merging strategy, remember the Golden Rule: only rebase with a local branch, never a public (shared) branch you suspect is being used by others
- Commits related to a particular issue (and referred to in its commit message) are viewable under that issue
Content from 3.6 Merge Conflicts
Last updated on 2025-10-23 | Edit this page
Overview
Questions
- How should I manage conflicts when merging branches?
- How does GitHub help me manage merge conflicts with a pull request?
Objectives
- Locate points of merge conflict within a pull request using GitHub
- Resolve a branch merge conflict from a pull request
Work on Another Issue
Now we still have two remaining issues we can look at. Interestingly, both of them require changes that can cause a conflict when merging, so let’s look at those now.
First, let’s go to the main branch and pull the
repository changes on this branch to our local repository. Generally,
it’s good practice to use git pull to synchronise your
local repo with the GitHub one before doing any further work.
So now, again, we have those two commits on main as we would expect. Let’s create a feature branch to fix our snake-case issue.
So now, edit the climate_analysis.py file, and change
functions to use a snake case style, e.g. change
FahrToCelsius to fahr_to_celsius. Remember to
also change the one in the fahr_to_kelvin function as
well.
Note we’ve changed the call to fahrtocelsius near the
bottom. let’s commit this to our new feature branch:
Now we can commit as before
Introducing a Conflict
At this point, we could follow this advice and merge this branch’s
work into the main branch, which would be very neat and
tidy. But life is rarely like that: what happens when someone else
commits their changes in some way to the main branch? Where does that
leave us when we come to merge?
You may recall we created an issue for fixing the function call to
the FahrToCelsius function, where the call referenced the
function incorrectly. Let’s assume that a colleague has made these
changes, and updated the main branch. Let’s pretend we’re
our colleague, and we’re making this fix to the main branch. First,
let’s switch to the main branch:
Now as we can see, this main branch is completely unaware of the
commits in our new feature branch, and is at the initial state of the
repository. Let’s make the fix. Now we could (and should) create a
feature branch here, make and commit the change, then merge with the
main branch. But for expediency, we’ll commit directly to the main
branch, and assume they did it the right way. Edit the
climate_analysis.py file, and update the
FahrToCels function call to FahrToCelsius, and
save the changes.
BASH
git status
git add climate_analysis.py
git commit -m "#3 Fix incorrect function call"
git log
git pushNow - we have this extra commit on main, which we can see if we do:
Resolving a Merge Conflict
Now let’s see what happens when we create a pull request on our feature branch, as before, and try to merge. Again, let’s go to GitHub and then:
- Go to
Pull requests, and selectNew pull request. - Select the new feature branch
issue-1-use-snake-case. - Select this new branch in
compare:, and ensure thatbase:saysmain.
Note that now it says we can’t automatically perform this merge.
Essentially, it’s compared the source and destination branches, and
determined that there is a conflict, since there are different edits on
the same line for commits in the main and feature branch.
But we’ll go ahead and create the PR anyway:
- Select
Create pull request. - For the title, add “Fixes #1 - use snake case naming”.
- Assign yourself to the issue.
- Select
Create pull request.
We should now see that “This branch has conflicts that must be
resolved”. And in this case, there is only one conflicting file -
climate_analysis..py, but there could be more than one. Now
we can attempt to resolve the conflict by selecting
Resolve conflicts.
The GitHub interface is really useful here. It tells you which files
have the conflicts on the left (only climate_analysis.py in
this case), and where in each file the conflicts are. So let’s fix the
conflict. Near the bottom, we can see that our snake case naming of that
function call conflicts with the fix to it, and this has caused a
conflict.
Now importantly we have to decide how to resolve the conflict.
Fortunately, our fix for the snake_case issue resolves this issue as
well, since we’re calling the function correctly, which makes the other
fix redundant. So let’s remove the other fix, by editing out the chevron
and equals parts, and the fix we don’t want. We then select
Mark as resolved, then Commit merge. Now
unfortunately, due to the conflict commit, we can no longer rebase and
merge. So select the option to create a Merge commit, then
select Merge pull request, and Confirm merge.
And as before, delete the feature branch which is no longer needed.
Commits Highlighted in Issues
If we go to the repository’s list of commits now in the
main branch, we see that we have a “merge branch main into
issue-1-use-snake-case” commit which resolves the conflict (which
occurred on the feature branch) and also a merge pull request commit,
for when we merged the feature branch with main.
- GitHub’s interface helps us identify where conflicts exist for a pull request
- Resolving merge conflicts on a per-conflict basis is achievable from within GitHub
Content from Lesson 4: Code Review
Last updated on 2025-05-02 | Edit this page
Overview
Questions
- What are the benefits of collaborative code development?
- How can collaborating improve the quality and effectiveness of your code?
- What practices and tools support effective collaboration?
- Why should collaborative tools and workflows be adopted early in a project?
Objectives
- Identify benefits of coding with others, including improved code quality and shared ownership.
- Recognise common collaborative practices such as code review, pair programming, and version control.
- Understand how early adoption of collaborative tools helps prepare for scaling up development.
- Apply the practical collaborative strategy code review in a software project.
This session introduces key practices for effective coding and collaboration within research software projects. You will learn how to work together on code through structured approaches such as code review, understand common workflows and tools that support collaborative development, and explore the processes that help maintain code quality and team productivity. We will then take a practical look at how to carry out code reviews using GitHub, one of the most widely used platforms for collaborative software development.
Introduction to Coding Within a Collaboration
Software development thrives on collaboration, even when much of the coding is done individually. Getting input from others can have a big impact on the quality, maintainability, and effectiveness of your work, often requiring only a small investment of time. Since there is rarely a single “perfect” way to solve a problem, working with others allows you to share knowledge, skills, and perspectives, leading to better solutions and new insights. Through collaboration, you can learn new techniques, discover tools and infrastructure that streamline development, and help build a shared understanding that benefits the wider team or community.
What are the Benefits of Coding With Others?
There are many benefits to coding with others. Collaborative coding practices — such as pair programming, code reviews, and shared repositories — can help catch bugs earlier, improve code readability, and increase overall code quality. It also fosters shared ownership of the codebase, making it easier for teams to maintain and extend code over time.
Importantly, it is best to adopt collaborative tools and practices before they become urgent. Setting up processes, code sharing and collaboration platforms (like GitHub or GitLab), and development workflows early on means you will be ready to handle code review, version control, and team communication smoothly when collaboration intensifies. Early investment in collaboration infrastructure pays off by preventing confusion and bottlenecks later in a project.
Introduction to Code Review
What is Code Review?
Code review is the process of examining and discussing someone else’s code with the goal of checking its correctness and improving its quality and readability at the point when the code changes. It is a key collaborative and software quality assurance practice in software development that can help identify bugs early, ensure consistency with coding standards, and support knowledge sharing across a team.
Code review is valuable at all stages of the software development lifecycle — from initial design through development to ongoing maintenance — but it is best to incorporate it right from the start. According to Michael Fagan, the author of the code inspection technique, rigorous inspections can remove 60-90% of errors from the code even before the first tests are run. Furthermore, according to Fagan, the cost to remedy a defect in the early (design) stage is 10 to 100 times less compared to fixing the same defect in the development and maintenance stages, respectively. Since the cost of bug fixes grows in orders of magnitude throughout the software lifecycle, it is far more efficient to find and fix defects as close as possible to the point where they are introduced.
Why do Code Reviews?
Code review is very useful for all the parties involved - code author as well as reviewers - someone checks your design or code for errors and gets to learn from your solution; having to explain code to someone else clarifies your rationale and design decisions in your mind too. In general, code reviews help improve code quality, catch bugs early, and promote shared understanding among team members. They also support skill development and encourage consistent coding practices across a project.
The specific aims of a code review can vary depending on the context — for example, production-ready code might undergo rigorous scrutiny, while early-stage prototypes may be reviewed more informally for general structure and approach. Code reviews can follow a more formal process (e.g. structured pull requests with approval workflows) or take an informal shape (e.g. ad hoc peer review or pair programming), depending on the needs of the project and the team.
Code Review Types
There are several types of code review, each suited to different contexts and goals.
An informal review involves casually asking a colleague for input or advice. This type of review is often used to improve understanding, share skills, or get help with problem-solving, rather than enforce specific standards. Some examples include over-the-shoulder code review (when one developer talks the other developer through the code changes while sitting at the same machine) and pair programming (when two developers work on the code at the same time with one of them actively coding and the other providing real-time feedback).
A code modification & contrubution-based review occurs when changes or additions to a codebase are reviewed as they happen — commonly used in version-controlled software development workflows like GitHub’s pull requests. This approach is a bit more formal (e.g. structured pull requests with approval workflows) and tool-assisted, and focuses on ensuring understanding, clarity, maintainability, and code quality.
A more rigorous and formal method is the structured codebase review, such as a Fagan inspection, where a team examines a codebase systematically, following strict criteria to identify defects or ensure conformance to standards. While this method can be highly effective, it is resource-intensive and less common in the research software community (but it does occur). It focuses generally on conformance to processes and practices and identifying defects.
Code Review Practices & Processes
In this session, we will focus on code review practices centered around code modifications and contributions. The aim is to integrate code review into the research software development process in a way that is lightweight, low-stakes, and easy to adopt. Even a short initial code review can have a significant impact. As highlighted in “Best Kept Secrets of Peer Code Review” by Jason Cohen, the first hour of review is the most critical and productive, with diminishing returns thereafter.
The goal is to strike a practical balance: invest enough time to offer useful, actionable feedback without turning reviews into a bottleneck. When reviewing code, focus on:
- Code quality - is the code clear and readable? Do functions serve a single purpose? Is it well-structured and consistent with the rest of the project?
- Best practices and conventions - is the project’s coding style followed? Are tests and documentation included and up to date?
- Efficiency and minimalism - does the change duplicate existing functionality (found elsewhere in the code or in a third-party library)? Is it limited to what’s required by the issue or ticket?
- Knowledge sharing: ask clarifying questions (do not assume you understand everything or know best) and offer respectful, specific feedback. This helps everyone learn and builds team trust.
Given the value of that first hour, keep your efforts targeted. Do not spend time on:
- Linting or style issues - automated tools or CI pipelines should catch these
- Hunting for bugs, unless something clearly looks wrong — instead, check that tests exist for various cases that should catch bugs
- Fixing unrelated legacy issues that pre-date the change — log those separately to avoid scope creep
- Architectural overhauls — save big-picture changes for design discussions or dedicated meetings to decide whether the code needs to be restructured
- Refactoring everything — provide only a few critical suggestions and aim for incremental improvement, not perfection.
In practice, code review often involves following a project-specific checklist to ensure consistency and alignment with coding standards. The process is typically iterative, with reviewers and contributors engaging in a cycle of discussion, updates, and re-review to address questions and refine changes before integration. If a conversation is taking place in a code review that has not been resolved by one or two back-and-forth exchange, then consider scheduling a conversation or a pair programming session to discuss things further (and record the outcome of the discussion - e.g. in the pull requests’s comments). This way - you can enhance code quality and collaborative learning.
Code Review Tools & Platforms
Modern source code management (SCM) tools such as Git, Mercurial, and Subversion are well suited for conducting code reviews focused on changes or contributions. These tools track modifications and provide clear “diffs” (differences) that make it easier to inspect code updates line-by-line.
On top of these, various higher-level software development support platforms — such as GitHub, Review Board, JetBrains Space, and Atlassian Crucible — offer additional features and tools to streamline the review process, including inline comments to facilitate discussions, approval workflows, and integration with issue trackers. Many projects also adopt custom workflows tailored to their specific needs, balancing formality and flexibility to best support their development practices.
Practical Work
In the rest of this session, we will walk you through how a code modification & contrubution-based code review process using pull requests in GitHub.
Content from 4.1 Setup & Prerequisites
Last updated on 2025-04-30 | Edit this page
Overview
Questions
- What prerequiste knowledge is required to follow this topic?
- How to setup your machine to follow this topic?
Objectives
- Understand what prerequiste knowledge is needed before following this topic
- Setup your machine to follow this topic
- Account on GitHub.com
- Understanding of Python syntax to be able to read code examples
Setup
GitHub Account
GitHub is a free, online host for Git repositories that you will use during the course to store your code in so you will need to open a free GitHub account unless you do not already have one.
Content from 4.2 Some Example Code
Last updated on 2025-10-24 | Edit this page
Overview
Questions
- What does a bad code repository look like?
Objectives
- Obtain example code used for this lesson
- Describe the purpose of the example code repository
Creating a Copy of the Example Code Repository
For this lesson we’ll need to create a new GitHub repository based on the contents of another repository.
- Once logged into GitHub in a web browser, go to https://github.com/UNIVERSE-HPC/review-example.
- Select ‘Use this template’, and then select ‘Create a new repository’ from the dropdown menu.
- On the next screen, ensure your personal GitHub account is selected
in the
Ownerfield, and fill inRepository namewithreview-example. - Ensure the repository is set to
Public. - Select
Create repository.
You should be presented with the new repository’s main page. Next, we
need to clone this repository onto our own machines, using the Bash
shell. So firstly open a Bash shell (via Git Bash in Windows or Terminal
on a Mac). Then, on the command line, navigate to where you’d like the
example code to reside, and use Git to clone it. For example, to clone
the repository in our home directory (replacing
github-account-name with our own account), and change
directory to the repository contents:
Examining the Code
This repository contains code written in Python to analyse a dataset from the UK ResearchFish publication database. For the purposes of this training, we’ll be using this repository to make some high-level commits and create a pull request for review. It’s not necessary for us to delve deeper into how it works, but note that the repository contents have been modified to deliberately include many problem and errors!
- Encountering a “bad” code repository is an opportunity to learn what not to do!
Content from 4.3 Fixing a Repository Issue
Last updated on 2025-10-24 | Edit this page
Overview
Questions
- How do we approach grouping commits together for a pull request?
- Can we use GitHub to directly make changes to files?
Objectives
- Create an issue on GitHub that describes a problem with the example codebase
- Use the GitHub file editor to make a direct change to a file in a repository
- Submit the fix for the issue on a new repository branch
Adding an Issue to the Repository
Let’s first add an issue to the repository, which will represent something we need to work on. For the sake of this exercise, it doesn’t really matter what the issue is, but perhaps we’ve spotted a problem with our codebase during development and we need to note this problem needs to be fixed.
If we look at the README for the repo we can see there’s a broken link near the top, so let’s register that as an issue.
- Go to your repository’s main page in GitHub in a browser, and select
Issuesat the top. You’ll notice a new page with no issues listed at present. - Select
New issue. - On the issue creation page, add something like the following:
- In the title add: Broken link to article
- In the description add: The README link to the SSI website article is broken, resulting in a page not found error
- Assign ourselves to the issue by selecting
Assign yourself. - Assign the
Documentationlabel to the issue. - Select
Createto create the issue.
QUESTION: who’s been able to create a new issue on the repository? Yes/No
Fixing the Issue
Now let’s assume at some future date we decide to fix the issue. Now in most cases, we’d probably do this by having the repository cloned on our machine, and then we’d make the change, and submit it that way. But in the interests of time and simplicity, we’ll just use GitHub’s direct file editing feature.
- Go to the repository’s main page
- Navigate to the
READMEfile in the file navigator - Select the edit icon shaped like a pen/pencil on the top right
- In the file editor, fix the broken link by removing the bit that says “typo/”
So we now need to commit the change. It’s good practice when committing a change is to refer to the issue number in the commit message, which will give us traceability for changes back to the originating issue when looking at the commits in a repository.
- Select
Commit changes...in the top right. - This is the first issue on the repository, so let’s refer to that
with
#1 - Fix broken article linkas the commit message - We could optionally put more info about the fix in the description if we wanted
Now importantly, we want to submit this change as a pull request on a new branch, since this will allow others to review that pull request.
- Select the second option
Create a new branch for this commit and start a pull request - Enter a meaningful name for this new branch,
e.g.
readme-broken-link-fix - Select
Propose changes
This change is now submitted to this new branch. If you go to the
main repository page and select branches, you’ll see our
new branch in the list.
QUESTION: who’s managed to commit their fix to a new branch? Yes/No
- We use branches to contain the change commits we want to submit within a pull request
Content from 4.4 Submiting a Pull Request
Last updated on 2025-10-22 | Edit this page
Overview
Questions
- How do you create a pull request using GitHub?
- How long should we keep a pull request open?
- How do we request a review of a pull request?
Objectives
- Create a pull request based on the changes we submitted to a new branch
- Describe the reasons to keep a pull request short-lived
- Request a review of your pull request from another participant
Creating a Pull Request
Let’s create a pull request now from this new branch.
- First, go the
Pull requeststab at the top of the group repository main page, and selectNew pull request - In the
Compare changespage that comes up:- Select
compare:and select your new branch, e.g.readme-broken-link-fix. You should now see a summary of the changes between the new branch and the main branch, i.e. a single commit and the fix you made earlier - Select
Create pull request
- Select
- In the
Open a pull requestpage that appears:- Add details for pull request before creating it, including a reviewer, label, title, and description
- Enter a fitting title, brief description, and label
- Select
Create pull request
You’ll then see a summary of the pull request, including a summary of
any conflicts with the base (main) branch, of which there
should be none. There’s also an option to merge the pull request - but
don’t do this yet, since you’ll need to wait for your pull request to be
reviewed!
QUESTION: who’s been able to create a new pull request? Yes/No
Interestingly, even though we have created this PR to do a merge, we could continue developing our code on this new branch indefinitely if we wanted. We could make and push new commits to this branch, which would show up here, and we then merge at a future date. This may be particularly useful if we need to have a longer discussion about the PR as it is developing. The discussion would be captured in the comments for the PR, and when ready, we then merge the PR.
How Long should PRs be Open?
Which raises the question, of how long should PRs be open, or
branches for that matter? To some degree, this depends on the nature of
the changes being made. But branches in Git are designed, and should be
wherever possible, short-lived and deleted when no longer required. The
longer a branch is open, the more potential changes could be made to the
main branch. Then when it comes time to merge the branch, we may get a
lot of conflicts we need to manage. So generally, it’s a good idea to
keep your branches open for a day or two, a few days maximum, before
creating a PR and doing a merge if you can. Note that we can also see
this PR, as well as any others, by selecting the
Pull request tab.
Obtain a GitHub Account ID from another Participant
For the next stage, you’ll be reviewing a pull request. Either:
- If you are attending a workshop with other learners, the instructor will enable you to obtain a GitHub account ID from another learner so you can request a review of your pull request from them, and you’ll also be requested as a reviewer on someone else’s pull request.
- If you are going through this material on your own, you can review the pull request you made on your own repository instead.
To assign your reviewer to your PR:
- Go back to your repository’s main page
- Select
Pull requests, and then the PR you created - Select
Reviewersand add the GitHub account for the reviewer
You should see an orange filled circle next to their name, indicating that you have requested their review and they have yet to submit it. We could add as many reviewers as we want, particularly if this is a complex change that affects many aspects of the codebase.
QUESTION: who has managed to add the other account and request a review from them? Yes/No
- Try to keep pull requests short-lived to avoid them becoming
outdated with other branches such as
main - We can request reviewers for a pull request by adding their GitHub
account to a list of
Reviewers
Content from 4.5 Reviewing a Pull Request
Last updated on 2025-10-22 | Edit this page
Overview
Questions
- How do I submit a review of a pull request?
- On what information about a pull request do I base my review?
- What are the levels of approval for a pull request review?
Objectives
- Describe how GitHub presents the information related to a pull request
- Add review comments to a pull request
- Submit a review of a pull request
Let’s now adopt a new role - that of the reviewer of someone else’s pull request (or PR for short).
Write a Review of the PR
To see a list of PR review requests for you, go to https://github.com/pulls/review-requested. You should see a review request from another participant, so select this from the list.
This will present an overview of the pull request (PR), including on separate tabs:
-
Conversation- an overview of the PR, including comments and other activities associated with the PR, as well as a summary at the end, indicating the overall status in terms of reviews requested, and whether there are any merge conflicts with the base branch (mainin this case) -
Commits- a list of all commits on the feature branch that have yet to be merged into the base branch -
Checks- whether there are any automated checks implemented in GitHub Actions and their status -
Files changed- the list of files and their line-by-line changes for this PR
If you select the Files changed tab, or if you select
Add your review from the Conversation page
which takes you to the same tab, you can then begin your review.
By default, the presented view indicates a “unified” view. This shows deletions highlighted in red, and additions highlighted in green.
Another view is the “split” view of these changes, which is
selectable by clicking on the cog-like icon and selecting
Split. This provides a side-by-side alternative, with the
older version on the left, and the newer version on the right. In this
case, you should see a number of green highlighted lines on the right
side of this view, indicating the added lines.
When providing a review, we have the option of adding comments or
suggestions inline to the proposed changes. By hovering over a line and
selecting the + symbol at the start of the line, we’re able
to add a comment on that line, for example if we spotted a spelling or
grammatical mistake, or in the case of code, a programmatic problem or
other issue.
We have the option of adding comments or suggestions inline to the proposed changes, if we want. For example, perhaps we know there is a Zenodo record for the code that this article points to, which we think should be added.
- Hovering over the line containing the fix and select the
+symbol at the start of the line - Add a comment, something like
We should also link to the Zenodo record for the code, at https://zenodo.org/record/250494#.Y2UUN-zP1R4 - Then select
Start a review
Can add as many comments as we want at this review stage, to any line. If this were a larger pull request, we would review all the other changes, and add comments as needed.
Finally, as a reviewer of this pull request, we can complete our review:
- Select
Finish our review - Add a brief comment,
e.g.
Overall, the changes look good, although we should consider adding the Zenodo repository link
And then we can select one of the following options:
-
Comment- where you’re just leaving a comment and aren’t requesting any changes -
Approve- no comments are changes are necessary -
Request changes- feedback must be addressed before it can be merged
For simplicity, let’s just go with the first option for this exercise.
Finally, select Submit review, and our role as reviewer
on the pull request is complete! The originator of the PR can then take
our review into account, and make changes in response to the review.
QUESTION: Who’s submitted a very brief code review? Yes/No
- The key reason to use pull requests is to ensure that code changes are reviewed by other team members before they are merged
- We can elect to approve changes, request changes prior to merging a pull request, or block a merge until requested changes are satisfied
- GitHub doesn’t allow the creator of a pull request to approve it
Content from 4.6 Merge the Pull Request
Last updated on 2025-10-22 | Edit this page
Overview
Questions
- How do I see the comments left by a reviewer?
- How do I merge a pull request?
Objectives
- Merge an approved pull request into its destination branch
Read Review and Merge the Pull Request
Now we return to our role as code contributor.
As owner of your PR, the next step involves addressing any feedback
made by the reviewer. Return to the PR you created earlier, and take a
look at the comments that will appear in the Conversation
tab. You may need to scroll down to see them.
We should now consider the review and any observations or suggestions
made, and make any needed changes. To add these changes, we’d add new
commits to the PR branch, but for simplicity, let’s assume our reviewer
fully endorsed our PR. We can go ahead and merge the pull request into
our codebase, by selecting Merge pull request, and then
Confirm Merge.
So now, our change has been integrated into our codebase! You’ll notice that the branch you created earlier has been deleted by GitHub, since it is no longer needed.
QUESTION: Who’s read the other participants’ review of their PR, and merged it? Yes/No
- Following a merge, pull request branches are deleted in keeping with the short-lived branch philosophy of GitHub
Content from Lesson 5: Unit Testing Code
Last updated on 2025-10-24 | Edit this page
Overview
Questions
- Why should I test my code?
- What is the role of automated testing?
- What are the different types of automated tests?
- What is the structure of a unit test?
- What is test “mocking”?
Objectives
- Explain the reasons why testing is important
- Describe the three main types of tests and what each are used for
- Describe the practice of test “mocking” and when to use it
- Obtain example code repository and run existing unit tests
- Describe the format of a unit test written for the Pytest testing framework
Testing is a critical part of writing reliable, maintainable code — especially in collaborative or research environments where reproducibility and correctness are key. In this session, we will explore why testing matters, and introduce different levels of testing — from small, focused unit tests, to broader integration and system tests that check how components work together. We will also look at testing approaches such as regression testing (to ensure changes do not break existing behavior) and property-based testing (to test a wide range of inputs automatically). Finally, we will cover mocking, a technique used to isolate code during tests by simulating the behavior of external dependencies.
Introduction to testing
Code testing is the process of verifying that your code behaves as expected and continues to do so as it evolves. It helps catch bugs early, ensures changes do not unintentionally break existing functionality, and supports the development of more robust and maintainable software. Whether you’re working on a small script or a large application, incorporating testing into your workflow builds confidence in your code and makes collaboration and future updates much easier.
Why test your code?
Being able to demonstrate that a process generates the right results is important in any field of research, whether it is software generating those results or not. So when writing software we need to ask ourselves some key questions:
- Does the code we develop works as expected?
- To what extent are we confident of the accuracy of results that software produces?
- Can we and others verify these assertions for themselves?
If we are unable to demonstrate that our software fulfills these criteria, why would anyone use it?
As a codebase grows, debugging becomes more challenging, and new code may introduce bugs or unexpected behavior in parts of the system it does not directly interact with. Tests can help catch issues before they become runtime bugs, and a failing test can pinpoint the source of the problem. Additionally, tests serve as invocation examples for other developers and users, making it easier for them to reuse the code effectively.
Having well-defined tests for our software helps ensure your software works correctly, reliably, and consistently over time. By identifying bugs early and confirming that new changes do not break existing functionality, testing improves code quality, reduces the risk of errors in production, and makes future development and long-term maintenance faster and safer.
Types of Testing - Levels
Testing can be performed at different code levels, each serving a distinct purpose to ensure software behaves correctly at various stages of execution. Together, these testing levels provide a structured approach to improving software quality and reliability.
Unit testing is the most granular level, where individual components—like functions or classes—are tested in isolation to confirm they behave correctly under a variety of inputs. This makes it easier to identify and fix bugs early in the development process.
Integration testing builds on unit testing by checking how multiple components or modules work together. This level of testing helps catch issues that arise when components interact — such as unexpected data formats, interface mismatches, or dependency problems.
At the highest level, system testing evaluates the software as a complete, integrated system. This type of testing focuses on validating the entire application’s functionality from end to end, typically from the user’s perspective, including inputs, outputs, and how the system behaves under various conditions.
Types of Testing - Approaches
Different approaches to code testing help ensure that software behaves as expected under a range of conditions. When the expected output of a function or program is known, tests can directly check that the results match fixed values or fall within a defined confidence interval.
However, for cases where exact outputs are not predictable — such as simulations with random elements — property-based testing is useful. This method tests a wide range of inputs to ensure that certain properties or patterns hold true across them.
Another important approach is regression testing, which helps detect when previously working functionality breaks due to recent changes in the code. By rerunning earlier tests, developers can catch and address these regressions early, maintaining software stability over time.
Mocking
When running tests, you often want to focus on testing a specific piece of functionality, but dependencies on external objects or functions can complicate this, as you cannot always be sure they work as expected. Mocking addresses this by allowing you to replace those dependencies with “mocked” objects or functions that behave according to your instructions. So, mocking is a testing approach used to isolate the unit of code being tested by replacing its dependencies with simplified, controllable versions — known as mocks.
Mocks mimic the behavior of real components (such as databases, APIs, or external services) without requiring their full functionality or availability. This allows developers to test specific code paths, simulate error conditions, or verify how a unit interacts with other parts of the system. Mocking is especially useful in unit and integration testing to ensure tests remain focused, fast and reliable.
For example, if a function modifies data and writes it to a file, you can mock the file-writing object, so instead of creating an actual file, the mocked object stores the “written” data. This enables you to verify that the data written is as expected, without actually creating a file, making tests more controlled and efficient.
Related Practices
Code style and linting are essential practices in code testing, as they help ensure that code is readable and maintainable by following established conventions, such as PEP8 in Python. Linting tools automatically check that code adheres to these style guidelines, reducing errors and improving consistency.
Continuous Integration (CI) further enhances testing practices by automating key processes, such as running tests and linting tools, every time code changes are committed. This helps catch issues early, maintain code quality, and streamline the development workflow. Together, these practices improve code reliability and make collaboration smoother.
Practical Work
In the rest of this session, we will walk you through writing tests for your code.
Content from 5.1 Setup & Prerequisites
Last updated on 2025-10-22 | Edit this page
Overview
Questions
- What prerequiste knowledge is required to follow this topic?
- How to setup your machine to follow this topic?
Objectives
- Understand what prerequiste knowledge is needed before following this topic
- Setup your machine to follow this topic
- Shell with Git version control tool installed and the ability to navigate filesystem and run commands from within a shell
- Python version 3.8 or above installed
- Understanding of Python syntax to be able to read code examples
- Pip Python package installer
- Visual Studio Code installed (ideally the latest version)
Setup
Shell with Git
On macOS and Linux, a bash shell will be available by default.
If you do not have a bash shell installed on your system and require assistance with the installation, you can take a look at the instructions provided by Software Carpentry for installing shell and Git.
Python
Python version 3.8 or above is required. Type python -v
at your shell prompt and press enter to see what version of Python is
installed on your system. If you do not have Python installed on your
system and require assistance with the installation, you can take a look
at the
instructions provided by Software Carpentry for installing Python in
preparation for undertaking their Python lesson.
Pip
Pip Python package should come together with your Python
distribution. Try typing pip at the command line and you
should see some usage instructions for the command appear if it is
installed.
VS Code
The hands-on part of this topic will be conducted using Visual Studio Code (VS Code), a widely used IDE. Please download the appropriate version of Visual Studio Code for your operating system (Windows, macOS, or Linux) and system architecture (e.g., 64-bit, ARM).
Alternative setup
Alternatively, if you are unable to install these tools, you can undertake the activity entirely in a web browser but you will need to register for a free account with a third-party web application called replit.
Content from 5.2 Some Example Code
Last updated on 2025-10-24 | Edit this page
Overview
Questions
- How do I run a set of unit tests?
- How do unit test frameworks operate?
Objectives
- Obtain example code used for this lesson
- Run a repository’s existing unit tests using a unit testing framework
- Describe the typical format of a unit test
Creating a Copy of the Example Code Repository
For this lesson we’ll be using some example code available on GitHub, which we’ll clone onto our machines using the Bash shell. So firstly open a Bash shell (via Git Bash in Windows or Terminal on a Mac). Then, on the command line, navigate to where you’d like the example code to reside, and use Git to clone it. For example, to clone the repository in our home directory, and change our directory to the repository contents:
Examining the Code
Next, let’s take a look at the code, which is in the
factorial-example/mymath directory, called
factorial.py, so open this file in an editor.
The example code is a basic Python implementation of Factorial. Essentially, it multiplies all the whole numbers from a given number down to 1 e.g. given 3, that’s 3 x 2 x 1 = 6 - so the factorial of 3 is 6.
We can also run this code from within Python to show it working. In the shell, ensure you are in the root directory of the repository, then type:
PYTHON
Python 3.10.12 (main, Feb 4 2025, 14:57:36) [GCC 11.4.0] on linux
Type "help", "copyright", "credits" or "license" for more information.
>>> Then at the prompt, import the factorial function from
the mymath library and run it:
Which gives us 6 - which gives us some evidence that this function is working. Of course, in practice, our functions may well be more complicated than this, and of course, they may call other separate functions. Now we could just come up with a list of known input numbers and expected outputs and run each of these manually to test the code, but this would take some time. Computers are really good at one thing - automation - so let’s use that and automate our tests, to make it easy for ourselves.
Running the Tests
As it turns out, this code repository already has a test. Navigate to
the repository’s tests directory, and open a file called
test_factorial.py:
PYTHON
import unittest
from mymath.factorial import factorial
class TestFactorialFunctions(unittest.TestCase):
def test_3(self):
self.assertEqual(factorial(3), 6)Now, we using a Python unit test framework called
unittest. There are other such frameworks for Python,
including nose and pytest which is very
popular, but the advantage of using unittest is that it’s
already built-in to Python so it’s easier for us to use it.
Before we look into this example unit test, questions Who here is familiar with object oriented programming? Yes/No Who’s written an object oriented program? Yes/No
What is Object Oriented Programming?
For those that aren’t familiar with object oriented programming, it’s a way of structuring your programs around the data of your problem. It’s based around the concept of objects, which are structures that contain both data and functions that operate on that data. In object oriented programming, objects are used to model real-world entities, such as people, bank accounts, libraries, books, even molecules, and so on. With each object having its own:
- data - known as attributes
- functions - known as methods
These are encapsulated within a defined structure known as a class. An introduction to object oriented programming is beyond the scope of this session, but if you’d like to know more there’s a great introductory tutorial on the RealPython site. This site is a great practical resource for learning about how to do many things in Python!
For the purposes of this activity, we use object oriented classes to
encapsulate our unit tests since that’s how they’re defined in the
unittest framework. You can consider them as a kind of
syntactic sugar to group our tests together, 2ith a single unit test
being represented as a single function - or method - within a class.
In this example, we have a class called
TestFactorialFunctions with a single unit test, which we’ve
called test_3. Within that test method, we are essentially
doing what we did when we ran it manually earlier: we’re running
factorial with the argument 3, and checking it equals 6. We use an
inbuilt function, or method, in this class called
assertEqual, that checks the two are the same, and if not,
the test will fail.
So how do we run this test? In the shell, we can run this test by ensuring we’re in the repository’s root directory, and running:
OUTPUT
.
----------------------------------------------------------------------
Ran 1 test in 0.000s
OK[CHECKPOINT - who’s run the tests and got this output? Yes/No]
So what happens? We see a single ., we see a message
that says it ran very quickly, and OK. The single dot means
the single test we have was successfully run, so our test passes!
But how does unittest know what to run exactly? Unit test frameworks
like unitttest follow a common pattern of finding tests and
running them. When we give a single file argument to
unittest, it searches the Python file for
unittest.TestCase classes, and within those classes, looks
for methods starting with test_, and runs them. So we could
add more tests in this class in the same way, and it would run each in
turn. We could even add multiple unittest.TestCase classes
here if we wanted, each testing different aspects of our code for
example, and unittest would search all of these classes and
run each test_ function in turn.
- Unittest is a built-in Python unit testing framework
- Other popular unit testing frameworks for Python include
pytestandnose - Object oriented programming is a way of encapsulating data and the functions that operate on that data together
- Run a set of Unittest unit tests using
python -m unittestfollowed by the script filename containing the tests that begins withtest_
Content from 5.3 Creating a New Test
Last updated on 2025-10-24 | Edit this page
Overview
Questions
- How do I write a unit test?
- How do I write a unit test that tests for an error?
Objectives
- Implement and run unit tests to verify the correct behaviour of program functions
- Describe how and when testing fits into code development
- Write a unit test that tests for an expected error
Add a New Test
As we’ve mentioned, adding a new unit test is a matter of adding a
new test method. Let’s add one to test the number 5. Edit
the tests/test_factorial.py file again:
[CHECKPOINT - who’s finished editing the file Yes/No]
And then we can run it exactly as before, in the shell
OUTPUT
test_3 (tests.test_factorial.TestFactorialFunctions) ... ok
test_5 (tests.test_factorial.TestFactorialFunctions) ... ok
----------------------------------------------------------------------
Ran 2 tests in 0.000s
OKWe can see the tests pass. So the really useful thing here, is we can rapidly add tests and rerun all of them. Particularly with more complex codes that are harder to reason about, we can develop a set of tests into a suite of tests to verify the codes’ correctness. Then, whenever we make changes to our code, we can rerun our tests to make sure we haven’t broken anything. An additional benefit is that successfully running our unit tests can also give others confidence that our code works as expected.
[CHECKPOINT - who managed to run this with their new unit test Yes/No]
Change our Implementation, and Re-test
Let’s illustrate another key advantage of having unit tests. Let’s
assume during development we find an error in our code. For example, if
we run our code with factorial(10000) our Python program
from within the Python interpreter, it crashes with an exception:
OUTPUT
Traceback (most recent call last):
File "<stdin>", line 1, in <module>
File "/home/steve/factorial-example/mymath/factorial.py", line 11, in factorial
return n * factorial(n-1)
File "/home/steve/factorial-example/mymath/factorial.py", line 11, in factorial
return n * factorial(n-1)
File "/home/steve/factorial-example/mymath/factorial.py", line 11, in factorial
return n * factorial(n-1)
[Previous line repeated 995 more times]
File "/home/steve/factorial-example/mymath/factorial.py", line 8, in factorial
if n == 0 or n == 1:
RecursionError: maximum recursion depth exceeded in comparisonIt turns out that our factorial function is recursive, which
means it calls itself. In order to compute the factorial of 10000, it
does that a lot. Python has a default limit for recursion of 1000, hence
the exception, which is a bit of a limitation in our implementation.
However, we can correct our implementation by changing it to use a
different method of calculating factorials that isn’t recursive. Edit
the mymath/factorial.py file and replace the function with
this one:
PYTHON
def factorial(n):
"""
Calculate the factorial of a given number.
:param int n: The factorial to calculate
:return: The resultant factorial
"""
factorial = 1
for i in range(1, n + 1):
factorial = factorial * i
return factorialMake sure you replace the code in the factorial.py file,
and not the test_factorial.py file.
This is an iterative approach to solving factorial that isn’t recursive, and won’t suffer from the previous issue. It simply goes through the intended range of numbers and multiples it by a previous running total each time, but doesn’t do it recursively by calling itself. Notice that we’re not changing how the function is called, or its intended behaviour. So we don’t need to change the Python docstring here, since it still applies.
We now have our updated implementation, but we need to make sure it works as intended. Fortunately, we have our set of tests, so let’s run them again:
OUTPUT
test_3 (tests.test_factorial.TestFactorialFunctions) ... ok
test_5 (tests.test_factorial.TestFactorialFunctions) ... ok
----------------------------------------------------------------------
Ran 2 tests in 0.000s
OKAnd they work, which gives us some confidence - very rapidly - that our new implementation is behaving exactly the same as before. So again, each time we change our code, whether it’s making small or large changes, we retest and check they all pass
[CHECKPOINT - who managed to write unit test and run it? Yes/No]
What makes a Good Test?
Of course, we only have 2 tests so far, and it would be good to have more But what kind of tests are good to write? With more tests that sufficiently test our code, the more confidence we have that our code is correct. We could keep writing tests for e.g., 10, 15, 20, and so on. But these become increasingly less useful, since they’re in much the same “space”. We can’t test all positive numbers, and it’s fair to say at a certain point, these types of low integers are sufficiently tested. So what test cases should we choose?
We should select test cases that test two things:
The paths through our code, so we can check they work as we expect. For example, if we had a number of paths through the code dictated with if statements, we write tests to ensure those are followed.
We also need to test the boundaries of the input data we expect to use, known as edge cases. For example, if we go back to our code. we can see that there are some interesting edge cases to test for:
Zero?
Very large numbers (as we’ve already seen)?
Negative numbers?
All good candidates for further tests, since they test the code in different ways, and test different paths through the code.
Testing for Failure
We’ve seen what happens if a test succeeds, but what happens if a
test fails? Let’s deliberately change our test to be wrong and find out,
by editing the tests/test_factorial.py file, changing the
expected result of factorial(3) to be 10, and
saving the file.
We’ll rerun our tests slightly differently than last time:
In this case, we add -v for more verbose output, giving
us detailed results test-by-test.
OUTPUT
test_3 (tests.test_factorial.TestFactorialFunctions) ... FAIL
======================================================================
FAIL: test_3 (tests.test_factorial.TestFactorialFunctions)
----------------------------------------------------------------------
Traceback (most recent call last):
File "/home/steve/factorial-example/tests/test_factorial.py", line 8, in test_3
self.assertEqual(factorial(3), 10)
AssertionError: 6 != 10
----------------------------------------------------------------------
Ran 1 test in 0.000s
FAILED (failures=1)In this instance we get a FAIL instead of an
OK for our test, and we see an AssertionError
that 6 is not equal to 10, which is clearly
true.
Let’s now change our faulty test back by editing the file again,
changing the 10 back to 6, and re-run our
tests:
OUTPUT
test_3 (tests.test_factorial.TestFactorialFunctions) ... ok
----------------------------------------------------------------------
Ran 1 test in 0.000s
OKThis illustrates an important point with our tests: it’s important to make sure your tests are correct too. So make sure you work with known ‘good’ test data which has been verified to be correct!
- FIXME
Content from 5.4 Handling Errors
Last updated on 2025-04-10 | Edit this page
Overview
Questions
- FIXME
Objectives
- FIXME
How do we Handle Testing for Errors?
But what do we do if our code is expected to throw an error? How would we test for that?
Let’s try our code with a negative number, which we’ve already identified as a good test case, from within the python interpreter:
We can see that we get the result of 1, which is incorrect, since the factorial function is undefined for negative numbers.
Perhaps what we want in this case is to test for negative numbers as an invalid input, and display an exception if that is the case. How would we implement that, and how would we test for the presence of an exception?
In our implementation let’s add a check at the start of our function, which is known as a precondition. The precondition will check the validity of our input data before we do any processing on it, and this approach to checking function input data is considered good practice.
Edit the mymath/factorial.py file again, and add at the
start, below the docstring:
If we run it now, we should see our error:
OUTPUT
Traceback (most recent call last):
File "<stdin>", line 1, in <module>
File "/home/steve/factorial-example/mymath/factorial.py", line 9, in factorial
raise ValueError('Only use non-negative integers.')
ValueError: Only use non-negative integers.Sure enough, we get our exception as desired. But how do we test for this in a unit test, since this is an exception, not a value? Fortunately, unit test frameworks have ways to check for this.
Let’s add a new test to tests/test_factorial.py:
So here, we use unittest’s built-in
assertRaises() (instead of assertEquals()) to
test for a ValueError exception occurring when we run
factorial(-1). We also use Python’s with here
to test for this within the call to factorial(). So if we
re-run our tests again, we should see them all succeed:
You should see:
OUTPUT
test_3 (tests.test_factorial.TestFactorialFunctions) ... ok
test_5 (tests.test_factorial.TestFactorialFunctions) ... ok
test_negative (tests.test_factorial.TestFactorialFunctions) ... ok
----------------------------------------------------------------------
Ran 3 tests in 0.000s
OKBrief Summary
So we now have the beginnings of a test suite! And every time we change our code, we can rerun our tests. So the overall process of development becomes:
- Add new functionality (or modify new functionality) to our code
- Potentially add new tests to test any new functionality
- Re-run all our tests
- FIXME
Content from Lesson 6: Continuous Integration
Last updated on 2025-05-07 | Edit this page
Overview
Questions
- What is automation in the context of software development, and why is it beneficial?
- How does Continuous Integration (CI) enhance the software development process?
- What tasks can be automated using CI?
- Why is integrating small code changes regularly preferable to integrating large changes infrequently?
- How can CI be extended to Continuous Delivery (CD) for automating deployment processes?
Objectives
- Understand the concept of automation and its role in improving efficiency and consistency in software development.
- Learn the principles and benefits of Continuous Integration.
- Identify common tasks that can be automated within a CI pipeline, such as code compilation, testing, linting, and documentation generation.
- Recognise the importance of integrating code changes frequently to minimize conflicts and maintain a stable codebase.
- Explore how Continuous Integration can be extended to Continuous Delivery to automate the deployment of packages and applications.
Doing tasks manually can be time-consuming, error-prone, and hard to reproduce, especially as the software project’s complexity grows. Using automation allows computers to handle repetitive, structured tasks reliably, quickly, and consistently, freeing up your time for more valuable and creative work.
Introduction to Automation
Automation is the process of using scripts or tools to perform tasks without manual intervention. In software development, automation helps streamline repetitive or complex tasks, such as running tests, building software, or processing data.
By automating these actions, you save time, reduce the chance of human error, and ensure that processes are reproducible and consistent. Automation also provides a clear, documented way to understand how things are run, making it easier for others to replicate or build upon your work.
Intro to Continuous Integration
Building on the concept of automation, Continuous Integration (CI) is the practice of regularly integrating code changes into a shared code repository and automatically running tasks and key checks each time this happens (e.g. when changes are merged from development or feature branch into main, or even after each commit). This helps maintain code quality and ensures new contributions do not break existing functionality.
A variety of CI services and tools, like GitHub Actions, GitLab CI, or Jenkins, make it easy to set up automated workflows triggered by code changes.
CI can also be extended into Continuous Delivery (CD), which automates the release or deployment of code to production or staging environments.
Principles of CI
Software development typically progresses in incremental steps and requires a significant time investment. It is not realistic to expect a complete, feature-rich application to emerge from a blank page in a single step. The process often involves collaboration among multiple developers, especially in larger projects where various components and features are developed concurrently.
Continuous Integration (CI) is based on the principle that software development is an incremental process involving ongoing contributions from one or more developers. Integrating large changes is often more complex and error-prone than incorporating smaller, incremental updates. So, rather than waiting to integrate large, complex changes all at once, CI encourages integrating small updates frequently to check for conflicts and inconsistencies and ensure all parts of the codebase work well together at all times. This becomes even more critical for larger projects, where multiple features may be developed in parallel - CI helps manage the complexity of merging such contributions by making integrations a regular, manageable part of the workflow.
Common CI Tasks
When code is integrated, a range of tasks can be carried out automatically to ensure quality and consistency, including:
- compiling the code
- running a test suite across multiple platforms to catch issues early and checking test coverage to see what tests are missing
- verifying that the code adheres to project, team, or language style guidelines with linters
- building documentation pages from docstrings (structured documentation embedded in the code) or other source pages,
- other custom tasks, depending on project needs.
These steps are typically executed as part of a structured sequence known as the “CI pipeline”.
Why use CI?
From what we have covered so far, it is clear that CI offers several advantages that can significantly improve the software development process.
It saves time and effort for you and your team by automating routine checks and tasks, allowing you to focus on development rather than manual verification.
CI also promotes good development practices by enforcing standards. For instance, many projects are configured to reject changes unless all CI checks pass.
Modern CI services make it easy to run its tasks and checks across multiple platforms, operating systems, and software versions, providing capabilities far beyond what could typically be achieved with local infrastructure and manual testing.
While there can be a learning curve when first setting up CI, a wide variety of tools are available, and the core principles are transferable between them, making these valuable and broadly applicable skills.
CI Services & Tools
There are a wide range of CI-focused workflow services and different tools available to support various aspects of a CI pipeline. Many of these services have Web-based interfaces and run on cloud infrastructure, providing easy access to scalable, platform-independent pipelines. However, local and self-hosted options are also available for projects that require more control or need to operate in secure environments. Most CI tools are generally language- and tool-agnostic; if you can run a task locally, you can likely incorporate it into a CI pipeline.
Popular cloud-based services include GitHub Actions, Travis CI, CircleCI, and TeamCity, while self-hosted or hybrid solutions such as GitLab CI, Jenkins, and Buildbot also available.
Beyond CI - Continuous Deployment/Delivery
You may frequently come across the term CI/CD, which refers to the combination of Continuous Integration (CI) and Continuous Deployment or Delivery (CD).
While CI focuses on integrating and testing code changes, CD extends the process by automating the delivery and deployment of software. This can include building installation packages for various environments and automatically deploying updates to test or production systems. For example, a web application could be redeployed every time a new change passes the CI pipeline (an example is this website - it is rebuilt each time a change is made to one of its source pages).
CD helps streamline the release process for packages or applications, for example by doing nightly builds and deploying them to a public server for download, making it easier and faster to get working updates into the hands of users with minimal manual intervention.
Practical Work
In the rest of this session, we will walk you through setting up a basic CI pipeline using GitHub Actions to help you integrate, test, and potentially deploy your code with confidence.
- Automation saves time and improves reproducibility by capturing repeatable processes like testing, linting, and building code into scripts or pipelines.
- Continuous Integration (CI) is the practice of automatically running tasks and checks each time code is updated, helping catch issues early and improving collaboration.
- Integrating smaller, frequent code updates is more manageable and less error-prone than merging large changes all at once.
- CI pipelines can run on many platforms and environments using cloud-based services (e.g. GitHub Actions, Travis CI) or self-hosted solutions (e.g. Jenkins, GitLab CI).
- CI can be extended to Continuous Delivery/Deployment (CD) to automatically package and deliver software updates to users or deploy changes to live systems.
Content from 6.1 Setup & Prerequisites
Last updated on 2025-10-23 | Edit this page
Overview
Questions
- What prerequiste knowledge is required to follow this topic?
- How to setup your machine to follow this topic?
Objectives
- Understand what prerequiste knowledge is needed before following this topic
- Setup your machine to follow this topic
- Shell with Git version control tool installed and the ability to navigate filesystem and run commands from within a shell
- Python version 3.8 or above installed
- Understanding of Python syntax to be able to read code examples
- Pip Python package installer
- Visual Studio Code installed (ideally the latest version)
- Account on GitHub.com
Setup
Shell with Git
On macOS and Linux, a bash shell will be available by default.
If you do not have a bash shell installed on your system and require assistance with the installation, you can take a look at the instructions provided by Software Carpentry for installing shell and Git.
Python
Python version 3.8 or above is required. Type python -v
at your shell prompt and press enter to see what version of Python is
installed on your system. If you do not have Python installed on your
system and require assistance with the installation, you can take a look
at the
instructions provided by Software Carpentry for installing Python in
preparation for undertaking their Python lesson.
Pip
Pip Python package should come together with your Python
distribution. Try typing pip at the command line and you
should see some usage instructions for the command appear if it is
installed.
VS Code
The hands-on part of this topic will be conducted using Visual Studio Code (VS Code), a widely used IDE. Please download the appropriate version of Visual Studio Code for your operating system (Windows, macOS, or Linux) and system architecture (e.g., 64-bit, ARM).
GitHub Account
GitHub is a free, online host for Git repositories that you will use during the course to store your code in so you will need to open a free GitHub account unless you do not already have one.
Content from 6.2 Some Example Code
Last updated on 2025-10-24 | Edit this page
Overview
Questions
- FIXME
Objectives
- FIXME
Creating a Copy of the Example Code Repository
For this lesson we’ll need to create a new GitHub repository based on the contents of another repository.
- Once logged into GitHub in a web browser, go to https://github.com/UNIVERSE-HPC/ci-example.
- Select ‘Use this template’, and then select ‘Create a new repository’ from the dropdown menu.
- On the next screen, ensure your personal GitHub account is selected
in the
Ownerfield, and fill inRepository namewithci-example. - Ensure the repository is set to
Public. - Select
Create repository.
You should be presented with the new repository’s main page. Next, we
need to clone this repository onto our own machines, using the Bash
shell. So firstly open a Bash shell (via Git Bash in Windows or Terminal
on a Mac). Then, on the command line, navigate to where you’d like the
example code to reside, and use Git to clone it. For example, to clone
the repository in our home directory (replacing
github-account-name with our own account), and change
directory to the repository contents:
Examining the Code
Next, let’s take a look at the code, which is in the
factorial-example/mymath directory, called
factorial.py, so open this file in an editor. You may
recall we used this example in the last session on unit testing.
As a reminder, the example code is a basic Python implementation of Factorial. Essentially, it multiplies all the whole numbers from a given number down to 1 e.g. given 3, that’s 3 x 2 x 1 = 6 - so the factorial of 3 is 6.
We can also run this code from within Python to show it working. In the shell, ensure you are in the root directory of the repository, then type:
PYTHON
Python 3.10.12 (main, Feb 4 2025, 14:57:36) [GCC 11.4.0] on linux
Type "help", "copyright", "credits" or "license" for more information.
>>> Then at the prompt, import the factorial function from
the mymath library and run it:
Which gives us 6 - which gives us some evidence that this function is working. But this isn’t really enough evidence to give us confidence in its overall correctness.
Running the Tests
For this reason, this code repository already has a series of unit
tests, that allows us to automate this results checking, written using a
Python unit testing framework called pytest. Note that this
is a different unit testing framework that we looked at in the last
session!
Navigate to the repository’s tests directory, and open a
file called test_factorial.py:
PYTHON
import pytest
from mymath.factorial import factorial
def test_3():
assert factorial(3) == 6
def test_5():
assert factorial(5) == 120
def test_negative():
with pytest.raises(ValueError):
factorial(-1)The key difference when writing tests for pytest as
opposed to unittest, is that we don’t need to worry about
wrapping the tests in a class: we only need to write functions for each
test, which is a bit simpler. But they otherwise essentially work very
similarly in both frameworks.
So essentially, this series of tests will check whether calling our
factorial function gives us the correct result, given a
variety of inputs:
-
factorial(3)should give us 6 -
factorial(5)should give us 120 -
factorial(-1)should raise a PythonValueErrorwhich we need to check for
Setting up a Virtual Environment for pytest
So how do we run these tests? Well, we need to create a virtual environment, since we’re using a unit test framework that’s supplied by another Python library which we need to have access to.
You may remember we used virtual environments previously. So in summary, we need to:
- Create a new virtual environment to hold packages
- Activate that new virtual environment
- Install
pytestinto our new virtual environment
So:
Then to activate it:
BASH
[Linux] source venv/bin/activate
[Mac] source venv/bin/activate
[Windows] source venv/Scripts/activateTo install pytest:
Then, in the shell, we can run these tests by ensuring we’re in the
repository’s root directory, and running the following (very similar to
how we ran our previous unittest tests):
You’ll note the output is slightly different:
OUTPUT
============================= test session starts ==============================
platform linux -- Python 3.10.12, pytest-8.3.5, pluggy-1.5.0
rootdir: /home/steve/test/ci-example2
collected 3 items

tests/test_factorial.py ...                                              [100%]

============================== 3 passed in 0.00s ===============================
But essentially, we receive the same information: a . if
the test is successful, and a F if there is a failure.
We can also ask for verbose output, which shows us the results for
each test separately, in the same way as we did with
unittest, using the -v flag:
OUTPUT
============================= test session starts ==============================
platform linux -- Python 3.10.12, pytest-8.3.5, pluggy-1.5.0 -- /home/steve/test/ci-example2/venv/bin/python
cachedir: .pytest_cache
rootdir: /home/steve/test/ci-example2
collected 3 items

tests/test_factorial.py::test_3 PASSED                                   [ 33%]
tests/test_factorial.py::test_5 PASSED                                   [ 66%]
tests/test_factorial.py::test_negative PASSED                            [100%]

============================== 3 passed in 0.00s ===============================
[CHECKPOINT - who’s run the tests and got this output? Yes/No]
- FIXME
Content from 6.3 Defining a Workflow
Last updated on 2025-10-23 | Edit this page
Overview
Questions
- FIXME
Objectives
- FIXME
How to Describe a Workflow?
Now before we move on to defining our workflow in GitHub Actions, we’ll take a very brief look at a language used to describe its workflows, called YAML.
Originally, the acronym stood for Yet Another Markup Language, but since it’s not actually used for document markup, it’s acronym meaning was changed to YAML Aint Markup Language.
Essentially, YAML is based around key value pairs, for example:
Now we can also define more complex data structures too. Using YAML
arrays, for example, we could define more than one entry for
first_scaled_by, by replacing it with:
Note that similarly to languages like Python, YAML uses spaces for indentation (2 spaces is recommended). Also, in YAML, arrays are sequences, where the order is preserved.
There’s also a short form for arrays:
We can also define nested, hierarchical structures too, using YAML maps. For example:
YAML
name: Kilimanjaro
height:
  value: 5892
  unit: metres
  measured:
    year: 2008
    by: Kilimanjaro 2008 Precise Height Measurement Expedition
We are also able to combine maps and arrays, for example:
YAML
first_scaled_by:
  - name: Hans Meyer
    date_of_birth: 22-03-1858
    nationality: German
  - name: Ludwig Purtscheller
    date_of_birth: 22-03-1858
    nationality: Austrian
So that’s a very brief tour of YAML, which demonstrates what we need to know to write GitHub Actions workflows.
Enabling Workflows for our Repository
So let’s now create a new GitHub Actions CI workflow for our new repository that runs our unit tests whenever a change is made.
Firstly, we should ensure GitHub Actions is enabled for repository. In a browser:
- Go the main page for the
ci-examplerepository you created in GitHub. - Go to repository
Settings. - From the sidebar on the left select
General, thenActions(and under that,General). - Under
Actions permissions, ensureAllow all actions and reusable workflowsis selected, otherwise, our workflows won’t run!
Creating Our First Workflow
Next, we need to create a new file in our repository to contain our workflow, and it needs to be located in a particular directory location. We’ll create this directly using the GitHub interface, since we’re already there:
- Go back to the repository main page in GitHub.
- Select
Add file(you may need to expand your browser Window to seeAdd file) thenCreate new file. - We need to add the workflow file within two nested subdirectories,
since that’s where GitHub will look for it. In filename text box, add
.githubthen add/. This will allow us to continue adding directories or a filename as needed. - Add
workflows, and/again. - Add
main.yml. - Should end up with
ci-example / .github / workflow / main.yml in mainin the file field. - Select anywhere in the
Edit new filewindow to start creating the file.
Note that GitHub Actions expects workflows to be contained within the
.github/workflows directory.
Let’s build up this workflow now.
Specify Workflow Name and When it Runs
So first let’s specify a name for our workflow that will appear under GitHub Actions build reports, and add the conditions that will trigger the workflow to run:
So here our workflow will run when changes are pushed to the repository. There are other events we might specify instead (or as well) if we wanted, but this one is the most common.
Specify Structure to Contain Steps to Run on which Platform
GitHub Actions are described as a sequence of jobs (such as building our code, or running some tests), and each job contains a sequence of steps which each represent a specific “action” (such as running a command, or obtaining code from a repository).
Let’s define the start of a workflow job we’ll name
build-and-test:
We only have one job in this workflow, but we may have many. We also specify the operating systems on which we want this job to run. In this case, only the latest version of Linux Ubuntu, but we could supply others too (such as Windows, or Mac OS) which we’ll see later.
When the workflow is triggered, our job will run within a
runner, which you can think of as a freshly installed
instance of a machine running the operating system we indicate (in this
case Ubuntu).
Specify the Steps to Run
Let’s now supply the concrete things we want to do in our workflow. We can think of this as the things we need to set up and run on a fresh machine. So within our workflow, we’ll need to:
- Check out our code repository
- Install Python
- Install our Python dependencies (which is just
pytestin this case) - Run
pytestover our set of tests
We can define these as follows:
YAML
    steps:

    - name: Checkout repository
      uses: actions/checkout@v4

    - name: Set up Python 3.11
      uses: actions/setup-python@v5
      with:
        python-version: "3.11"
We first use GitHub Actions (indicated by
uses: actions/), which are small tools we use to perform
something specific. In this case, we use:
-
checkout- to checkout the repository into our runner -
setup-python- to set up a specific version of Python
Note that the name entries are descriptive text and can
be anything, but it’s good to make them meaningful since they are what
will appear in our build reports as we’ll see later.
YAML
    - name: Install Python dependencies
      run: |
        python3 -m pip install --upgrade pip
        pip3 install -r requirements.txt

    - name: Test with pytest
      run: |
        python -m pytest -v tests/test_factorial.py
Here we use two run steps to run some specific commands,
to install our python dependencies and run pytest over our
tests, using -v to request verbose reporting.
What about other Actions?
Our workflow here uses standard GitHub Actions (indicated by
actions/*). Beyond the standard set of actions, others are
available via the GitHub
Marketplace. It contains many third-party actions (as well as apps)
that you can use with GitHub for many tasks across many programming
languages, particularly for setting up environments for running tests,
code analysis and other tools, setting up and using infrastructure (for
things like Docker or Amazon’s AWS cloud), or even managing repository
issues. You can even contribute your own.
Adding our Workflow to our Repository
So once we’ve finished adding in our workflow to the file, we commit this into our repository:
- In the top right of the editing screen select
Commit changes.... - Add in a commit message, e.g. “Initial workflow to run tests on push”.
- Select
Commit changes.
This commit action will now trigger the running of this new workflow, since that’s what the workflow is designed to do.
- FIXME
Content from 6.4 Tracking a Running Workflow
Last updated on 2025-10-24 | Edit this page
Overview
Questions
- FIXME
Objectives
- FIXME
Checking a Running Workflow
We’ve committed our workflow, so how do we know its actually running?
Since the workflow is triggered on each git push, if we go
back to our main repository page, we should see an orange circle next to
the most recent commit displayed just above the directory contents.
When this workflow is complete, it will display either a green tick
for success, or a red cross if the workflow encountered an error. You
can also see a history of the past workflow runs’ failures or successes
for each workflow run triggered on the commits page, by selecting
Commits on the right of this most recent commit
display.
For more detail we can check the progress of a running workflow by
selecting Actions in the top navigation bar (e.g. https://github.com/steve-crouch/ci-example/actions). We
can see here that a new run has started, titled with our commit message.
This page also shows a historical log of any other previous workflow
runs too.
We can also view a complete log of the output from workflow runs, by
selecting the first (and only) entry at the top of the list. This will
then display a list of our jobs (in this case only
build-and-test). If we select build-and-test
we’ll see an in-progress log of our workflow run, separated into
separate collapsed steps that we may expand to view further detail. Each
of the steps is named from the name labels we gave each
step. Note that the workflow may still be running at this point, so not
all steps may be complete yet.
If we drill down by selecting the Test with pytest
entry, we’ll get a breakdown of the thing we’re really interested
in:
OUTPUT
Run python -m pytest -v tests/test_factorial.py
============================= test session starts ==============================
platform linux -- Python 3.11.12, pytest-7.2.0, pluggy-1.0.0 -- /opt/hostedtoolcache/Python/3.11.12/x64/bin/python
cachedir: .pytest_cache
rootdir: /home/runner/work/ci-example2/ci-example2
collecting ... collected 3 items

tests/test_factorial.py::test_3 PASSED                                   [ 33%]
tests/test_factorial.py::test_5 PASSED                                   [ 66%]
tests/test_factorial.py::test_negative PASSED                            [100%]

============================== 3 passed in 0.01s ===============================
Which shows us that our tests were successful!
Triggering our Workflow with Code Changes
Now if we make a change to our code, our workflow will be triggered and these tests will run, so let’s make a change.
In GitHub (or on the command line if you prefer), edit the source
code file mymath/factorial.py, add an additional line
before return factorial. Then save the file (if editing
locally), and commit the change.
If we return to the GitHub Actions workflow list and select the most recent workflow run, we should see the workflow execute successfully as before - so we know our change hasn’t broken anything.
Summary
Our workflow will now be triggered every time a change to our code is pushed to our GitHub repository, which means that our code is now always being checked against our tests. Although we must remember to check the workflow log for this to have value. We also need to be sure that our tests sufficiently verify the behaviour of our code as it evolves, so we should ensure we update our tests as necessary, and adding new tests as required to verify new functionality.
- FIXME
Content from 6.5 Build Matrices
Last updated on 2025-10-24 | Edit this page
Overview
Questions
- FIXME
Objectives
- FIXME
Running Workflows over Multiple Platforms
So far, every time our workflow is triggered, it runs over a single operating system, Ubuntu. From an automation perspective this is incredibly helpful, since although running our unit tests is a quick process, by automating it this cumulative savings in time becomes considerable. However, what if we wanted to test our code across different versions of Python installed on different platforms, such as Windows and Mac OS? Let’s look at a feature called build matrices which allows us to do this, and really show the value of using CI to test code at scale.
Suppose the intended users of our software use either Ubuntu, Mac OS, or Windows, and have Python versions 3.10 through 3.12 installed, and we want to support all of these. Assuming we have a suitable test suite, it would take a considerable amount of time to set up testing platforms to run our tests across all these platform combinations. Fortunately, CI can do the hard work for us very easily.
First, let’s update our workflow to specify which platforms and
Python versions we wish to run, by adding/changing the following where
runs-on is defined:
YAML
    strategy:
      matrix:
        os: ["ubuntu-latest", "macos-latest", "windows-latest"]
        python-version: ["3.10", "3.11", "3.12"]

    runs-on: ${{ matrix.os }}
Here we define a build matrix that specifies each of the
os and python-version we want to test, such
that new jobs will be created that run our tests for every permutation
of these two variables. So, we should expect 9 jobs to run in total.
We also change runs-on to refer to the os
component of our matrix, using {{ }} as a
means to reference these values.
Similarly, we need to update our Python setup section to make use of
the python-version component of our build matrix:
YAML
    - name: Set up Python ${{ matrix.python-version }}
      uses: actions/setup-python@v5
      with:
        python-version: ${{ matrix.python-version }}
Once we’ve saved our workflow, commit the changes to the repository as before.
If we view the most recent GitHub Actions workflow run, we should see that a new job has been created for each of the 9 permutations.
Note all jobs are running in parallel (up to the limit allowed by our account) which potentially saves us a lot of time waiting for testing results. Therefore overall, this approach allows us to massively scale our automated testing across platforms we wish to test.
Failed CI Builds
A CI build can fail when, e.g. a used Python package no longer supports a particular version of Python indicated in a GitHub Actions CI build matrix. In this case, the solution is either to upgrade the Python version in the build matrix (when possible), or to downgrade the package version (and not use the latest one like we have been doing in this course).
Also note that, if one job fails in the build for any reason, all subsequent jobs will get cancelled because of the default behavior of GitHub Actions. From GitHub’s documentation:
GitHub will cancel all in-progress and queued jobs in the matrix
if any job in the matrix fails. This behaviour can be controlled by
changing the value of the fail-fast property in the
strategy section:
This would ensure that all matrix jobs will be run to completion regardless of any failures, which is useful so that we are able to identify and fix all failures at once, as opposed to having to fix each in turn.
- FIXME