1.2 Getting Started with VSCode
Last updated on 2025-10-24 | Edit this page
Overview
Questions
- How do I access the key features of Microsoft Visual Studio (VS) Code?
- How do I open a software project in VSCode?
- What are VSCode extensions, and how do I use them?
Objectives
- Describe the general layout of the VSCode interface
- Download or clone an existing remote GitHub repository
- Open a code folder in VSCode using the explorer feature
- Install and configure an extension to VSCode that helps with Python code development
Running VSCode
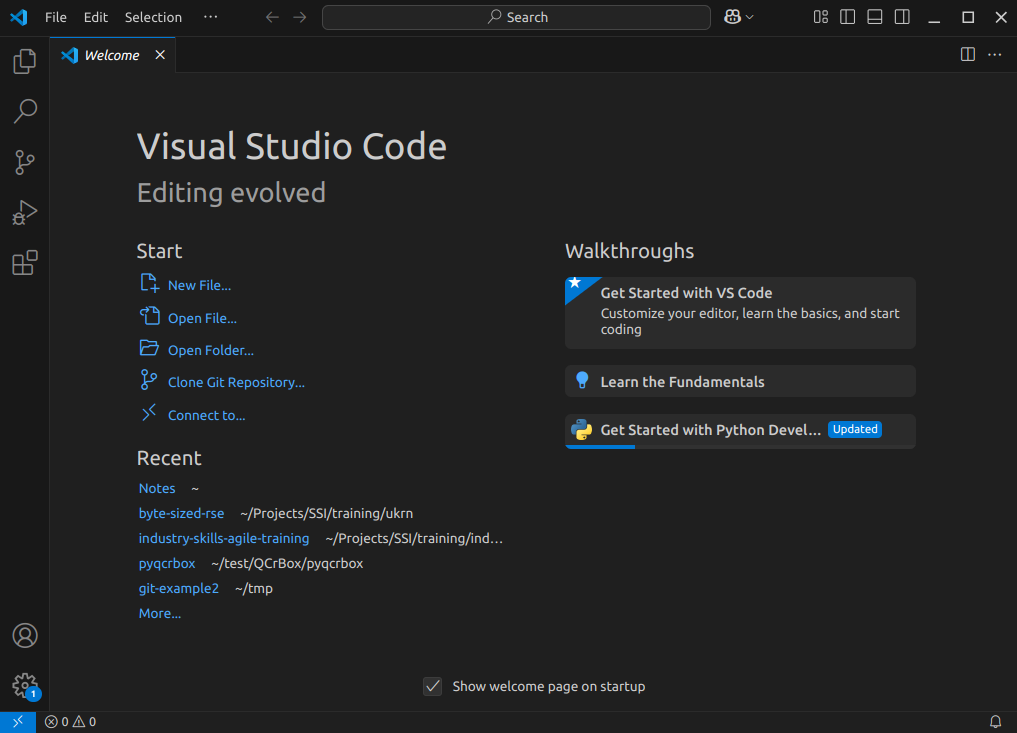
Let’s start by running VSCode now on our machines, so run it now. How you run VSCode will differ depending on which operating system you have installed.
The first thing you’ll likely see is a welcome-style page with links to features for opening files, and creating or opening a project. You may find it asks you which kind of theme you’d like - you can select from either a dark or light theme.
Navigating Around VSCode
So let’s take a look at the application. You’ll see some icons on the left side, which give you access to its key features. Hovering your mouse over each one will show a tooltip that names that feature:
Explorer- the top one is a file navigator, or explorer - we can use this to open existing folders containing program files.Search- the next one down is a search capability, so you can search for things (and replace them with other text) over your code files.-
Source control- this gives you access to source code control, which includes Git version control functionality. This feature means you can do things like clone Git repositories (for example, from GitHub), add and commit files to a repository, things like that.CalloutIf you’re not familiar with Git, that’s totally fine - you don’t have to use this feature, although it’s worth looking into using version control for writing your code. Version control Systems like Git allow you to manage your code by storing it - and all the changes you make to it - within a repository hosted elsewhere, for example, on GitHub.
Run and Debug- this allows you to run programs you write in a special way with a debugger, which allows you to check the state of your program as it is running, which is very useful and we’ll look into later.Extensions- which we’ll look into right now, allows you to install extensions to VSCode to extend its functionality in some way.
There are many other features and ways to access them, and we’ll cover key ones throughout this lesson.
Installing Extensions
Extensions are a major strength of VSCode. Whilst VSCode appears quite lightweight, and presents a simple interface (particularly compared to many other IDEs!), this is quite deceptive. You can extend its functionality in many different ways. For example, installing support for other languages, greater support for version control, there’s even support for working with databases, and so on. There are literally tens of thousands of possible extensions now.
Now VSCode already comes with built-in support for JavaScript, including TypeScript and node.js, but also has extensions for other languages too (C++, C#, Java, PHP, Go, and many others). Installing a language extension will allow you to do more things with that particular language in VSCode, as we’ll see now.
Let’s install an extension now:
- Firstly, select the extensions icon, then type in “Python” into the search box at the top, and it’ll give you a list of all Python-related extensions.
- Select the one which says
Pythonfrom Microsoft. This is the Microsoft official Python extension. - Then select
Install.
It might take a minute - you can see a sliding blue line in the top left to indicate it’s working. Once complete, you should see a couple of “Welcome” windows introducing you to two of its key features - support for Python and Jupyter notebooks. If you use Jupyter notebooks, which is a way of writing Python programs that you can run line by line from within an editor as you write the program, you may find this useful.
For now, let’s configure this extension for our Python development,
and to do that, we need to tell VSCode which Python installation on our
machine we’d like it to use. In the Python Welcome window, select
Select a Python interpreter, and then
Select Python interpreter. You may find you have many
installations of Python, or only have one. Try to select the version
later than 3.8 if you can. Then select Mark done, and close
the Welcome window.
A Sample Project
Next, let’s obtain some example Python and edit it from within
VSCode. First, download the example code we’ll use from https://github.com/UNIVERSE-HPC/code-style-example/releases/tag/v1.0.0,
either as a .zip or .tar.gz compressed archive
file. If you’re unsure, download the .zip file. Then,
extract all the files from the archive into a convenient location. You
should see files contained within a new directory named
code-style-example-1.0.0.
Now we need to load the code into VSCode to see it. You can do this in a couple of ways, either:
- Select the
Source controlicon from the middle of the icons on the left navigation bar. You should see anOpen Folderoption, so select that. - Select the
Fileoption from the top menu bar, and selectOpen Folder....
In either case, you should then be able to use the file browser to
locate the directory with the files you just extracted, and then select
Open. Note that we’re looking for the folder that
contains the files, not a specific file.
What about using Git Version Control?
If your system has the Git version control system installed, you may
see a Clone Repository option here too. If you are familiar
with Git and wish to use this option instead, select it and enter the
repository’s location as
https://github.com/UNIVERSE-HPC/code-style-example. Then
use the file browser that is presented to find a convenient location to
store the cloned code and click on
Select as Repository Destination, then select
Open when ‘Would you like to open the cloned repository?’
popup appears.
You’ll then likely be presented with a window asking whether you trust the authors of this code. In general, it’s a good idea to be at least a little wary, since you’re obtaining code from the internet, so be sure to check your sources! Be careful here - I found on Windows the “Trust” option appears on the left, whilst on Mac, it appears on the right! In this case, feel free to trust the repository! You’ll then see the explorer present you with some files in a small window (or pane) on the left you can use to navigate and find files.
So far within VSCode we have downloaded some code from a repository and opened a folder. Whenever we open a folder in VSCode, this is referred to as a “Workspace” - essentially, a collection of a project’s files and directories. So within this workspace, you’ll see the following:
- A
datafolder, containing a single data file (click on it to see the data file within it). - Two files, a
climate_analysis.pyPython file, and aLICENSE.mdfile
So next, let’s look at editing code.
- Key VSCode features are accessible via the left navigation bar and the menu
- VSCode’s capabilities can be increased by installing extensions
- Language-specific support is available via extensions
- A VSCode “workspace” is a project that consists of a collection of folder and files
- Git source code repositories on GitHub can be cloned locally and opened from within VSCode